
|
 |
|
|
| Flags & Slabs - Page 02 |
|
|

|
|
|
|
|
|
|
|
|
|
|

|
Pointing flags with coloured mortar - Richard - 5 Mar 2002 | |||||
|
Hi Tony,
I had a play around with black coloured mortar a few days ago so I'll be to ready to finish off the paving when we have a stint of 'fine weather'. I made up a small batch suitable for normal use, and pointed a false joint between two bits of flag. It looked terrible, very black mortar and it stained the paving very easily. I'll have another go, and use less dye than recommended and see what that looks like, but the thought of buggering up the paving by trying to point with black mortar concerns me. Any suggestions/advice re. this would be great. I used Travis-Perkins black dye if that helps in any way. cheers |
||||||
|
|
Tony McCormack - 5 Mar 2002 | |||||
|
Hi Richard,
did you use silver sand for your black mortar? Using silver sand means that you need less of the messy dye to get a dark mortar than you would with a traditional red or yellowy building sand. I'm afraid mortar work is, by nature, a messy job. Don't make your mix too wet; remember that many dyes incorporate a plasticiser, so you don't need much added water, and try working with two trowels - a larger brick trowel to hold the mortar and a smaller pointing trowel to feed it into the joints. You might find it useful to 'mask' the edges of the flags as you work. You could use a bit of tin plate (a flattened baked bean tin, f'rinstance) or a piece of plywood, or even just a polythene bag (such as sand comes in) that you can move along as work progresses. Although the mortar might stain at first, it soon weathers away to nothing. Don't expect to achieve a perfect, stain-free finish - it's just not possible. However, keep the staining to a minimum, and, if you do get a bit messy, wipe off as much as you can as soon as you can, then rub over the stained area with dry sand and, if necessary, wipe down with a damp cloth.
And most importantly, take your time! |
||||||
|
Richard 6 Mar 2002 |
Thanks for that Tony,
I used a red building sand. Will the intense black colour I saw on my practice run tone down at all, or does it stay "black"? I'll may have another go with less dye and see how that looks, and will certainly try some of your masking tricks when I start the main job.
cheers |
|||||
|
Tony McCormack 6 Mar 2002 |
I find that if a red building sand is used, what starts out as a black mortar weathers to a dark brown in 12-24 months. Some red sands are so loaded with iron oxide (the technical name for rust, which is responsible for most of the reddy colouration in these sands, and, coincodentally, the base compound for most concrete/cement dyes) that they weather to a distinct reddy-brown in 12 months or so.
Just another reason to use a washed silver sand rather than the red building sand. |
|||||
|
|
||||||
|
|
Orkney Flag Stones / Electric Underfloor Heat - Philip Edell - 11 Mar 2002 | |||||
|
Hello,
Great site - but I have not found answer to my problem. I live on small island and have vast quantities of riven flag (probably old roof stones?). I want to lay these in a room 8m x 5m. There is an existing structural concrete floor. Ideally I would like to place a layer of Depron on the concrete and then cover this with heating mat. (See www.warmfloor.com ). How should the flags be layed on top of this? A thin layer of mortar? Latex tiling stuff? The layer needs to be as thin as possible for heat, but this might mean a cracked floor. Thanks for your help! |
||||||
|
|
Tony McCormack - 11 Mar 2002 | |||||
|
Hi Philip,
because the riven flags vary in thickness, you really don't have much of an option - mortar is the only cost-effective laying material for this sort of application. A friend in Shetland did something similar and they used a 6:1 mortar for the bedding, carefully selecting flags that would allow them to keep the bedding to a minimum. There was a lot of wastage, but, as you say, there's no real shortage of stone therabouts, so it was worth 'picking and choosing'. The floor, which I keep promising to visit, was finished with a 3:1 pointing mortar, and then sealed with a matt-finish sealant. Does that help? |
||||||
|
|
||||||
|
|
Patio Patterns - Woody - 13 Mar 2002 | |||||
|
Is there a computer programme for working out patterns for a patio? I have the dimensions but there are nine different sizes and it would be nice to know how many slabs i need of each size and it would be easier to lay looking at a pattern
thanks woody |
||||||
|
|
Tony McCormack | |||||
|
Hi Woody,
there's no prog that can take a randomly-shaped area and generate a pattern using a set of pre-determined size flags- I've been trying to develop one since the days of the ZX81, and failed miserably! A friend in the maths and computing business in Cambridge tells me this is known as the "Knapsack Problem" and is used to define how many ways a given number of 'pieces' can fit into a given shape. Apparently, it's been taxing better brains than mine for many years! However, Bradstone have a gizmo that can generate a sort-of random pattern for their products for a rectangular area, but there's a few problems with it, not least of which is piecing-in around the edges and 'wastage'.
I have some layouts for 9-size patio flags and I can create a custom layout, in colour, in exchange for a few beers. Have a look at those I've put on the Random Layout page - if that's the sort of thing you want, then email me. |
||||||
|
|
||||||
|
|
Cost Effective Riven Paving - Amrik - 17 Mar 2002 | |||||
|
I am looking for 70 metres of slabs for a Patio. Does anyone know of where I can get these cost effectively? I am looking for a riven slab that looks good, (without pimples etc).
P.S. Site is Awesome. |
||||||
|
|
Tony McCormack - 17 Mar 2002 | |||||
|
Hi Amrik,
there's 3 grades of riven copy flags/slab - cheap but awful, mid-price and not too bad, and top price but damned good. It depends on how much you want to spend. Quite frankly, I wouldn't entertain the cheapies. these are the sort of things you see in the DIY shed for 99p per 450x450x30mm flag, usually in a garish non-authentic colour. There's no size variation, so you can't create interesting or random layouts. The mid-price lot are better, but they are definitely copies. They come in a reasonable size range, usually 5 or 6, colours aren't too bad, but the moulds are not very convincing and the finsh can be a bit iffy. At the top of the range come the real beauties, such as Millstone by Stonemarket and Chancery by Marshalls. Top quality concrete, best dyes, best size rang (9 or 10 diff sizes), and you have a job telling them apart from genuine stone paving. Of course, you pay for that look! Best advice I can give you is to work out your budget, and then I can tell you 2 or 3 'candidates' that would fall within your price range. The final choice has to be yours, because it's you that has to live with them. |
||||||
|
Amrik 30 Mar 2002 |
|Thanks for the info. I looked at Chancery from Marshalls, and I agree it is truly excellent. Unfortunately out of my budget of £900.00 (that is really pushing it). Any recommendations would be welcome. | |||||
|
Tony McCormack 31 Mar 2002 |
Does that 900 quid cover ALL materials and labour or just the flags, Amrik?
If it's just for the flags, that gives you a budget of just under 13 quid per m², which is very tight for quality riven flags. You could have a look at the offerings from Bowland, Minster or Atlas - see the Concrete Paving Manufacturers Links page for contact details. I'd be interested to hear how you get on, and what you think of the products these manufacturers offer. |
|||||
|
Amrik 30 Apr 2002 |
Got a brilliant deal. Small manufacuturer in between Binfield & Wokingham in Berkshire.
Same as Marshalls Chancery, very thick and very very heavy for £15/ sqm. |
|||||
|
Tony McCormack 30 Apr 2002 |
Tell us more, Amrik. If you've got a good deal, then pass it on, don't keep it to yerself! What's the company name and address? |
|||||
|
Amrik 9 May 2002 |
Contact details are as follows:
Belco Paving
Regards, |
|||||
|
|
||||||
|
|
FLAGS ON FLAGS - DAVE YEARSLEY - 21 Mar 2002 | |||||
| I HAVE A PATIO AREA LAYED WITH IMPERIAL 2'X2'X2" CONCRETE FLAGS. THE AREA IS 22 SQ MTRS. THE PATIO IS LEVEL AND SOLID, BUT THE FLAGS LACK CHARACTER. IS THERE ANY WAY I CAN ĀLAY NEW MARSHALLS HERITAGE PAVING DIRECTLY ON TOP, OR SHOULD I EMBARK ON A PROPER JOB, TAKE THEM UP AND LAY A SCREED BED. | ||||||
|
|
Tony McCormack - 21 Mar 2002 | |||||
|
Best take up the old stuff, Dave and start afresh. You may compromise the clearance to dpc if you overlay the existing - Heritage ar 40mm thick, plus another, say, 40mm for the bed, that's 80mm - how far below the dpc is the existing patio?
There's a page in the Block Paving section of the main site that deals with laying over existing. Have a read of that as it helps explain the problem with levels and thresholds.
PS - knock off Caps Lock when you type. Using all capitals is the 'net equivalent of SHOUTING! |
||||||
|
Dave Yearsley 22 Mar 2002 |
Thanks for the prompt reply to my question. Now I know to take up the old flags, I will soon be making a start, and will no doubt be in touch if I encounter any problems.
PS sorry for shouting. |
|||||
|
Tony McCormack 22 Mar 2002 |
That's what I'm here for, Dave!
Not been up to Rochdale for a while - has it thawed out yet? |
|||||
|
|
||||||
|
|
Dry Grouting Measurements - Alan - Jan 11th 2001 | |||||
|
I will be putting a patio down and was wondering what the calculations would be for measuring how much builders sand and cement I would need to dry grout an area of about 33 square metres using 600 x 600 mm slabs.
Thanks in advance |
||||||
|
|
Tony McCormack - 25 Mar 2002 | |||||
|
Hi Alan,
the calculation, assuming 12mm joints is..... nr of flags per m² × ½ flag perimeter × joint depth × joint width ....which gives..... 1200mm × 50mm × 12mm = 0.002m³ per m² ....so for 33m² you need 0.067m³ of mix. Using a density of approx 1.9 t/m³, that comes to 125Kg, which, at 5:1 is 21 kg of cement and 104kg of sand. If you buy a 25Kg of cement and 3 × 40kg or 3 × 50Kg bags of sand, that'll allow for wastage. You can safely use a 6:1 ratio for patios, so 3 bags of sand plus a 25kg bag of cement (what we call a 'half-bag') If that doesn't work out, let me know! |
||||||
|
Tony McCormack 26 Mar 2002 |
Thanks Tony,
I shall now start the patio over the Easter weekend, and will let you know if it doesn't work out ! |
|||||
|
|
||||||
|
|
Patio Adjoining House - TimB - 26 Mar 2002 | |||||
|
I intend to lay a new patio that will adjoin the back of our house. I have read that patios should be laid at least six inches below the damp proof course. Is this absolutely necessary if the patio falls away from the house?
If I wanted the patio to be at the same level as the internal floor would I have to install a linear drain along the back of the house? Thanks, |
||||||
|
|
Tony McCormack - 27 Mar 2002 | |||||
|
Hi Tim,
the 150mm below dpc rule is used to protect your property from damp. No-one can stop you laying level with the dpc if you wish, but if you do, you face problems if you ever decide to sell up, as it's one of the things Surveyors pick up on. If you must lay level with dpc, have a look at products such as Ready Step from RMC, which is a threshold drain, and, if at all possible, limit the high area to dorrways only. You could use a linear drain, but you are creating a potential damp bridge. There is sound reasoning behind the 150mm below dpc rule - primarily that it prevents 'splashback' damp. It's not just something dreamt up for aesthetic reasons. Why do you feel you need to lay the paving so high? |
||||||
|
TimB 2 Apr 2002 |
The garden is 7m × 5m and originally sloped towards the house. I have removed a lot of soil so now the garden is level. If I set a fall of 1:80 away from the house starting at 150mmm below dpc the end of the patio will be below the footings of the old boundary brick walls. So I thought a way round this would be to start the patio at a higher level at the house.
From what you say, I can see that this might not be a good idea when I come to sell the house. |
|||||
|
Tony McCormack 2 Apr 2002 |
Would it be possible to slope the first 1200-1500mm width, adjacent to the house, so that it falls away from the brickwork to a gully or channel, and then the rest of the patio could slope back to this low point? That's one way of dealing with the level problems.
You could use a simple channel, such as Keychannel from Marshalls, or even a Linear drain, if you preferred. Depending on the type of paving being used, you could also use a plain 'soldier course' of brick pavers and slope them towards a central gully. There's more than one way to skin a cat, as they say! |
|||||
|
|
||||||
|
|
Recolouring Slabs - The Wanderer - 3 Apr 2002 | |||||
|
I have a patio area laid some 20 odd years ago by a previous occupant. The slabs are coloured, some green and some cream. I pressure wash the patio each spring, and it seems as though the colours have been applied as a surface dressing, rather than impregnated throughout the slabs when they were cast. The colours seem to withstand the pressure washing, but they are fading, particularly on the cream slabs.
Any recommendations for brush-on colour treatments for concrete slabs? |
||||||
|
|
Tony McCormack 3 Apr 2002 |
|||||
|
There are some paints-cum-dyes that have been developed to re-colour concrete flags, but stockists are thin on the ground (I know of only one in the NW of England), the results aren't exactly gob-smackingly impressive and the damage to the pocket is severe. From memory (it must be 5 years at least since I treated some flags for a client) it was costing around 4 quid to treat a 600x600mm unit - more than it costs for a new replacement flag!!
Try asking at your local BM. Again, from memory, I think the name of the product we used was 'Keim', but I may be confusing it with something else. I'll have a poke about in my files after I've had me tea and see if I kept any notes at the time. |
||||||
|
|
||||||
|
|
Settlement - Roger - 4 Apr 2002 | |||||
|
Using soil excavated from the footings of a huge extension and double garage we had built, I am in the process of landscaping a large rear garden (about 400m²) which lies on a medium gradient slope away from the house. The main feature is that the garden is to be terraced, with a pergola walkway down one side of the upper garden, and over part of the across the middle of the garden. The flagstone path will continue round the outer edge of the whole of the upper garden. The terracing process involves shifting large amounts of topsoil and heavy clay subsoil to create the necessary changes of level. The work has been going on for the best part of a year now, as I am barrowing it all. (Don't ask!)
Do you have any advice on the length of time I'd be advised to leave the shifted material to settle naturally, what's the best way of compacting it - if that's what should be done - and the kind of base I'd be best advised to have before I pave it with flags? At its deepest point the difference between the new level and the old level is about a metre; at its shallowest it's about 300mm. I've read with interest all your stuff on this site and found it extremely helpful and informative, I could just do with some clarification on this particular issue. |
||||||
|
|
Tony McCormack - 4 Apr 2002 | |||||
|
Good to see you made it into the forum at last, Roger! It could take anything from 12 months to 12 years for your re-grading to settle and compact. It all depends on soil type, particle sizes, weather (honest!), traffic, and probably the winner of the Grand National on Saturday! What you could do is get yourself a wacker plate and run that over the planned pathway a dozen or so times. Allow at least 450mm spread each side, so, f'rinstance, if you want a 1200mm wide path, wacker it 1200+450+450=2100mm wide. You will find that the wacker plate sticks to the clay, but by spreading grit sand or scattering a sprinkling of DTp1 over the semi-compacted earth, you should be able to manage. There are a couple of tools that are specially designed to compact earth/soil/clay. The first is a Trench Compactor, which is similar to a wacker plate but has a much more powerful engine and a wider plate. Secondly, there is a Rammer - a sort of motorised leg that bounces up and down and literally hammers the ground solid. You should be able to hire these via somewhere like Hewden Hire. The Rammer (aka Rampactor or Jumping Jack) is a bit of an experience the first time you use one, but they're great fun once you've learned to control them. And, of course, you could always use a roller. A single drum might be a bit like hard work, but a double drum, something like a Bomag 75 walk-behind, might do the job, but be wary of getting it bogged down. Let us know how you get on! |
||||||
|
Jonny 2 May 2002 |
First of all, great site Tony, it's very rare to find this sort of in-depth info to help DIYer's make the most of expert experience to do projects like patio laying the right way.
I'm building a raised patio using a three course brick wall around the perimeter, infilled with a 150mm layer of compacted hardcore, 40mm layer of semi dry bedding mix and then Bradstone slabs on top. ĀI'm doing a raised patio because my patio doors are 6 courses of brick high off the ground. The DPC is right under the patio doors so the raised patio surface will be 150mm below the DPC. Once the wall is built, can I load my hardcore layer directly onto the top soil, then use a wacker to compact it, or do I need to excavate the top soil first? It would be a right pain in the a**e to move all that top soil only to fill the space with more hardcore.ĀI'm thinking of using crusher run as the hardcore. Also, if I butt the patio onto the back of the house, it will cover a number of air bricks which are positioned low down on the back wall. To get round this, I'm going to leave a 150mm gap between the back wall of the house and the patio to allow air to get to the air bricks. Although the patio will slope away from the house, I'm worried about any water which might collect in this "gully". I'm thinking about putting a 4m run of linear drain into this "gully" which will sit below the level of the air bricks, and hence about 100mm below the patio surface. As I'm not expecting too much water to get into this drain, can I just leave both ends of the drain blocked and let any water to just evaporate away or do I need to run some drain piping to feed the water into the rainwater system? Thanks in advance |
|||||
|
Tony McCormack 2 May 2002 |
Hi Jonny, you sweet talking sod!
You should be ok laying the sub-base over the topsoil, but strip off any vegetation first, along with the top 25-50mm or so, as this tends to be soft or improperly compacted. Further, if you have soft, made-up or iffy ground of any sort, it might be worth putting down a separation membrane forst - something like Patio Partner from Terram, or Terram 1000, if you have a lrrge enough area. As for the airbricks, one way of resolving this common problem is to build a small retainer around the airbricks, using bricks or concrete edgings. If the retainer is kept 150mm or so clear of the airbrick, this will ensure adequate ventilation, and, by raising the retainer by 25mm or more above the paving level, you can prevent almost all water (other than a few drips of rain) from getting anywhere near the airbricks. As I said, this is a common pronblem and I've been building a page dealing with the most common solutions, but, it's not ready for upload just yet. However, if you can't understand what I'm wittering on about in the paragraph above, I'll sketch it out and upload a drawing for you. Your solution using a linear drain is another oft-quoted solution, but, you really do need to have an outfall at one or both ends, even if it's only to a mini-soakaway. Without an outfall, you're more or less inviting trouble and you can almost guarantee the damned thing will fill with water! The best solution, of course, is to connect the lin drain to the existing SW system, if at all possible. |
|||||
|
Jonny 20 May 2002 |
Cheers Tony.
I've gone for the Linear drain option and it's worked a treat. I'm now about to lay the slabs. I've dry laid them out onto the compacted hardcore sub base. How do you recommend laying the slabs onto bedding mix...lifting them one at a time, adding bedding mix and bedding in before moving on to the next slab, or lifting all the dry laid slabs, putting bedding mix down over whole area and then bedding the slabs in? The area to lay is about 20 m².
Thanks, |
|||||
|
Tony McCormack 20 May 2002 |
For me (before I was knackered), I would have cleared out the flags, spread the bedding material, then laid all the flags and been in the alehouse by dinner time. However, if you're going to be working slower than that, it may be worth doing half at a time, spreading around 10m² of bedding and getting that area flagged before deciding if you want to do any more that day. I'd still get all the flags out of the way, first, though. Lifting one at a time and adding bedding will be a nightmare - you'll be tripping up over the unlaid flag, losing your tools, struggling to bring in the bedding material. It's always better to work in a cleared area. |
|||||
|
|
||||||
|
|
Sand and cement bed thickness - ChrisM - 8 Apr 2002 | |||||
|
Hi, having figured out how to drain my planned patio, I'm now wondering about the bed thickness. I've read and re-read your guidance but have to confess to still being unclear. I'm planning to lay Stonemarket Yorkstone octagonal system slabs which I gather are nominally 37mm thick. You suggest a screed of sharp sand and cement and advise against the five point mortar dab approach. Elsewhere, you recommend making an allowance of a few millimetres (10-15 I think) so that the slabs can be settled down to the correct level.
Two questions : if I use the sand and cement screed will this still require the settling allowance or is this just needed when using sand only? Secondly, if I don't use the 5 dabs of mortar, do I use any mortar at all? I fear these questions reveal my painful ignorance but, as ever, your advice is much appreciated. |
||||||
|
|
Tony McCormack - 9 Apr 2002 | |||||
|
Chris asked....
if I use the sand and cement screed will this still require the settling allowance Yes, it will, but only trial and error will determine just how much is required. The Stonemarket flags, along with many other cast flags, vary in thickness, and so a screed, while being useful, will not be 100% reliable. The claimed 37mm nominal thickness means they will be anywhere between 32mm and 42mm, and could even be 32mm thick at one edge and 42mm thick on the opposite edge. However, you could prepare a screed, and then adjust as required with extra sand/cement for those flags that prove to be a little thinner than ideal. Even with a screeded bed of sand/cement, you still need to consolidate the flags once they're in position. If I don't use the 5 dabs of mortar, do I use any mortar at all?
Only for pointing. |
||||||
|
|
||||||
|
|
Steep stone steps on heavy clay - Geoff Black - 9 Apr 2002 | |||||
| I recently dug up a crazy paving driveway which left me with about 5 tons of good quality stone. I now plan to build a flight of approx 35 stone steps on a very steeply sloping site (fall of 1 in 3) with a sub-base of heavy clay. The steps will get light foot traffic and an occasional wheelbarrow. Can I hasten the building process by just bedding the stones on sand over the clay, or must I bed onto mortar? Any advice greatrly appreciated. | ||||||
|
|
Tony McCormack - 9 Apr 2002 | |||||
| They ought to be bedded onto concrete, Geoff. Have a look at the Steps page - does that make it clear? | ||||||
|
|
||||||
|
|
Using membrane/polythene sheet in patio - Saihuj - 17 Apr 2002 | |||||
|
I'm building a patio using slabs (flags) - the area is 35ft by 11 ft, and a friend mentioned that it's a good idea to put a polythene sheet on the soil before I lay the hardcore/sand-cement mix.
Apparently, it reduces weed growth. Can you please offer any advice on this? Should the sheet go before the hordcore, or in between the hardcore and the sand-cement mix? Many many thanks |
||||||
|
|
Tony McCormack - 17 Apr 2002 | |||||
|
There's absolutely no need to use a membrane, polythene or otherwise, beneath a patio unless there are specific problems, usually seriously bad ground conditions or deep-rooted pernicious weeds. I'm afraid this obsession with membranes is becoming an urban myth - how do you reckon we managed to build drives, paths and patios 20-odd years ago before membranes were popular?
They do have their uses, but I reckon 95% of all patios have absolutely no need for a membrane. If you are constructing with a sub-base (what you refer to as 'hardcore') and then a cement-bound laying course, and a 35-50mm thick flag/slab, then only something like Japanese Knot Weed will be able to find its way through that lot! Further, the vast] majority of weeds on patios and driveways don't come from beneath the paving; they grow into the paving from above, by colonising the joints and sending roots into any little fissures they can find. No membrane can stop that happening! Have a read of the geo-membranes page, and the Landscape fabrics page, and that should help explain further.
Unless you are on boggy or made-up land, or if you're using a particularly open sub-base (ie, one with a lot of voids) there is probably no reason whatsoever to use a membrane, unless you like wasting money. I've built over 1,000 patios since 1988. I've used membranes on two of them, that's less than 0.2%. With driveways, the incidence rises to around 1.5%, but that's still the exception, rarther than the norm. |
||||||
|
|
||||||
|
|
Where to get plasticiser - saihuj - 22 Apr 2002 | |||||
|
I read in this site somewhere, that 'The use of a plasticiser for pointing mortars cannot be recommended too highly - it makes the job 10 times easier.'
Where do I get this from and what is it called?
Many thanks in advance! |
||||||
|
|
Tony McCormack - 22 Apr 2002 | |||||
|
It's called.... are you ready for this....Plasticiser! It's a basic product within the construction industry and is sold by every Builder's Merchant I've ever known. If you ask for plasticiser, they'll sort you out. There's dozens of brands, such as FebMix, PlaMix; it comes in powder form and in liquid form, but the liquid is best for diy use. You can buy 5 litres, which is enough to last the average diy'er about 5 years, for around 3 quid. Follow the dosing instructions on the container, but it's roughly two capfuls of Plasticiser to a 10 litre bucket of water. If you're using a cement dye, some of those contain a powder-form plasticiser, so check before spending more money. Also, if you only have a little mortar work to do, a small squirt of wash-up liquid works almost as well - just add enough to give a light froth on the water - don't be tempted to overdo it! |
||||||
|
|
||||||
|
|
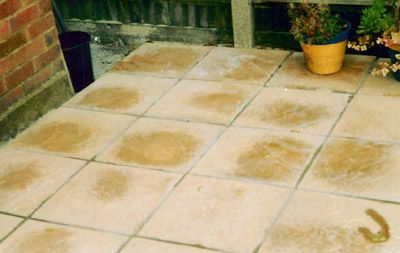
Dark stains on riven wet cast slabs - Tiler - 24 Apr 2002 | |||||
|
I have some Castacrete slabs laid as patio
They have dark circlar stains, I maintain that this is a manufacturing fault , castacrete say that it is to be expected due to natural variations in the materials used, What is the truth? |
||||||
|
|
Tony McCormack - 25 Apr 2002 | |||||
|
That's a new name to me, Castacrete; where are they from?
These circular marks, are they perfect circles, more or less central to the flags? If so, they are marks left by the vacuum lifts used to move the partially-cured flags around the factory. You normally only see these marks on pressed flags, rather than cast flags. If that is the cause, they're marked for life, I'm afraid. Have you any photos? |
||||||
|
Tiler 25 Apr 2002 |
Dear Tony
Many thanks for your reply , yes the stains are circular but not uniform in size or position. I do have a photo, can i email it to you ?
Castacrete give their address as... Many thanks for your help
Regards |
|||||
|
Tony McCormack 1 May 2002 |
Thanks for the photo.......
Basically, the concrete nearer the edges of the flags has dried out partially during the curing process, while that in the centre has remained 'damp'. The result is a difference in final colouration. (It's not quite correct to think of concrete as drying. The curing process is a little more complex than that, and is a change in chemistry, rather than an evaporation of water content. However, the water content of a concrete does have an effect on the actual curing process, and so, if the moisture level is not uniform throughout the concrete, you can end up with a colour or shade variation in the cured final product.) Now, sometimes, this disappears over time, usually a couple of months, but I have known it to last for 12 months or so, but eventually, it usually does disappear, although not always completely. In some cases, there is a faint but permanent difference in shade between the centre of the flag and the edges. If you were to go back to the manufacturer, I'm fairly certain they would not be interested in an exchange or refund, and will probably give you the old line about them being a 'budget' or 'utilitarian' flag, rather than a top-of-the-range product, and, in the words of the prophet, you gets what you pays for. In your case, I'd go back to the manufacturer/supplier. There's no harm in asking if they will offer a (partial) refund, as you're "terribly disappointed" with the finished effect. It's got to be worth a try. I don't think youd get very far claiming it to be a manufacturing fault, although a good lawyer could argue that it probably does constitute poor manufacturing procedures. Your best line of attack is that the flags don't look the same as those in their brochure or on display in their yard. You need to go for the aesthetics rather than the composition. Is that any help? |
|||||
|
Tiler 1 May 2002 |
Tony
Thats fantastic. many thanks for your your expertise.I can address the situation in a much more informed and therefore effective manner now. |
|||||
|
|
||||||
|
|
Laying Flags in Wet Weather - Tony Prescott - 25 Apr 2002 | |||||
|
Hi,
Thanks for the great site which has encouraged me to dig up my old and uneven patio to replace it with a new one this weekend. If this goes well, I may try block-paving next! For the patio I am using Marshalls Chancery paving, and I'm planning to put this on an dry sand-cement screed layer (as suggested on your site) and do the pointing with ordinary mortar.ĀMy only worry is that the weather forecast for the rest of the week isn't particularly good.ĀI work weekdays and may not have another free weekend for a month. So if its drizzling Saturday/Sunday should I go ahead as planned or postpone it till a sunny day?
Thanks in advance, |
||||||
|
|
Tony McCormack - 26 Apr 2002 | |||||
|
You can work in light rain, but if it's pis...err... raining hard, you're better off in the alehouse! Try to avoid tracking cementitious bedding onto the flags while you're working, if they're wet, and leave the pointing for a dry day. If you have a roll of polythene or visqueen, you could use that to sheet over the work and protect it from the worst of the weather. If you do get cement on the surface of the flags, swill them down with clean water before you pack up for the night. It's a damned sight easier to get rid of cement while it's fresh, rather than waiting for it to set and bond, especially with them Chancery, which aren't exactly cheap! Let me know how you get on, and, if you take any piccies, let me see them, as there's another avid reader of this Forum who is considering using Chancery for their patio area, and just needs to be convinced that they will look ok.
My missus has an uncle that shares your name. Amazing fact number 12254! |
||||||
|
Tony Prescott 26 Apr 2002 |
Hi Tony,
Thanks for your advice.ĀDespite the forecast the good weather seems to be holding in Sheffield with only the odd shower. Having prepared the bedding layer, I have been trying out my Chancery slabs in the space.ĀI am trying to fit my patio between a concrete wall and a pre-existing row of natural stone slabs (themselves adjacent to the house wall). Turns out that the flags I have chosen exactly fit the space which is nice, however, this doesn't leave room for mortared joints. Do you think I can get away with using butt jointing with the Chancery slabs? This would save me the hassle of trimming one flag in each row to create a bit more room. If you think its worth the extra effort to create space for mortar joints, do you have any specific tips for removing a thin slice from the edge of a slab (I am using a small angle-grinder to do the cutting)? Incidentally, I am using Chancery slabs in one half of the patio and re-using some of the natural stone that was there previously (the flattest bits!) for the other half. ĀSo the final result should be an interesting mixture... Tony |
|||||
|
Tony McCormack 27 Apr 2002 |
From my experience with Chancery, even if they are laid 'butt-jointed' there is still a 6mm or thereabouts gap that needs to be pointed.
Personally, I think tight joints will always look like tight joints and it's one of those things that will catch your eye every time you look at the finished paving. If it really does look 'tight', then it's got to be worth slicing an edge of the flags to get an even joint, but the determining factor is, "Can YOU live with it?" If you do need to take off a thin slice, an angle grinder or cut-off saw is the only safe way to do it with these cast flags. Make sure you wear goggles! |
|||||
|
|
||||||
|
|
Bedding for riven flags - Paul Marbre - 2 May 2002 | |||||
|
I have 11m SQ patio to lay using Wickes riven Wentworth flags. This includes a circle with square off kit.
I intend to screed the area with sharp sand. Do i need to mix 1 part cement with the sand? I want to use a dry mortar mix for the joints. Do I need to butter joint? I'm worried about being too slow for this to be effective! Do I start with the centre of the circle and complete the square or lay a line of flags up to the circle to stand on? I'm starting to worry now - they're being delivered tomorrow! Amazing amount of info on site - great to see. |
||||||
|
|
Tony McCormack - 2 May 2002 | |||||
|
Use a 10:1 mix of grit sand and cement for bedding. Don't add any extra water.
You don't need to butter the joints, but the finish will be far superior if you do. The mositure from the butter will help initiate setting in the dry mortar jointing mix. How you lay the circle and square depends on the site. I find the easiest way is to lay one edge and then work across, making sure the centre is higher than the edges so that it drains adequately. Setting screed rails about 150mm outside the line of the paving, and then using a wooden stake tapped in on the centre point with 25-40mm of fall to the outside edges allows you to screed off with one end of the screeder 'anchored' to the central stake and the other travelling over the screed rails. Some folk like to start in the centre and work out to the edges, but this need you to determine the centre of the circle exactly, and, if you're working to a solid edge, such as a wall, it's all too easy to realise that you're 25mm out and the whole lot has to be 'nudged' one way or t'other to fit in the last few flags. Once the whole square is laid, you may need to adjust joint widths to get a balanced look. 11m² would take a tradesman around 2-3 hours, complete. If you allow yourself a full day, you should have plenty of time. Don't worry too much about the pointing; concentrate on getting the ground covered and you can catch up with the pointing the following day if necessary. Let me know how you get on. Good luck! |
||||||
|
Paul Marbre 7 May 2002 |
Thanks for the prompt advice Tony! This and other info on your site enabled me to lay the patio by 5PM yesterday. Still some finishing off to do though. I need a cutter as the area is a fixed size. It's not perfect but it looks damn good! It may not slope away from the house and the middle of the circle may not be higher than the outside, but hey.. next time..
I now realise why all these techniques are used. I still have to add the dry mortar mix to the joints so I'm off to have another look at your site for the right mix to use. If I do need to relay one or two at a future point is it simply a case of removing the hardened mortar mix from beneath and replacing with fresh and tapping down to desired level? Thanks again Tony! |
|||||
|
Tony McCormack 7 May 2002 |
Well done, Paul! As long as you're happy with the results, then that's all that matters. For your jointing, use a 4:1 mix of building or silver sand with cement, and, if you do need to relay, the easiest method is to prise out the flag(s) in question, scrape out the top 20mm or so of the bedding and replace with a wet 6:1 mortar, then re-position the flags and tap them into place with a rubber hammer. Any excess mortar bedding should squeeze up between the joints. This is a better method for replacing individual flags within a patio, but, if you're relaying 3 or more adjacent flags, a semi-dry bed can be used. |
|||||
|
Paul Marbre 7 May 2002 |
Hi Tony. Is this 4:1 for a dry mix to brush between the flags?
Does it need compacting in afterwards?
Cheers |
|||||
|
Tony McCormack 7 May 2002 |
Yes - it's 4:1 whether it's a dry mix or a mortar. If you choose a dry mix, brush it in, then compact it as thoroughly as you can with a jointing bar or length of bent copper pipe.
There should be enough residual moisture in the sand and the joint itself to initiate setting, but you could always encourage it with a light sprinkling of clean water via a fine rose fitted to the watering can.
I prefer mortar for pointing, but I know it can be a nightmare if you're not confident in handling it and avoiding too many stains. Still, it's worth trying it out in a discreet corner - you never know, you might have a natural talent! Have you taken any pictures? |
|||||
|
|
||||||
|
|
Laying a path on a slope - Joe Bungle - 5 May 2002 | |||||
|
I have to lay a new garden path - 15 metres in total - which I'd like to do in Riven slabs. The garden slopes quite significantly (30 degrees) across the width of the path so I need to build a small retaining wall on one side to make the path level (there is an existing high wall on the other side).
My question is; do I screed the path level with the retaining wall and lay the slabs directly on top of it or should there be a bed of mortar between the slabs and the wall in which case how do I get the screed level right? Or should I simply lay shedloads of concrete and forget about slabs? Hopefully this makes sense. Thanks in advance for any advice.
Great site by the way. |
||||||
|
|
Tony McCormack - 5 May 2002 | |||||
|
If you're laying the riven flags on top of the retainer wall, they need to be laid on a bed of 4:1 mortar, to ensure they can't slip off the edge. Laying on a screed of sand, or even sand and cenment, won't hold them in place.
Once you've got the edge flags bedded in place on the mortar, individual bedding is the easiest way to lay the rest of the flags, but, if you prefer to use a screed, then cut a notched screeder board, as shown for laying block paving. Assuming the riven flags are 35mm thick, a 30mm notch should be sufficient, but one of the problems with screeding from riven flags is that the screeded level tends to reflect the ups and downs of the riven surface. You can elinmoiate the worst of this by using a float or short straight-edged timber to tittivate the bedding layer once the screeded board has levelled it out. HTH |
||||||
|
|
||||||
|
|
Mortar joints - Scott - 8 May 2002 | |||||
|
You have a great information base in this web site!
My question is that I live in a climate with freezing temperatures for up to 4 months and i have been told that i should not mortar my joints for the flags without a concrete base. With your methods is this ok? Will my joints push and crack. Should I mix cement in the screeding process. I prefer the mortared look and value your advise in this process. My flag is approximately 40 - 50 mm thick and will be delivered in a day! Any info would be great.
thanks |
||||||
|
|
Tony McCormack - 10 May 2002 | |||||
|
The usual method for paving in very cold climates is to ensure the bedding, the jointing and the flags themselves all have similar or identical expansion/contraction rates so the whole pavement acts as one, almost. Therefore, the bedding needs to be a concrete, a C20 equivalent (I'm not sure what spec is used in your homeland, but see the Concretes page for a more detailed explanation of what constitutes a C20) with an added frost-proofing agent. Similarly, the jointing mortar should be a Class II with added frostproofer. The bedding should be at least 100mm thick, but I know of some instances in N.America where a 250mm thick concrete bedding layer has been used, laid atop a compacted sub-base.
Depending on the size and layout of your paving, you will need to provide movement joints at regular intervals. 3 metre centres seems to be a popular choice for movement joints in flagged patios and driveways, but final choice depends on site conditions and bed thickness. |
||||||
|
|
||||||
|
|
Pointing bother - Malanda - 10 May 2002 | |||||
|
Firstly, may I congratulate you on what may be the world's finest website? I only stumbled upon it by accident whilst trying to identify some existing flags that I needed to match.
Anyway, I've now laid my patio extension. I'm very pleased with the result, except I'm having trouble with cracks appearing where the pointing meets the flag. I suspect the mortar may be drying too quickly (we've had warm, windy weather recently). I tried hosing the flags regularly, but it doesn't seem to have solved the problem. Any suggestions, please? I'm also not sure that I'm using the right amount of plasticiser. I bought a 5 litre bottle from Naylor Myers - it is obviously intended for the trade, but it was only a couple of quid. The instructions are a bit vague, but they talk about using 1 litre in 200 litres of gauging water. So I used 1:200 for my bucketful of mortar. Does this sound about right? (What happens if you get it wrong?) By the way, it turned out that my flags were made by RLC Pavings in Huddersfield. They don't seem to be mentioned on your links pages. |
||||||
|
|
Tony McCormack | |||||
|
May I congratulate you on your impeccable taste and discerning eye for a fine website? Give the flags a soaking 12-24 hours before you plan to point them. You don't need to drown them, just enough to cover them with water until it begind to run off rather than be absorbed. Make sure you allow plenty of time for them to dry before doing the actual pointing. Make up your mortar as stated - 200:1 with the plasticiser is fine; you won't do any harm by adding it at, say 150:1, but you won't do any good, either. It doesn't make a better mortar the more you add - it really does work best at low concentrations and it's always best to follow the instructions on the container. Point the joints as described, then cover them with sacking, polythene bags, strips of timber or anything you have that will keep the moisture in place for the first 24 hours or so while initial setting takes place. You may still get micro-cracks within the mortar, but it's not critical unless the cracks are at the interface of the flags and the mortar, which indicates the flags are moving and aren't settled down fully. After the first 24 hours, you can remove the covers and sweep clean the joints with a soft brush. As for RLC Pavings, I've never heard of them, but then, there's dozens, possibly hundreds of small, local manufacturers that I've not come across in my time, especially if they aren't based in the NW of England. If you get me a full address or a website url, I'll get in touch with them and add them to my list. Let me know how you get on with the pointing. |
||||||
|
Malanda 17 May 2002 |
Thanks.
I've now repointed and made sure it was covered up for a few days, and the end result is much better. RLC Pavings are at ...
Birdwell Works, I don't know much about them - I just rang up to order and they delivered a week later COD. They do a nice line in fake yorkshire flags |
|||||
|
|
||||||
|
|
Laying Marshalls Heritage - Dave Yearsley - 10 May 2002 | |||||
|
Hello Tony, greetings from sunny Rochdale.
I hope you or anybody can help.
Regards |
||||||
|
|
Tony McCormack - 10 May 2002 | |||||
|
If you make your bedding as a 10:1 mix of the grit sand and cement, that will do.
The spot bedding method that Marshalls insist on illustrating, both on their site and in their latest arty-farty-can't-see-the-bloody-flags catalogue is aimed at the amateurs and is their marketing depts' attempt to make flagging seem easy. Spot Bedding is a bad thing for any and all the reasons listed on the Flagging page. The use of a 10:1 semi-dry bedding is the equivalent of a full mortar bed.
Quite why Marshalls suggest Heritage can't be successfully laid on unbound grit sand has not been explained to me, but I have a simple arrangement with Marshalls - I won't tell them how to manufacture flags, kerbs and block pavers as long as they don't tell me how to lay them. Ā
Hope the weather holds out for you, Dave. I saw the sun shine in Rochdale once - 1973 it was, when my dad did the 'road and sewers' for a housing estate in Syke. |
||||||
|
Dave Yearsley 17 May 2002 |
Ive just ordered my Marshalls Heritage for the 30th May, the patio area is dug out and I'm just looking at the levels. The main area to be flagged is 9mtrs long x 3mtrs wide, the 3mtrs is between the house wall and a retaining garden wall, there is a gully against the house wall in the middle of the 9mtrs. What is the best way to mark out my levels, chalk line against the walls or timber battens? I am thinking of making the fall towards the gully from both ends of the 9 mtrs inwards and towards the gully from the retaining wall.I hope this makes some sort of sense and any advise will be appreciated. The levels I require are to lay my grit sand.
P.S the sun is still shining here in Rochdale.
Thanks |
|||||
|
Tony McCormack 18 May 2002 |
I really don't like surface water lodging against brickwork, even on its way to a gully, so this is my usual solution for patios using riven paving. Against the wall, lay a single course of a tumbled block, something like Drivesett by Marshalls or Woburn by Charcon, and slope it AWAY from the wall by about 15mm for a 160mm wide block, or 1:10 if you're using summat else. I like to lay this edge course on a cement bound bed, something like 10:1 grit sand with cement or a lean-mix concrete, so that it doesn't get easily dislodged when the rest of the paving work is done, and also, to ensure it stays put over the longer term.
If you don't fancy the paver edge course, you can create the same effect by laying a 300mm wide cours e of the Heritage against the wall, giving each 300mm wide flag 20-30mm of fall AWAY from the wall, and then carrying on as outlined above. Finally, a chalkline is by far the best way to mark your levels. Fixing timber battens is time-consuming and a waste of good timber. Use the chalkline or even a string line, and check your work with a spirit level as you progress.
Are you going to take any photos of this job, Dave? I'd like to see the end product and/or some 'under construction' piccies. |
|||||
|
|
||||||
|
|
|
|
Brew Cabin Archive navigation dhtml courtesy of Milonic |