
|
 |
|
|
| Block Paving - Page 05 |
|
|

|
|
|
|
|
|
|
|
|
|

|
Making a 9ft circular pattern - Suki - 31 July 2002 | ||||
|
I am in the process of laying the blocks on job that is 120+ metres square and the customer has asked me to do a pattern in the 45degree herringbone pattern, no, i said showing here the portfolio with types of diamond patterns that we have inlayed into other jobs, oh no she says i want a 9ft in diameter circle that stands out from the main brick with some sort of detailing
so i figure half blocks all round the circumference and then what?? can u help out here tony any advise would be gratefully appretiated, if u have no advise i will telling her no can do i'm affaid and back to some sort of diamond we will go, i am documenting the job as we go, so can send u some digi pics if u like when completed. as over the years i have basically learned 70% of my trade from this very excellent site many thx with the site m8 and long may it be here as a constant source of learning to any one wanting to go down this path. |
|||||
|
|
Tony McCormack - 31 July 2002 | ||||
| What blocks are you using? Manufacturer/make/sizes? | |||||
|
Suki 31 July 2002 |
I am using Eaton 200x100x60 block paviours, with a charcoal soldier coarse laid 100mm wide all around the perimeter then a buff inlay laid 200mm wide and a marigold 45 degree main body.
ps how do u attach piccys to the post or send them to your good self. |
||||
|
Tony McCormack 1 August 2002 |
You have a number of options. If you try to use the blocks you have then you've a lot of work in front of you.
Using the blocks to form a double stretcher course....
leaves you with big open joints, around 25mm (an inch) as shown above. What about if you lay it as a soldier course?
Well, it's slightly better but you still have 20mm gaps - too wide for sand: too unsightly for mortar. You could trim the blocks, of course....
...as you can see, you need to take 7.5mm off each edge, and with 82 blocks in this outer course alone, that's 164 cuts, assuming none go bad on you! What I would do, is buy in a pre-made circle. There's the Marshalls Driveline circle - same 200x100 type of block, but as a kit and available in Charcoal or Red.
Or you could use the Tegula Drivesett circle for a real contrast, or even one of the riven flag type circles, laid on a full concrete bed, of course. There's millions of options, but you really need to look at bringing in a kit-form circle or switching to smaller units, say 100x100mm to get the joint width down to an acceptable minimum.
If you want to post piccies, they need to be on your own server/webspace and then read the instructions in the HELP link opposite. Basically, you wrap the url in a pair of <img> tags. If you want to post them to me for uploading, send them to |
||||
|
Suki 1 August 2002 |
thx tony for the help. I spoke to marshalls about the circles and they only do it 50mm and i really need 60mm so i have talked to the customer and they are now happy to have a diamond pattern as they didnt really want to pay extra for the circle.
thx for the quick response though |
||||
|
|
|||||
|
|
Paving level near DPC - R Bradshaw - 1 August 2002 | ||||
| Due to levels and the need to ramp up to a door the finished paving level will be less than 150 below the DPC. How do I avoid damp problems? Can it be done with a bitumen application and if so how far up/down the wall should it go? | |||||
|
|
Tony McCormack - 1 August 2002 | ||||
|
How much of the paving will be less than 150mm below dpc? Is it just the doorway ramp, or is it much more than that?
Document M of the Building Regs makes provisions for ramped access to doorways, and there are now several methods of creating a ramp without compromising damp proof integrity. However, if your project involves a considerable area (say more than 3 linear metres) that will be less than 100mm below dpc, then an alternative strategy will be required. The exact situation, the type of paving, the distance between dpc and paving, the total area, the falls....all these need to be considered before recommending a suitable strategy. |
|||||
|
R Bradshaw 2 August 2002 |
Ignoring the ramp to the door, site level problems require the block paving (which in all cases falls away from the house at from 1:60 to 1:100) to be from 150 below DPC level up to 110 below DPC over a distance of about 2.5m either side of the high point. The block paving construction is 60 blocks on 50 sand on 100 sub-base. I would be grateful for an indication of what options are available.
As to the door ramp what options are avilable in that situation? |
||||
|
Tony McCormack 2 August 2002 |
If the paving reaches a maximum height of 110mm below dpc, I really wouldn't worry about it, as long as the paving falls away from the wall. You state 1:60 as the max fall - could this be increased at all. I'd prefer to see 1:60 as the minimum fall.
The threshold ramp - you could use a length of drainage composite (see Fin Drains page), or even a length of linear drain, but for a simple threshold to a private property, you could get away with tanking the brickwork to the level of the paving and/or covering with a damp-proof membrane. |
||||
|
|
|||||
|
|
Are blocks best? - MikeK - 4 August 2002 | ||||
|
Hi - Looking for some advice please on what to put on my driveway.
Over the last 4 weekends, have dug out my old concrete driveway (45 m²)and layed 15 ton of DTP type 1 on top of a bed of the broken up old concrete. Leveled (Min. 100mm of DTP1)and whacked it until my fillings loosened. Now I am not sure about my original choice to block pave. Reason being, that since I started this project, I have been given a barrage of conflicting advice on the pros/cons of block paving. The drive has a reasonably steep slope towards the house. (DTP1 finish at house is 250mm). A local paving contractor (with a good reputation) who has completed a number of drives - satisfaction in all cases - for friends and neighbours - advised that I steer clear of block paving and choose crazy paving or something like "Milltown" (Not sure what this looks like yet). He also said that IF I had to choose block, not to go for Marshalls, but use Bretts instead or some other brand that escapes me. So, here I am confused !
Can you please give me your thoughts on a sloping towards house with dimensions of approx. 10m wide (length of house) by 4.5 m deep (house to path).
PS - Why did'nt I use this contractor ? - His quote was too expensive for me, thus DIY so far. PPS - Tony - Well done - One of the best and really useful practical sites I've seen. Any advice or guidance appreciated. |
|||||
|
|
Tony McCormack - 5 August 2002 | ||||
|
No offence to your contractor acquaintance, but he sounds as though he's full of **it!
Crazy paving! Ber-luddy hell - he's extracting urine, and in industrial quantities. Crazy paving is a very labour intensive job. It has to be laid on a full concrete bed if it's a driveway, and it's the sort of job even experienced contractors hate because it is so easy to bollox up. It's slow work; all the joints have to be properly pointed; it will crack; it's a bugger to keep levels accurate; it's the sort of job you get one-quarter of the way through and realise you HATE doing it. If crazy paving is so wonderful, as this eejit suggests, how come you don't see every other driveway done with it instead of block paving? Millstone - this is a very, very nice and very, very expensive imitation Yorkstone patio flag manufactured by a company called Stonemarket. It's around 35-40 quid per m² just to buy the flags. Then you have to lay them on concrete, because they're only 45mm thick and can't take the weight of a car. And then they have to be pointed....can you see a theme developing here? Your man is pizdov because you knocked back his quote! And why not Marshalls? I'm not saying Brett Paving is not good stuff, but it's no better than Marshalls, who just happen to be the biggest manufacturer in the UK - so they must be doing summat right! Brett have some nice products, but they are a small fish compared to Marshalls, as they serve only the South-east You should choose a block according to your taste and your wallet, not what this gobshite says! I've not seen your drive, and I'm usually reluctant to recommend a particular product for any job I haven't seen, but I am 99% certain that block paving of one formor another would be fine on your driveway, as long as the slope is less than 1 in 2. If it's more than 1 in 2, then there are special laying structures that can be used, but block paving is still possible. I reckon he's winding you up, hoping to see you struggle so you end up calling him in to finish off the job that's nearly killed you. Ask him what construction he recommends for a crazy paved driveway, and ask him if the guarantee from Stonemarket is the same as that for, say, Marshall's block paving. If he's not deliberately winding you up, then he's confusing his arse with his elbow! |
|||||
|
|
|||||
|
|
Screed rails - Suki - 5 August 2002 | ||||
| I am now using some 3 metre box sectional 10 gauge 2":x1" aluminium lengths which are perfectly straight. However my concern comes when i lay them on the subbase and cover with 2 - 3 inches of sand i then use the compacter plate over the sand and the bars, this is the problem for me how do i not bend or damgage the bars with the wacka plate when compacting the sharp sand prior to screeding?? | |||||
|
|
Tony McCormack - 5 August 2002 | ||||
|
Don't run the Vib plate over them! We don't set the screed rails in position until the sand is semi-compacted and we're ready to screed.
If you need the rails in place as a guide when sand placing, then do so, but remove them before compacting and re-set them once you're ready to screed. If your sub-base is accurate, then you really shouldn't need the screed rails in place as a guide - best to leave them out altogether until they're needed for screeding. |
|||||
|
Suki 6 August 2002 |
OK i kind of understand but what is the best tool for clearing out a channel in the compacted sand to place screed rails back onto the sub-base so screeding can then commence with the compacted sand? | ||||
|
Tony McCormack 6 August 2002 |
|A Brickies' hammer.
Spread and compact your sand, then scutch out a channel for the screed rails in the sand (not necessarily all the way down to the sub-base). Set the screed rails in position, check for level and adjust as required.
Once the screed rails are set correctly, screed off the bedding layer, remove screed rails, tittivate the channel as required and lay them blocks! |
||||
|
Suki 7 August 2002 |
I am slightly confused when u say not to take sand all the way down to the sub-base as i have 2" exactly screed rail. I need 50mm of screeded sand so I would in this situation need to go down to the sub-base or i would have too much sand??. ideally i would compact the sand to about 2.5 inches all over and drop in the 2" rails into the sand on top of the SB and then screed off the excess .5" sand leaving me with exactly 2" to lay the block onto??? | ||||
|
Tony McCormack 7 August 2002 |
If you have a screed rail the same thickness as the bedding sand, then, obviously, you'd need to place it on the sub-base, but, if you were using the rail t'other road round, so it's only 25mm deep, then it wouldn't need to go all the way down to the sub-base.
Remember, not everyone uses 50x25mm screed rails - some are only 25x25 or 40x30. |
||||
|
Suki 7 August 2002 |
I understand exactly what u are saying tony but how do i know when using the 25mm x 25mm rails that they have axactly 1 " of sand is underneath them to the Sub base and that the 1" is square along the length, these are things that i wish to learn, although our jobs are tip top and we get all our work from word of mouth i see u as the daddy of paving i wish to learn from your vast knowledge so plz do not see me as questioning what u are saying as i know u have massive knowledge and what u say is correct i am merely trying to glean as much info as poss from the master |
||||
|
Tony McCormack 7 August 2002 |
You shouldn't set the screed rails to a level of x mm above sub-base - they should be set to x mm below finished paving level (FPL ).
Now, just how you determine the FPL at any given point is up to you. You could use an automatic level of some kind, or rely on boning rods, a taut string line, a laser, or whatever, but levels for ALL layers, are judged from FPL, not from the level of the preceding layer. So, with the 25x25 screed rails, they might be 25mm above sub-base at one particular point, but they could be 30mm halfway along their length, and 35mm at the far end, if there was a 10mm difference in your sub-base. Remember that working tolerances decrease the closer you get to the paving layer. Your sub-grade can be +/- 50mm, and your sub-base +/- 10mm, the bedding +/-7mm, but your finished paving should always be +/- 3mm from FPL. And less of the brown-nosing! |
||||
|
Suki 7 August 2002 |
ok i got it now! i do it a little different to that and i seem to do ok but i'll give it a try like that and see what happens
heres a quicky for ya , when we are working on site and one of the labourers drops a fag end on the sub base the norm response is "nowhere on AJ,s site does it say that fag ends is a suitable part of the sub base - now pick that out and throw it in the skip!"
Your site is a frequent talking point on the job im afraid, brown nosing apart it is excellant |
||||
|
Tony McCormack 8 August 2002 |
Fag ends, the crusts off bacon butties, and unwanted copies of "Juicy Lucy and her Triangular Monster" with all the pages stuck together do not count as acceptable sub-base material, I'm afraid. |
||||
|
|
|||||
|
|
Preparation and layout for new drive - D Meehan - 5 August 2002 | ||||
|
Great site! Just what I was looking for!
I am about to dig out my old concrete drive, expand the area, and lay new. The old drive was laid in a real patch and make do fashion, no more that 50mm thick, and as best as I can ascertain, there is little sub-base, just the bear earth.�That said, there has not been a great deal of subsidence. We are on a hill, and the drive slopes in the region of 1:7. The subsoil is clay with a fair amount of natural rock thrown in (maybe a 8:1 clay/rock ratio) and tends to be very firm in itself. Rainfall is fairly high (edge of Exmoor) and runoff in the form of seepage from the field above is enough for riveulets to form across the current drive after sustained rainfall. We are not yet fully decided on the final surface, currently toying between tarmac and/or pavers. We would prefer all pavers, but the cost may be prohibitive (RMC Priory is our preferred, Charcon's Woburn Rumbled otherwise). Total area is approx 130sq m. The drive is regularly used by 2-3 vehicles, one being a long wheelbase Landrover. Because of the site layout, in and out requires 2 or 3 point turns, so the surface needs to withstand the skewing forces as well as straight up and down. We also need to occasionally take your average modern tractor (which seem to get bigger by the day) over the surface for hay deliveries and the like.�Therefore, you could be looking at 5-10 tonne loads at times (maybe 6 times a year). Most of the literature suggests a 100mm subbase, and for pavers, 100mm to allow for block and bedding layer.�I suspect that because of load etc, I should be looking at a 200mm sub-base. I'm planning on excavating as required, back filling with the old drive material (probably providing approx 50-75mm depth), and topping up with 40mm scalpings, which will be compacted. Is 100mm ok, or is more required? If we choose to go with tarmac as the surface, what depth of base and wearing layer should we aim for, and if pavers, should they be 50, 60mm or greater? Would you advise flexible or hard construction? The entire drive area is surrounded by walling to act as a fixed barrier to any paving. We have thought of mixing pavers and tarmac, so that the pavers form an edging, maybe 500mm wide around the tarmaced area. �Which is easier to fit first? The other concern with tarmac is that in the winter, any rainwater tends to freeze on the surface, creating a 1:7 ice rink. Can tarmac be finished with a decent rough surface to help with grip? And, finally (phew!) beyond the driveway to the field, we plan on using grass grids (like RMC's uni-green) to provide a natural but hardwearing surface. What base should be used for this, given that the tractor and land rover need to pass over this. This is another 100sq m.
Thanks very much in advance.
|
|||||
|
|
Tony McCormack - 6 August 2002 | ||||
|
Hi Dave,
where to start? Well, if you opt for block paving, from what you've told me, I'd strongly recommend a 150-200mm sub-base, and using proper DTp1 rather than them owld scalpings, which can be highly variable in quality. You could, I s'pose, excavate, and then use the better stuff from the existing driveway as a capping layer, but make sure you have at least 100mm of well-compacted DTp1 on top of a good 50mm of the owld stuff. I can't say this too often, but the biggest cause of settlement and ponding with block pavements is sub-standard sub-bases. It's a false economy to save a hundred quid or so on cheap, nasty "hardcore" rather than the proper stuff, especially if you're anticipating exceptional loads (for a domestic driveway). So, 150-200mm sub-base, then your 35-50mm bedding layer of grit sand, and then a 60mm paver. There's no need to use an 80mm, not for the occasional tractor, but, if you have any other HGVs, such as a CH oil delivery tanker or the septic tank emptier, then it might be worth moving up to the 80mm block. But what about blacktop? I'm wary about blacktop on a steepish gradient for the very reason you mention - icing in winter. You can get a 10mm wearing course that will give better grip, or you could have a hi-grip surface dressing added, but I don't think it would work out to be cost effective against a tumbled block paving such as the Priory/Woburn offerings. Spec for bitmac would be, again, a 150-200mm sub-base, with a 65mm base course of 20mm dense and a 25mm wearing course of 10mm dense. And then your grass pavers. These need to be laid on a free draining medium or they just turn to mud and gloop. You need a decent sub-base, with adequate drainage, so perhaps 150mm again, with a drainage composite if the ground is wet. You need a grit, not a sand, but a 4-6mm grit on which to lay the grass pavers, and then they need to be filled with a quality sand/grit/soil mix, not any owld topsoil you can dig out of a field. To be honest, I think you need someone to look at the site and give you the benefit of their experience. You've a lot of factors to take into consideration, and, with the grass pavers, this is not a standard job, needing a good bit of branewerk before breaking the ground. |
|||||
|
|
|||||
|
|
Laying bed - Ydis - 7 August 2002 | ||||
|
Thanks for this excellent site and very useful information that it contains. I used it to plan and design the block paving of my driveway. However, I am finding myself with an unforeseen problem for which I am requiring your advice:
I have started the job and I have already completed the 12 inch-thick sub-base. I am compelled to use a 3 inch-thick layer bed instead of the recommended 1 inch bed. Do you foresee any problem in relation to that? Advice, please. |
|||||
|
|
Tony McCormack - 7 August 2002 | ||||
|
You're using 3 inches (75mm) of sand for bedding? That's way too much and you will experience problems with settlement in the next few months.
Sand doesn't compact or behave quite the same as granular sub-base material when loaded - it behaves something like a fluid, and it can move, slowly and imperceptibly, but it will move. The best solution is to top up the sub-base, adding an extra 25-40mm (1" to 1.5" ) and compacting that, before placing the bedding sand. The figure of 50mm for bedding sand really is a maximum. You can, occasionally and on light-use projects, stretch that to 60mm, but 75mm is just asking for trouble. |
|||||
|
|
|||||
|
|
Geofix for jointing - Rogan - 7 August 2002 | ||||
| I am nearing completion of my block paved drive with the help of your excellent site and my father suggested using feb Geofix jointing compound instead of dried kiln sand to finish off the drive, would you recomend it and what colour does it end up, cheers big ears | |||||
|
|
Tony McCormack - 7 August 2002 | ||||
|
No! I would never recommend GeoFix as a jointing material for a flexible block pavement. It does not work in the right way to create sufficient interlock between adjacent blocks. Further, after the GeoFix has cured, if there were to be any movement at all within the driveway, as there often is with flexible constructions, the GeoFix cannot re-settle to accommodate the movement and 'tighten' the joint again, as happens with jointing sand.
Stick with proper jointing sand. It's much, much cheaper and it does the job correctly. Leave GeoFix for rigid pavements. |
|||||
|
Rogan 7 August 2002 |
cheers Tony, thanks for the prompt reply, i'll stick with the sand and tell me dad why,once again superb site. | ||||
|
|
|||||
|
|
PVC sheets. What for? - Leo- 7 August 2002 - 7 August 2002 | ||||
|
Hi everone,
Could anyone tell me where in the paving layers (over the primary base, over the sand and below the paving brick) the porous PVC sheeting is placed, which is supposed to prevent weed growth? Thanks in advance for your help. Leo |
|||||
|
|
Tony McCormack - 7 August 2002 | ||||
|
It's not a porous pvc sheet, it's a geo-membrane or, if they are not too sure what they're about, a landscape fabric . If one is to be used with a block paved surface, then it should go between the sub-grade and the sub-base to prevent the sub-base settling/mixing into a weak sub-grade.
It is not a weed barrier, as no weeds (with the exception of the really pernicious stuff like Japanese Knotweed ) would be able to penetrate the 200mm min construction thickness of a standard block pavement. |
|||||
|
|
|||||
|
|
A Curved Garden Path - Claybrooke - 8 August 2002 | ||||
|
Tony,
Unbelieveable site mate - the most helpful I have found in years - top man! I have been pondering a project for a year now and only now having joined the Cabin do I feel slightly more confident. A well constructed block path looks the bee's knee's but poor ones just make you weep every time you look at them. How's this for ambition.. I plan to run a 'classic' path from the gravelled patio by the house that gently curves between two rose arches, around the pond, then one side bleeding off to a small 3 metre patio, then continuing through the garden to the car parking area! Total distance approx 22 metres. The idea of the small 75mm cobbles looks appealling but probably a bridge too far! I like the look of the Marshall Altira blocks (in all 3 sizes) but I thought to check first with the Cabin Crew while also having a brew... What do you think? |
|||||
|
|
Tony McCormack - 8 August 2002 | ||||
|
What makes you think the 75mm cobbles (which ones?) would be more difficult to lay than the Altira blocks? They shouldn't be!
There's no construction problem in using Altira �- it's all a matter of aesthetics. I don't have any concrete paving in my garden because I think clay pavers are more natural looking and the mosses/grasses colonise them ina very organic sort of way, but then, I have what might be thought of as a 'cottage' style garden. In a modern garden, my paths and patio would look totally out of place. So, you choose the paving to suit the property and the style of garden you have. If you like Altira, then go for the Altira. Personally, I think the Burnt Ochre (multi-brown) is more sympathetic to most gardens than the Brindle (multi-red) but again, it all depends on the type of garden and personal taste. With curved paths, longitudinal stretcher bond (sometimes called running bond) looks superb, as it draws the eye along the arcing lines. Here's a pic of a path I laid about 7 years ago, back in the days when I could still work......
...this path was constructed using Ionica, which, at that time, was manufactured by BDC but they were subsequently bought out by RMC, who still produce this block today. Anyway, the Ionica is very similar to the Altira (and the TopPave Classico, which used to be Marley's ). Enough of the history of CBPs in Britain - note how the blocks follow the curve, accentuating the arc and leading the eye around the corner, which is a favourite trick of all those arty-farty garden designers. This path has never been cleaned or sealed, so you can see what a CBP path might look like a few years down the line. If you prefer the 'clean and tidy' look, then consider using a sealant.
Has that kettle boiled yet? � |
|||||
|
Claybrooke 8 August 2002 |
Well you were quick, I've only had time for a couple of brews yet! 'Management' will be delighted that the Site Agent can quickly see through such obvious delaying tactics that small clay cobbles may be too expensive and much too difficult for an Apprentice to tackle.. Hence the 'Altira' rationale.
Okay, I know you're right - yes I have an old cottage (built with wonderful red handmade bricks - painted white by previous owners!) with a typical cottage garden. But since the bricks are now very porous and spalling, I may need to render in the next few years. However a garden wall does run the length of the garden and will never see the sight of any whitewash - as long as I live! But I thought a pathway of small red little cobbles could be too twee? Cleary I have to call another site meeting.. The cobbles I looked at were the small 50mm Marshalls (sorry) and seeing that there were 3600 of the little buggers in just over 9m, I just thought this would be too much for an absolute Apprentice and will take many, many summers to complete. The photo in your reply is an abolute inspiration and being an Apprentice, I would have laid the stretcher bond the other way so that I could get round sharper corners easier!I have much to learn.. I'll get the digital out and send a pic prior to any paving activity - but you'll need to be patient on the last point! Sincere thanks, Claybrooke |
||||
|
Tony McCormack 8 August 2002 |
I have the 56x56 Marshalls clay cobbles for my garden paths!!! Amazin', eh?
Even more amazin': that path was laid by Mrs Taz and The Reichskinder while I was laid up after first losing the use of my back, so, there's really nothing to scare an apprentice. They laid the lot, about 15m², in a day, although, to be fair, the sub-base was already in place from the previous, nasty concrete blocks path, and so it was simply a matter of wazzing out the owld rubbish and laying the new little beauties. Two of the Reichskinder were splitting the cobbles and arguing, while Mrs Taz screeded the bedding and laid them in place as I groaned and moaned from my sick bed (well, sick recliner, to be honest!)
There's a really crap photo of it on my garden website which you can access by clicking here but tomorrow, I'll haul meself downstairs and take a better one on the digicam and post it to this thread. |
||||
|
Claybrooke 9 August 2002 |
And there was I anticipating a supporting response that it would be just too much for an apprentice. You should post a pic of Mrs Taz - because to lay 15m of cobbles in one day commands deep respect man and worthy of pinning up on the cabin wall to remind apprentices to stop whinging. I have a small (40K) pic to post of my garden but I can't figure out how to do it.. It's raining again, so I'm off back to the Cabin for a brew and a ponder.. Yours in awe, Claybrooke |
||||
|
Tony McCormack 9 August 2002 |
It's persisting down outside, so I'm not going out there to photo the garden path, but I have dug out these pics from my portfolio....
....for advice on how to post pictures, click the Help link and then read the bit on "Ikoncode". If you can't upload the pictures direct, send them to me by email and I'll upload them for you. |
||||
|
|
|||||
|
|
Puddles+sub-base - Nashy - 10 August 2002 | ||||
| My drive cleared of concrete/soil now looks like a mud pit after 2 days of torrential rain.I also have 4 ton of hard-core sat on the garden and the grass isn't too happy either. I'm against putting the hardcore down due to the puddles/muddied area, will i be okay to lay hard core when the puddles have disappeared? should i wait for some firmness within the soil? or am worrying about nothing. | |||||
|
|
Tony McCormack 10 August 2002 |
||||
|
If the sub-grade beneath is normally firm and stable, then the best option would be to wait for a gap in the rain, scrape off the worst of the mud and then get the sub-base material in place and compacted.
If there is any doubt about the integrity of the sub-grade, then use a separation membrane (summat like Terram 1000 ) that will prevent the sub-base disappearing into the earth. |
|||||
|
Nashy 11 August 2002 |
Thanks for the reply,the rain held off today i managed to clear puddles/excess mud and now have sub base down. Got sand and block arrving tomorrow. | ||||
|
Tony McCormack 12 August 2002 |
The weather looks more favourable this week. How much paving have you to lay? | ||||
|
Nashy 13 August 2002 |
Roughly 55ft by 7ft from pavement down side of house into rear garden/garage area.The width is slightly out thru and i'm having to do cuts against the house as this is the place where its less likely to be noticeable. Has been quite an eye-opener from start with the digging, and at times has felt like a lead weight round my neck. I also had to have a dwarf wall built between myself and next door as my drive is 2ft higher. The only consolation i have is that i work shifts 4 on 6 off so i can get stuck in but its down-heartening when the rain starts. | ||||
|
Tony McCormack 14 August 2002 |
It's only the really heavy rain that puts a stop to laying work. Obviously, you need it dry for the sand jointing, but, more or less everything else can be done in the damp - if it wasn't so, it would be impossible to make a living as a paving contractor in these soggy islands! | ||||
|
|
|||||
|
|
New Project - Wiganer - 12 August 2002 | ||||
|
I am about to start a driveway, firstly I have never done one before but I have read the website and would like to say I am impressed by the detail that is given. I have done other small garden projects i.e paths/patio's but never on this scale. I hope to get some useful help throughout this project from here and I will try to get some pic's.
I would like some advice/information on setting the sub base out, I will be using edgings/soldiers, do you lay these directly on the sub base or do you dig some of the sub base out at the edges then concrete and haunch? This will make a difference to the outer perimeter area I presume. Are there any tips on best patterns and colours like diamonds/circles etc where and where not to use, direction for driving a car on etc? My total area is 50 m², how much sub base will I need for 100mm, 9 tonne? Hope I am not too much of a nuisance in the coming few weeks. |
|||||
|
|
Tony McCormack - 12 August 2002 | ||||
A pie-eyter, eh? My missus is a Leyther and she says she didn't know they'd got t'internet, or even electrickery, in Wiggin! 
When it comes to laying your soldier course edgings, it's up to you how you do it. I prefer to lay the sub-base, then scratch out a 'channel' for the concrete bedding, but others prefer to lay directly over the sub-grade. This is shown diagrammatically on the Laying Flexible Block Paving page, in the 'Kerbs' section. Colours and design details come down to personal taste. The most popular colour scheme in and around Wiggin is the charcoal edging with a brindle body. Herringbone is the best pattern for a driveway, as it gives a full interlock, and a 45 herringbone looks more professional that a 90 herringbone, even though it is no stronger. Placing circles or diamonds is best done after laying the main body of paving - see the Detailing page.
For your sub-base, 9-10 tonnes should be about right, just depending on how accurate you are with depth of dig and the final profile of the driveway. You'd be better off getting a 10T load delivered in bulk, rather than buying it in agg bags. Keyline at Hindley, Builder Centre at Coppull or Jewson at Pemberton should be able to arrange what is known as a 'direct delivery'.
I'm looking forward to hearing/seeing your progress, or lack thereof! |
|||||
|
Wiganer 14 August 2002 |
Thanks for the reply, well it all starts this weekend! The skip arrives friday and I have my pick and shovel ready, hope to prepare the ground ready for the sub base material this weekend. I work regular days so it may take some time depending on the weather.
I have a small round drain inspection hole in the middle of the drive, should I pave round it so it shows or use a cover? Do these small drains move up or down to get the right level? |
||||
|
Tony McCormack 14 August 2002 |
How small is 'small'? If it's 450mm or bigger in any diomension, I'd use a recess tray cover, but if it's just a rodding eye or similar, it's probaby easiest to adjust the level to suit (all drainage fittings can have their finish level adjusted) and then pave around it.
Can you give a fuller description? |
||||
|
Wiganer 15 August 2002 |
It's less than 450mm.
How do you paste a picture in the reply? Can anybody recommend a place for block paving near Wigan? |
||||
|
Tony McCormack 15 August 2002 |
To include a picture, you need to have it uploaded to the web, usually in your own webspace, and then include the path to the picture inside a pair of tags. It's all explained in the HELP section under Ikoncode Tags at the bottom of the screen.
If you can't upload a picture to your own webspace or image storage webspace, send it to me and I'll upload it for you. For block layers in Wiggin, this company emailed me earlier this week... DKG Paving - 01942 706690 ....I don't know them, but they say they've been in business for 8 years.The only firm I do know in the area from when I was contracting is GC Construction - 01942 492288. They've been doing the block paving for quite a few years and generally do a very good job. |
||||
|
Wiganer 19 August 2002 |
Well I am certainly aching this morning! all the preparation has been done ready for the sub base material.
Sorry for the confusion but I meant a supplier of blocks not someone who can do it? I have an extension to the rear of the house which has a ring beam, this means that the concrete base comes out about 6" into the pathway were I will be paving, this means it will be higher than the drive. I will have to change levels from the pathway to the drive, but I dont want a dramatic step. The difference in height is about 2" would it look right to slope it gently from the drive to the path over say 3 ft length? Still not sure on how to get the pictures in the replies. |
||||
|
Tony McCormack 19 August 2002 |
Here's one of your pictures, showing the existing driveway.....
Block suppliers in Wigan - just about anywhere. Jewsons, Keyline, Travis Perkins, Builder Centre ... they all charge more or less the same price to diy'ers, but it's worth 'phoning around to see who's the cheapest. As for the ring beam problem, rising 50mm over a metre (2" in 3 feet) is not a problem for block paving - you'll hardly notice. Have you considered slicing a few of the blocks into 'slips' so that you can maintain the correct level? |
||||
|
Mike 19 August 2002 |
OK. I don't mind airing my higorance in public. What, please, is a ring beam in this context?
Thanks. - Mike -
|
||||
|
Tony McCormack 20 August 2002 |
It's a glorified foundation, Mike - imagine a concrete-filled trench beneath the outer wall of a building and that's your basic ring beam. It usually contains hell of a lot of reinforcing steel and can be quite close to the surface, although they normally have at least 300mm of cover, except where it is used as an integral base. In some cases, a ring-beam connects together a series of vertical piles (No! Not those piles!! ) that are driven into the earth to find a firm foundation.
Aren't you glad you asked? |
||||
|
Wiganer 20 August 2002 |
Having difficulty in picking the colours! Looking at marshalls driveline 50. I like the look of the DIY page on this website, is the main body mixed with red and charcoal, can't make it out on my PC ?
Any suggestions? |
||||
|
Tony McCormack 20 August 2002 |
The pics on the DIY page aren't Marshalls Driveline, they're clay pavers and the colours are much more intense than with concrete blocks.
If it's the Driveline you're going with, then opt for the Brindle brick for the body of your driveway, with the charcoal for the edge coldier courses. That is the most popular colour scheme in N.Western England. With the Brindle being a multi-colour block, it doesn't show up any minor stains or marks quite as badly as a mono-colour, such as red, and so it's a much better choice for driveways. Have you got all the sub-base finished now? |
||||
|
Wiganer 22 August 2002 |
Laying the sub-base and edges/soldiers this weekend, can I ask a few question before I start!
I am using 50mm blocks, how much bedding layer should I have after screeding? this will determine the FPL I presume. The process I presume should be:
|
||||
|
Tony McCormack 22 August 2002 |
Bedding layer - after screeding, the thickness of the bedding layer should be between 35 and 50mm. With 50mm blocks, using the gritstone zone 2 sand that's popular in Wiggin, your screed level should be approx 43mm below FPL, as you generally get around 7mm of compaction, using a pre-compacted bed.
Edgings and soldiers - lay on concrete, haunch with concrete. Soldier joinbts can be sanded, kerb joints can be butt-jointed but I reckon they always look better pointed in a complementary mortar. If you;re using the red KS kerbs, use a red coloured mortar. Once your soldiers are in place, you can use them to screed off, and the rest is a relative doddle. Was there an existing sub-base underneath that old bitmac you had on the drive? |
||||
|
Wiganer 27 August 2002 |
Base down now and half the edgings in, bigger job than I first thought!
The small drain I have in the middle, should I bed the blocks down around the drain on mortar or just lay them with the other blocks? How do I lift the drain level, is there some screw inside? |
||||
|
Tony McCormack 27 August 2002 |
You could bed the blocks around the drain on mortar, but it's not essential. However, you need to get that drain to the correct level first, ie before laying the blocks around it, and just how that's done depends on the type of drain.
Can you describe it or send me a picture? |
||||
|
Wiganer 27 August 2002 |
The drain is approx 400 mm diameter with a black lid on, sent you some pictures today. | ||||
|
Tony McCormack 27 August 2002 |
Here's the image....
....that's an Inspection Chamber (IC ) and the lid, which is Ductile Iron, sits inside a frame which, in turn sits atop the chamber sections. There's an illustration of this type of IC on the Manholes page.
You need to lift off the cover and frame and then re-set them on a bed of mortar or bricks and mortar, and then tap down to the correct level.
By how much do you reckon you'll need to lift the cover and frame? Up to 25mm can be done on a simple bed of mortar, but anything more than that will require either slate, broken flags or brickwork to help carry the load. You also need to think about the detailing around the cover once it's set to the correct level. Have you looked at the Detailing page? That's gives an illustration of the various ways in which you can detail the paving around an IC cover such as this. Progress to date....
|
||||
|
Wiganer 28 August 2002 |
From the manhole page the lid and the frame should come off:
Should I set this to my FPL on a bed of mortar and/or slate then detail the drain during paving then joint? Set the drain and detail on a bed of mortar and/or slate before I pave? What about when I compact the blocks after will this disturb the mortar on the drain either way? |
||||
|
Tony McCormack 28 August 2002 |
I reckon you should lay as much of the paving as is poss, to withing 300mm or so of the IC cover, but don't compact. Then, set the frame and the surround detail blocks on a bed of mortar/concrete, tapping down to finished level. Leave it for 24 hours, then piece-in and you can compact with the wacker plate.
Take it easy around the cover - you can run the plate right up to the detailing, but try not to run over the cover at this stage as it might just rattle loose the bedding mortar. |
||||
|
Wiganer 3 September 2002 |
All edgngs now done ready for the blocks.
Can I block in the rain or damp conditions? I have around 2" of sand for about 39 sqm required for the blocks. How much should I order? Which is the better tool to use for cutting the blocks, I am using driveline 50. splitter or saw? |
||||
|
Tony McCormack 3 September 2002 |
The only weather that stops block laying is torrential rain or hard frost/snow. A bit of damp or drizzle is nowt to worry about - if it was, we'd never get any paving laid in this country! 39m² - you'll need around 4 Tonnes of the grit sand, and then around 5 x 40kg bags of the jointing sand for when you've done. A splitter is better for concrete blocks, but many diy'ers seem to prefer a cut-off saw, even though it is incredibly dusty, it's noisy, more expensive, more back-breaking and, 12 months down the line, you'll not be able to tell whether the cuts are split or sawn! |
||||
|
Wiganer 4 September 2002 |
Can you get clean cuts with a splitter? If not will you be able to see them after?
Just conscious that I will have to hire a tool this weekend and want to get the right one. |
||||
|
Tony McCormack 4 September 2002 |
I can, and, with a bit of practice, there's no reason why you shouldn't be able to. What do other diy'ers feel? Are you happier with splitters or with cut-off saws? |
||||
|
Mike 4 September 2002 |
I've ended up using angle grinder (which I already had) together with splitter. For my skill level, I found the problem was not "Do splitters give clean cuts?" (normally very), but more "Mmmm. Why did it choose to split there?". Occasional use of the angle grinder to skim a millimetre off reduced the amount of wastage (for me).
Another job where I found the nangle grinder/splitter combo worked well together was in cutting McCormack soldier corners, where one quarter of a block has to be removed with a 45 deg cut leaving a (relatively) delicate sticky-outy bit (technical term). Just marking out with a pencil or whatever and then submitting your block to the splitter produced extremely variable results (including beautifully aligned cuts but with the point missing, or beautiful point but the cut offset etc.). A careful score with the angle grinder (only a mm or so needed) to preload the stress into the top face of the block AND give you a determined guide for the splitter blade gave me results that I think would even get a grudging "Hmm. Alright" from himself. Just my tuppence. It worked for me, but YMMV. A cut-off saw provides an alternative option I guess; as a 'when I can get a couple of hours' DIYer, I never felt the cost and inconvenience of hiring a c-o saw several times worthwhile. I did the arithmetic and bought] myself a splitter - again, YMMV but for me that has paid for itself because my jobs have been very spread out (multiple hirings). - Mike - |
||||
|
Wiganer 17 September 2002 |
Finished at last, I would like to thank you for all your help and think the website is excellent for us DIY'ers.
One last question : I cracked a brick on the last pass of compacting and only saw this after I Keybonded. Whats the best way of dealing with it? P.S. I sent you some Pictures of the finished job |
||||
|
Tony McCormack 17 September 2002 |
Abso-bloody-lutely superb! That is a cracking looking job, Ian. I like the interlocked diamonds, and the recess tray is spot on. Well done!
As for the one broken block, just flick it out with two trowels, as shown on the Repair page, and put in a new block. Sprinkle a handful of jointing sand around it, and leave it be. You'll need to top up the jointing sand for the whole drive in 6-8 weeks, so check it again then, and re-do the Keybond if you really think it's necessary. |
||||
|
|
|||||
|
|
140 sq mtrs done and dusted - Suki - 14 August 2002 | ||||
|
Hi, just thought i'd share these with u all this was our latest job it was 144 sq metres and took around 7500-ish Eaton 60mm marigold blocks laid on a 45 degree herringbone and took 3 guys 9 working days. We used eaton bullnose edgers around the perimeter there was a wicked slope towards the house which we cured with a long gulley drain in front of the garage (which used to fill with water before) which we stitch drilled into a underground drain, we also constructed a step at the entrance so any water flowing down the driveway will be redirected to the drains and not hang around the doorway, luckily it pished it down for a couple of hours on the last day as we were cleaning up and we observed zero standing water on the driveway :)the bullnose circle on the lawn is for a ornate lamp in the near future(electrics are in), we also had an area at the top of the driveway which we sheeted and covered with 13 tons of washed 20mm gold blend and is retained by the back face of the bullnose edgers. We collected our sheckles and the customer was very happy. many thx to tony who has helped me out with many a problem in the past.
|
|||||
|
|
Tony McCormack - 14 August 2002 | ||||
|
Looks really good, Suki - let's hope you get plenty of 'follow-ons' from this job. It's a nice drive to add to your portfolio. |
|||||
|
Suki 15 August 2002 |
Unfortunately this job was on a dead end road so no follow ons here and it was near the end of the road as well |
||||
|
|
|||||
|
|
High spot in paving - Nashy - 20 August 2002 | ||||
|
Got a slight high spot in part of my paving,about quarter of inch difference to surrounding area.The neighbour reckons it will whack out, but also says its not that visible, but i layed the drive and it meets my eye every-time i walk on it.
The area in question is about a foot square,is it common to come across this kind of problem? do the professionals have these kind of problems, or is it because i'm an amateur. |
|||||
|
|
Tony McCormack - 20 August 2002 | ||||
|
We do get high spots or low spots, occasionally, but we can usually work out why - it might be where two screed levels meet, or where there's a change in fall, but understanding why is just as important as resolving the problem, as that means we can avoid making that error in the future. Do you know why this has happened with your paving?
It may be, as I said, a change of screed, but it could be something more complex, such as a patch of over-thick blocks, or a big lump in the sub-base that isn't compacting as much as the surrounding area. Run the plate over it a half-dozen times and see if that 'irons it out', but don't go mad with the plate or you risk damaging the blocks. If you have a weighty clonker or a mall, that can be used to 'persuade' the high blocks down to level, but if none of this works, then it's simply a matter of lifting the blocks in the high spot, and the immediately surrounding area, re-screeding the bed, and re-laying the blocks.
That's the beauty of block paving (and other elemental pavings ) - if you make a mistake, it's so easy to put it right! |
|||||
|
Nashy 23 August 2002 |
As you state it's where my screed levels meet, b4 i ran the whacker over i pull em out and levelled off. | ||||
|
Tony McCormack 23 August 2002 |
So, have you managed to resolve it, then? | ||||
|
Nashy 23 August 2002 |
I have removed blocks and screed sand from offending area, drive is on a slight incline towards house, suspect it occured when screeding level for fall into grid. | ||||
|
|
|||||
|
|
Cleaning Block Paving - Sinkers - 21 August 2002 | ||||
|
Hi, this is an absolute numpty question.
I've just bought a house with block paving in place its started to go green and slippy and I would like to know the best way to clean it. Ive tried power wash but yes i have driven the sand out in some areas so I need to know the best way to maintain it as well and with what type of sand. Any help would be appreciated. |
|||||
|
|
Tony McCormack - 21 August 2002 | ||||
|
You need to replace the jointing sand as soon as possible, as it's an absolutely integral part of the cosntruction, not merely a way of filling the gaps. You can buy dried jointing sand in 40Kg bags from most Builders Merchants, and then it's just a matter of sweeping it into the open joints, letting it settle for a week or so, and then topping up.
Longer term, you might want to consider applying a sealant. This will prevent the mosses and algae establishing themselves quite so freely, and will keep the jointing sand in place when you do decide to give the paving a power wash. If a sealant isn't to your taste, and not everyone does appreciate the gloss or semi-gloss finish, then keep the power wash lance to a shallow angle when washing down and never aim directly at the joints. There are joint stabilising fluids that are considered in the Jointing and Pointing pages, and these will help keep the sand in place if you decide against using a sealant. |
|||||
|
|
|||||
|
|
Block paved path - John - 21 August 2002 | ||||
|
Hi Tony.
since we last spoke i have been married and recently returned from australia on honeymoon so have only just finished going through the forum pages that I had to catch up on. I was in Adelaide and Sydney. It was their winter and it was 18-19c average. I'm thinking of setting up Adelaide paving.The bulk of their work is clay paving it is everywhere. It is interesting to see that when you started your new forum I was I think the third or fourth member. Now you are up to the two hundred plus. You must be very pleased and it shows what a good job you are doing. Keep up the good work. I came out the pub in Malaysia at 10.30pm and there were two Malaysian flaggers on £40 per week laying flags on the highway with no lights or any health and safety protection whatsover. Our work is hard but i felt sorry for those guys.
Anyway to my question.
I have been asked to construct a path 1.2m wide in a horshoe shape coming back on itself, if you know what i mean.
|
|||||
|
|
Tony McCormack - 22 August 2002 | ||||
|
Off getting wed in the middle of the busy season., John? Your brains must be addled! I scheduled my wedding for the end of November, when work starts to tail off, the days are short, and you're better off tucked-up in bed with a warm woman than out on site mixing concrete. Twenty years go, this November...Tempus really does Fugit!
Good to see you're back in der Pool and ready to get stuck in to the work again, though! Tightest radius for a path - I suppose you mean to use 200x100 blocks, laid 100mm wide. If so, and if we are willing to accept joints up to 10mm, then each block can be rotated by approx 4 degrees, which gives a radius of approx 2.9m. Once the radius comes down to 1.7m, though, the joint width opens to 16mm, as shown in the drawing below. I've allowed for a 3mm joint at the 'tight' end of the joint, and there will be some variation on site, but generally, any curve faster than 3m radius needs to have at least some of the blocks taper cut.
|
|||||
|
|
|||||
|
|
Setting out - Mike - 24 August 2002 | ||||
|
I am creating a small rectangle of 90deg herring-bone paving (with a flat but not level surface) to link my porch with my driveway, replacing some grass that gets suicidally slippy in the wet season. I'd be interested to know how you would set out guidance (strings or whatever) in this particular circumstance, where the subsoil is natural subbase, cracked but virgin shillet. I have plenty of roadpins from my other domestic paving job, but my chances of getting them into the ground here at all are close to zero, let alone exactly where I need them to be.
But I am a bit perplexed as to the best way to actually get the levels right. I can speed-lay soldiers accurately to string very happily now, but I know from experience that when a stringline can't be established it's rather more tricky (especially if not level). Would you attempt the roadpins game in this kind of ground? �Do you have other tricks up your sleeve**? �Would you do it all by eye? I probably will do it in stages of dead reckoning and just hope when I've done my four sides of soldiers the start and the end actually join up in all three dimensions! So:
1. lay along the iron channel, which will give me top left and top right references.
Interested in any comments you might have!
** another option might be to temporarily bed a couple of blocks in the driveway at stage 1. so that their surfaces can be used as reference for strings which would then give orthogonality AND level correctly for the side runs. |
|||||
|
|
Tony McCormack - 24 August 2002 | ||||
|
You've more or less solved it for yourself, Mike!
Lay the soldier edge course along the channel grating, as you said. Set a brick on a bed of sand just beyond the end each side run, in a roughly orthogonal position. Don't worry about level at this point, although you can, if you wish, set the top of the brick to the projected level. Set up string lines stretched from each end of the channel course over the top of the temporary bricks, and then use the 3-4-5 triangle method to check for accuracy. Once the sting lines are correctly positioned, they can be weighted in place behind the temp bricks, to generate the required tension, and then simply lay the blocks. You can use a straight-edged timber to check the level and the alignment and then piece-in the stop end. Another option that we use in situations where it's impossible to drive in road pins, is to use a decking sheet or timber baulks set just outside the working area, and then knock in nails to act a 'mini road pins'. The string line can be stretched over another piece of timber to give correct level and alignment and then fastened to the nail for anchorage. Remember to weigh down the decking sheet/timber baulk if there's any chance of the tension from the string line causing it to shift during the work. Does that make sense? I don't envy you having to reduce dig that ground to get it down to formation level. What a way to spend the Bank Holiday! |
|||||
|
Mike 26 August 2002 |
And 'tis done....
The block on pile of sand technique worked very well - thanks for the advice. The idiot grin on face is because our digital camera is a bit naff by current standards and the LCD viewer so faint my wife is peering through a toilet roll centre to be able to make anything out. - Mike - |
||||
|
Tony McCormack 27 August 2002 |
Excellent! Well done, Mike! I've just had a request from a firm in Maldon - they're looking for block layers, if you're interested in a new career!
VACANCY DETAILS
|
||||
|
Mike 28 August 2002 |
Thanks Tony, but I reckon Devon to Essex every day would be even more exhausting than block laying!
Slightly off at a tangent, but a little academic question for you, please. How important is it to whack immediately after laying, for domestic very-light-use footpaths? I have the little pocket handerchief in this thread and about, I guess, 25 m² of my other pathwork awaiting final whack. I have a local family builders, very close, convenient and cheap but I won't be able to hire their whacker for a month, maybe two. The other option is to go into town and pick up a whacker for £30 (1 day minimum charge) from the 'impossible to park outside' hire shop. That all seems a bit daft for a half hour usage. What are the downsides of delaying whacking a low traffic footpath? (There's plenty of kiln sand down the gaps.) Cheers. �- Mike - |
||||
|
Tony McCormack 28 August 2002 |
I wouldn't worry about it, Mike. If you were running cars over the paving, then I'd say get it done as soon as, but for the amount of hammer it's going to receive from postman and the milkman, you'll be safe enough waiting until you've the rest of the paving ready and then have a borrow of the wacker plate. |
||||
|
|
|||||
|
|
Membrane, is it necessary? - KeithP - 28 August 2002 | ||||
|
Hi,
I was just wondering when building a Block paving drive whether its important to lay down some membrane, to prevent the bases mixing together or prevents plant growth from underneath?, would you recommend it? Also where should the membrane be laid, in correlation to the seperate layers beneath the actual paving?
Many Thanks
|
|||||
|
|
Tony McCormack - 28 August 2002 | ||||
|
No, it's not essential, unless you're on really bad ground, and then its role is as a separation membrane, not a weed barrier.
There's more about the use of membranes on the Geo-Sheets page. |
|||||
|
KeithP 28 August 2002 |
Ive received a quote from a paving company which includes a plastic liner between the sub-base and the bedding layer. Is this OK?, by the sounds of it, it isnt the membrane mentioned above. | ||||
|
Tony McCormack 28 August 2002 |
Have they given a reason why they think a plastic liner is necessary, because I can't think of one.
I can't understand why a 'liner' or a membrane would be used between the sub-base and the bedding layer in the first place - if a membrane is to be used, it is placed over the sub-grade and beneath the sub-base. There's a definite whiff of bovine excrement about this. Call them and ask for their reasoning. |
||||
|
KeithP 28 August 2002 |
They told me that it was to stop weeds, is this correct? and if they do lay it could it cause any problems (the drive is on a slight slant)
Thanks |
||||
|
Tony McCormack 29 August 2002 |
How will it stop weeds? Think about it - there should be at least 100mm of well-compacted granular sub-base (crushed rock) which only the most pernicious of weeds could possibly penetrate. If such weeds (eg, Japanese Knot Weed) are present, then the membrane should be between the sub-grade and the sub-base, to keep it out of the sub-base altogether.
Weeds tend not to grow through block paving - they settle into the sand joints and grow into the paving, and no membrane can prevent this. For that, you need a sealant or joint stabilising compound. I still think they're trying to baffle you with science. There is absolutely no way a membrane between the sub-base and bedding layer will prevent weeds colonising the surface of the paving, or prevent the sub-base being contaminated by sub-grade pumping. The way they have proposed to use a membrane is a total waste of money. Have they given a type of membrane, or a brand name? |
||||
|
KeithP 29 August 2002 |
Hi,
Thanks for the reply They showed me the material, and it is just plastic sheeting (not membrane). I think its because I was asking about membrane they thought they could make me happy by adding this layer (although by the looks of it, I dont need membrane anyway as the ground is pretty good). I was just wondering whether there would be any negative result by putting this plastic layer in? (such as flooding)?
Thanks again for all your help
|
||||
|
Tony McCormack 29 August 2002 |
Get rid of these eejits, pronto, Keith! Lead them back to their horses, saddle them up and send them packing! They wanted to use a plastic sheet?!?!? Beneath the paving?!?!? That's a more or less guaranteed recipe for disaster!
Using an impermeable sheet in this manner means the bedding layer cannot drain, so it becomes saturated, and starts to behave like a fluid, with the blocks floating on the surface. In next to no time, the whole pavement will have rutted, blocks will have spalled, and the jointing sand will start to 'pump', ie, be forced out of the paving. They've no idea, have they? Send 'em packing! |
||||
|
KeithP 29 August 2002 |
We will probably change builder, all the other local builders have said that the bedding layer will be stone dust instead of Coarse sand is this OK? (Best to check).
Thanks again for all the advice and help
|
||||
|
Tony McCormack 29 August 2002 |
Stone dust is fine, usually. I know it's popular in some parts of the country and, if all the local trade are saying it's fine, then it probably is. |
||||
|
KeithP 29 August 2002 |
Excellent! Thanks for all your help. Keep up the good work I will post some pictures of the drive when its done and see what you think.
Thanks once again
|
||||
|
|
|||||
|
|
70m² of hell to pave! - JayHoe - 28 August 2002 | ||||
|
Hi Tony,
what a stunning site. I am contemplating (being nagged into!) laying a patio.�It is fairly large (70m² approx) and I have some beginners questions...... 1) Drainage. The patio would be L shaped behind the house and around the garage (see diagram below). As the length ot the patio is around 12 metres, if I was to drain down the length of it, the bottom end would end up below ground level. Now I know that I shouldn't drain towards the house, but what about immediately alongside the garage? �I was thinking about the linear grid drainage with slopes towards it from both sides.
� � � � �HHHHHHGGGGG Also, would the linear drain have to have a fall along it or is it filling enough for it to run out? 2) Edging. I am going to put soldiers around the patio, but, as the proposed patio is framed by the house, garage, wall, and concrete gravel boards on each side, do they need to be concreted in? I am sure that I will have tons more questions, and if I proceed, I will take step by step pics for you to use on the site if you wish. PS, I am thinking of using Tegula Drivesett - what are your opinions on this as a material? Cheers and Regards JayHoe |
|||||
|
|
Tony McCormack - 28 August 2002 | ||||
|
Using a linear drain is fine, but it has to outfall somewhere. Is there an existing gully or pick-up point somewhere along the edge of the garage?
For the perimeter Soldier courses, I always prefer to lay them on a lean-mix bed of semi-dry concrete, say 10:1, as that ensures they aren't dislodged while laying the rest of the paving. Where they're up against an existing wall, there's no need to haunch, obviously, but they will need to be haunched at any free edges.
Looking forward to the piccies, and don't fret; you can't go wrong with the Drivesett - it's one of my top 3 pavings in the UK. |
|||||
|
JayHoe 28 August 2002 |
Thanks for the swift reply Tony.
Doh! You are quite right! Their are down pipes on the end of the garage that then head off under the proposed patio to an existing dispersal (yeah right) system on the lawn beyond the wall. (Dispersal cos a soak away doesn't like to work in solid clay). This would mean that I could put a real gentle flow on the drain up and down to meet at the bottom left corner of the garage. Bonzer! I am now thinking about the order of tasks.
1) Dig out whole area
Enough for now!�Perhaps you can confirm I am ok so far. Also, access to this whole area is either thru the house or thru the garage (side door over the proposed linear drain. Where is it best to start laying if I am not supposed to walk on screeded sand? (Also just thought, not having done drainage before, how do you cut into and join to an existing pipe (I believe it is a clay pipe). Alternatively, I may just revert to draining from the bottom end of the linear drain, thru the gap in the wall and connect directly to the dispersal system (perforated plastic pipe surrounded with gravel) Thanks John |
||||
|
Tony McCormack 29 August 2002 |
Your Sequence of Operations is right, but I don't envy you having to trek everything through the house/garage.
When it comes to laying, screed off the entire area, find your way back to the house/garage by walking on the soldiers, then start placing the actual paving from the doorway, and gradually work your way out. There's a thousand and one ways of connecting linear drains to existing. With there being an existing pick-up point at the corner of the garage, then a simple outfall connection unit is probably the best way, but it depends on the type of Linear Drain you use. Some don't have outfall units, so you'd need to cut out a hole in the base of the channel, and bed this on mortar directly over the existing pipe, once you've removed the existing hopper or gully and fettled the pipework accordingly. What's there at the moment? Can you describe or send in a piccie? |
||||
|
JayHoe 30 August 2002 |
Glad the sequence is OK. I don't envy me either having to cart it all thru the garage.
I will take a couple of pics over the w/end and send them in. As for the existing drains, I have one d/pipe in the corner of the house/garage, and 2 at the end of the garage. All 3 join up some where(!) but I didn't see how the builder connected them up. They then head off straight down the garden. I hope to start digging out tomorrow, so I may well have an exploratory dig. However, there are no rodding points or anything along the underground pipe work, so I am a little concerned that dust/and dirt walked onto the paving will block up the drainage quite quickly (perhaps I am just over concerned). I will send the pics to give you more idea of the general layout. Cheers John |
||||
|
Tony McCormack 30 August 2002 |
Any dust or dirt should be caught in the P-Trap, but anything that is carried around the trap in suspension will be flushed along the system and should not cause any problems. However, if you have any parts of the drainage system open during the works, cover it with a board or a placky bag or summat to keep out the worst of any muck that's lying around.
Good luck with the digging - I'm off for a long weekend in the country. |
||||
|
JayHoe 2 September 2002 |
Hi Tony, well, I have started to dig out (my front garden is now one great pile of dirt, and we have only so far dug out a quarter!
As for the drains, I see that it would be no problem to connect in the linear drain, but we have another difficulty. As the drainage goes down the garden to a herringbone subsurface dispersal system, it is only about 3" below the surface. Can I block over it? The clay pipes themselves would only have sand bedding over them, no hardcore. Would a plate compactor smash them? Lowering the drainage is not an option. Any ideas? I have been trying to decide if it may be better to pave the area instead. If so, do I need hardcore? of is just a sand/grit bed enough. I have looked at your site and was wondering if the following is correct...
Hardcore where necessary (filling and sof spots)
Arrgh! Going mad here! Hope you had a good weekend, Regards John |
||||
|
Tony McCormack 2 September 2002 |
That drainage is terribly shallow - is it just collecting from the rainwater pick-ups? It really ought to be at least 300mm deep. You can't lay block paving over a land drain so shallow, but you might get away with laying flags/slabs.
Your order of operations is basically correct, but I'd try to make sure that the shallow drain is bridge by a larger flag and doesn't have a joint directly over it or one of the smaller flags. Lay the flags on the grit sand/cement bedding; no need for a full mortar bed if you're using a semi-dry grit sand/cement. Have you thought about what type of flags you'd go for? |
||||
|
JayHoe 2 September 2002 |
Tony,
the drainage is for rainwater from a flat roof extension and pitch roofed garage. Our soil is very poor draining and so a soakaway just wouldn't work. Sounds like slabs are the way to go. I am still unsure on the bedding though. Do I just level off the grit, add cement powder, rake it in (all dry) and then plonk the slabs on top? Do I add water at any stage?? How much cement per square meter? I have been looking at Marshalls slabs (and obviously the blocks before hand!). Any recommendations? I do not want to lay huge slabs as I had experience of this in my green house and moving them around nearly killed me. I quite fancy using rectangular slabs laid in stretcher bond. Sorry for all these questions Tony, but I am a great believer in doing things right the first time! Much appreciated. |
||||
|
Tony McCormack 2 September 2002 |
Is there no mains drainage at all that could be used for surface water? If you're doing all this work, you might as well get the drainage solved once and for all.
Marshalls flags - depends on the look you're after. I really like the Perfecta flags for patios, but you might be after, say, a riven type or summat more decorative. Have you seen one you fancy? With the bedding, there's usually sufficient moisture in the sand to initiate setting of the cement, so it's a simple matter of adding the cement and stirring it in. You can mix it all in one go and then spread it out as required, in which case you should mix 1 x 25kg bag of cement with 6 x 40kg bags of grit sand, or, if you're butying in bulk agg-bags, then it's 4 x 25kg bags of cement to each agg bag of grit sand. If you're mixing in cement after spreading the sand, then, assuming the sand is around 50mm deep, each 25kg bag of cement should cover 3 to 4 m². You only need to dampen it down if the sand is very dry, and then, the best way is to spray it lightly with a hose. You don't want it sopping wet, just damp enough so that it clumps together when squeezed in your fist. |
||||
|
JayHoe 3 September 2002 |
Hi Tony,
We are going for flags but haven't decided which ones yet. As for drainage, I was still going to add a linear drain and connect to my dispersal system. I have been looking at your dry bedding mix page and you mention sand/gravel and ballast. Am I right in thinking that I can just use a sandy ballast, spread it and mix in cement, rake it out and lay? Do the flags actually bond to the bed, or is it just that the bed 'firms up' so there can be no movement? Digging out is proceeding, the first area was dug down deep enough for blocks before I hit the drainage(!) so I will have to back fill with hardcore. The next are is stripped of turf, the remainder will be tonight. We are asking a few people round on saturday to barrow dirt from the site to the skip. To break the (very hard) ground, I have been using my rotavator. This breaks up a 2-3" layer which is easily shovelled up, leaving a compacted layer beneath. Neat eh? I noted on some of the Marshalls slabs in the catalogue it said they were to be mortar bedded. Is the 'firmed up' ballast/sand cement bed ok? or would they require a wet mortar? (I must admit I much prefer the idea of not using wet). |
||||
|
Tony McCormack 3 September 2002 |
For the bedding, you can use grit sand and cement, or all-in ballast with cement, or grit sand, gravel and cement; whatever is readily available in your area. The idea of adding the cement is to firm up the bedding to prevent any settlement or erosion by groundwater, ants, etc., so there's no need for the flags to bond to the bedding. In fact, it's better if the flags don't bond to the bedding, as that makes any remedial work or replacement that much more difficult.
If the rotavator is breaking up the ground, then it doesn't qualify as 'very hard' in my book. Very Hard Ground needs a mattock or a crowbar, and that's assuming there's no JCB available! Marshalls' DIY advice is basically wrong. Mortar bedding is more time-consuming, it's messier, it uses more cement than is actually required, it makes adjacent flags 'float' and shift from finished level when laying, it's a nightmare if any units need remedial work.....but, it makes the job seem easy in the catalogues and brochures. Cement mortar bedding is not an accepted practice for site works, so I fail to see why it's ok for patios. Use a coarse sand bed or a semi-dry 10:1 grit sand cement bed - leave Mortar bedding for the Blue Peter School of Flagging! |
||||
|
JayHoe 4 September 2002 |
Tony,
great, I will use an all in ballast then as I would assume that it would be inherently more stable than grit.
I understand what you are saying about the slabs not bonding to the bedding. (and I am glad I won't have to mix up all the mortar!!! OK, so the ground isn't JCB hard, but it is VERY compacted. Last night I used the rotavator on the last section of grass (I would hesitate to call it a lawn) and it dug in about 1/2", just enough to remove the grass. When I go over it again, it will bite deeper, but it is a large rotovator and it is very hard work to get it to dig. By comparison, I recently dug over my veg plot with it that has lain undisturbed for a year and it bites down 6" with ease. So comparatively this area is hard. I did take some photos of the area before I started, so I will take some of how it is after we have finished on Saturday and will send them in. Thanks again for your help and advice, it is much appreciated, and I will certainly drink a toast to you on completion. |
||||
|
|
|||||
|
|
Off colour paving blocks - Leo - 29 August 2002 | ||||
| A contractor completed a paving block job for my drive. Paving block colour is brindle. As they laid them some of the blocks appeared to me to be off colour. That is reds turning greyish. I asked them about this and they said it was just salt deposits and would wash off when raining. We had a couple of rainy days, but off colouring is still there. What could be the reason for this ? Could it be corrected ? Any help would be appreciated. | |||||
|
|
Tony McCormack - 29 August 2002 | ||||
|
Is this discolouration like a milky deposit on the surface?
There are two common 'deposits' on new concrete block paving that can make the colour look wishy-washy.
The first is soap oil residue. This is not seen all that often, but is more prevalent during the summer. Soap Oil is the vernacular for Mould Release Agent and it's used to line the moulds used in the manufacture of the blocks to prevent the concrete 'sticking', so that, when they are pressed out from the moulds, the blocks are perfect and intact. Soap Oil is water soluble and will disappear after a few showers of rain, that's why I say it's more commonly seen during the summer, when we can go for, oh..., hours without any rain! The second common agent of discolouration is efflorescence and this is a natural phenomenon with all high-quality concrete products. It comes about because of the ongoing reaction between the lime in the cement, the rest of the aggregates, atmospheric humidity and the air itself. It can look like a white power or dust on the surface of the paving, often more pronounced at the edges. Again, it's a temporary non-critical phenomenon and should disappear in under 6 months.
If it's like that shown above, it will eventually vanish. If it's not, then you need to speak with the contractor and get them to write into their guarantee that, if this phenomenon is still visible in, say, next April, then they'll replace the affected blocks as part of their defects liability. |
|||||
|
Tony Green 14 October 2002 |
I have recently seen a contract with severe dark staining over 70% of Pavers ,could this be Oil soap residue as mentioned. | ||||
|
Tony McCormack 14 October 2002 |
Dark staining? That's unlikely to be a soap oil, which is often a white or milky looking deposit, but not as limey/powedery as efflorescence,. Do you have a picture or the name of the block type, Tony? | ||||
|
|
|||||
|
|
Paver sealers - als - 6 September 2002 | ||||
|
Hi Tony
What in your opinion, is the best sealer for driveway concrete pavers. there seems to be a few different types and various prices. | |||||
|
|
Tony McCormack - 6 September 2002 | ||||
|
The one sealant for concrete block paving that I have no hesitation in recommending, and have used on work in the past, is Resiblock 22. It ain't the cheapest, but it's probably the most exhaustively tested and has a seemingly indefinite lifespan.
Cheaper, acrylic sealants often need re-doing every 12-18 months, but the latest research from Resiblock is indicating a lifespan of at least a decade, and possibly twice that. So, although it might be as much as twice the purchase cost of the cheapest DIY Shed sealant, when costed out over a reasonable term, it's actually much more cost effective, and undoubtedly saves on labour in the long run.
I should state that I have no connection with Resiblock. They don't pay me to say this, nor do I get any freebies - it's just my opinion, formed over years of experience and reading. |
|||||
|
als 6 September 2002 |
Do you have any more info or links to resiblock? | ||||
|
Mike 6 September 2002 |
Try the Resiblock website - Mike - |
||||
|
|
|||||
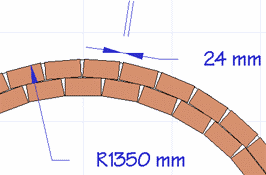
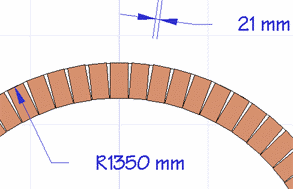
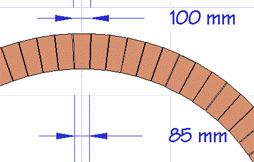


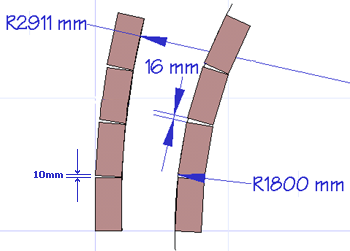


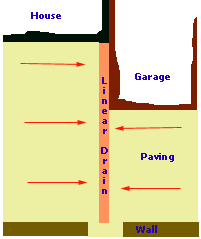
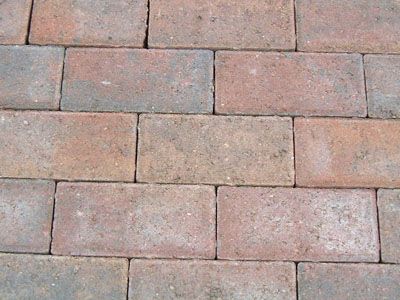
|
|
|
|
Brew Cabin Archive navigation dhtml courtesy of Milonic |