
|
 |
|
|
| Block Paving - Page 04 |
|
|

|
|
|
|
|
|
|
|
|
|

|
Paving around a pool - Shawn - 10 June 2002 | ||||
|
I have actually 2 questions, I'm thinking on paving my pool deck (over the old concrete) I actually have a couple of questions if someone knows...
How would you handle a screened pool enclosure? pave up to the aluminum rail screwed into the deck? How would you allow for drainage? current concrete deck slopes back toward the house where there is a drain channel...would you leave this open? it would obviously sit much lower as it is, should it be raised? or one of those drainage channel pavers used? I'm very confused with how pavers drain....my deck has some cracking and i'm going to morter seal it before pavers but since the pool area is elevated with a 6 foot retaining wall at one end i want to make sure water will drain as the wall isn't designed for moisture under the deck (although i am leaving the old concrete deck)
Thanks for any helpful information...
|
|||||
|
|
Tony McCormack - 11 June 2002 | ||||
|
Hi Shawn,
I'm not overly familiar with screened pool enclosures - we don't have much call for them here in soggy Warrington (England), unlike you lucky sods in Florida-land, but I'll see if I can help... Given that this is likely to be a very wet environment, I reckon you need to opt for a rigid construction, which means laying the pavers on a bed of mortar over the top of the existing concrete base. In theory, you could use a flexible construction, but if you did, I'd strongly recommend it be sealed to prevent saturation of the bedding layer. The aluminium rail - I assume this is some sort of guard rail attached to the existing concrete surface via anchor bolts. There are two ways of dealing with this. If the height of the rail is critical (ie, it must be a certain height above floor level) then it could be detached, set aside while the area is re-paved, and then fastened to the new surfacing once the bedding/jointing has cured. Alternatively, you could pave around the downstands and fill in any gaps with the mortar used for jointing. Drainage - water will run over the surface of the paving, just as it runs over the concrete deck at the moment, so, if you match the current falls, any surface water will drain as it did before, into the open channel you mention. Given that the drop to the channel will be increased by the thickness of the paver plus the bedding, then it may be worth elevating the existing channel, or installing a new one at a higher level, but, without knowing the exact layout or the type of pavers you propose using, it's not possible to state which would be the best option. Are you diy-ing this or bringing in a contractor? |
|||||
|
Shawn 11 June 2002 |
Tony, wouldn't you know it, I completely missed seeing the UK in the boards description, forgive me if I intruded.
I will probably contract this out, theres alot of curves and angles around the pool area, it will be alot of cutting....though who knows around here in florida finding contractors is pretty tough. Yeah the rain worries me a little, though the sceen does break up a lot of the direct hard rain. From what i've read most contractors here use sand, then mortoring the edges. I agree i think i'd have to seal them. The aluminum rail I was speaking of, Basically these enclosures have a horizontal bar anchored with bolts into the concrete which runs around the entire deck. Then the vertical bars go up from the top of those every X number of feet, then of course the horizontal for the roof etc. But I think you answered my ? and thats to pave right up to that base horizontal frame.
Thanks for answering my questions it helped a lot!
|
||||
|
Tony McCormack 11 June 2002 |
I don't think you've intruded, Shawn - I just thought it was important you understood that my experience of sunny weather, pools outside the back door and 'screen enclosures' is somewhat limited.
When it comes to finding a local contractor, try the ICPI site - they're the trade body for what you call Paver Installers in the States and should be able to put you on to someone in Florida-land. But, if you get really stuck, I know a really good paving expert who could be flown out to Florida from Warrington quite cheaply and is happy working for beer and bacon butties (Oops! Sandwiches, to you)
|
||||
|
Shawn 12 June 2002 |
haha tony funny you should mention that, I was running a new electrical wire in the attic this weekend this place is about 15 years old, I found 2 empty six packs, a couple of budwiser bottles and thats just 1 wall, seems most florida contractors work for beer too!
Well if you head this way I have to warn you florida is generally considered a roque state by most in the US, we have prehistoric bugs the size of small cars (thus screen enclosures aka last line of defense), small pets get eaten by gators, we love to scare tourist with shark stories Tremendous site btw, it was the only one I could find to ask questions, i've been looking for paver info for a month! I did have another question, have you seen larger sand set concrete pavers? they're 12x12, I'm wondering if they really hold as well as the small pavers, i walked on some and they didn't seem as stable and interlocking as the traditional small pavers, seems the pavers get they're longevity and strength from the interlocking, i dont see how a 12x 12 can offer this without being mortered. It looks like they bond some type of decorative surface on top as the color, etc isn't usually all the way through i'm also curious how well that holds up in the long term too. |
||||
|
Tony McCormack 12 June 2002 |
12x12? I assume you mean 12 inches - we're metric in Europe, so we use 300x300mm.
Anyway, 300x300 is the threshold of what we term as paving blocks and what is known as 'small element paving'. These start at 300x300, then 400x400 (what's that: about 16", I think) and then 450x450 (18"x18" ). This small element paving is only really taking off in the UK/RoI over the last 10 years or so, but we predict it will become more and more popular, especially for civil and commercial schemes, as it offers all the benefits of an elemental paving at a cost below that of decorative block paving, and offers fast installation, too. Properly laid, there's no problem of stability or interlock with small element paving. Some of the leading research into the subject has been carried out under the auspices of Prof. John Knapton and you can read some of his findings on the SEPT site. |
||||
|
Shawn 14 June 2002 |
Tony thanks for answering my questions, you sound like the expert to me! I have one more if you dont mind...
This one is complicated but I'll try to make it short. I'm on a slope, as the slope goes back (down) away from the house concrete blocks were built up in a square. So basically at the end is a 5 foot wall, the pool deck is laid on top of that and the pool beam, in the middle of the raised deck (square) is the pool. Over the coarse of 13 years from what i can gather (don't know the history) the backfill dirt settled. The existing concrete deck was shabbily constructed, no rebar, fibercloth, and in some areas is only 2 inches thick. Also a long time ago the previous owners put an old heavy hottub on the back end where its 2 inches. Big crack. There is other cracking too from the air beneath the deck and the loose fill....some pretty bad. Its been patched over the years but its bad enough to warrent replacement.
So heres possible solutions and thier problems:
Another idea i thought of was cutting the old deck out, then using pavers directly on the backfill (with base of course). Problem here is the back wall wasn't designed for moisture to permeate the fill creating more weight. So for this idea to work, the pavers would have to be pretty water tight, though i could probably have some weep holes put in the wall, but considering its age as dry as possible is preferable. I wondered if there is some watertight membrane I could put below the pavers..I would think rooftop patios, parking garages, etc use something like this? I'm not too sure of this idea but it was one i was considering, any clue on this? *whew* its complicated because a) its a raised deck, b) involves a pool in the center c) has a retaining wall under the back deck ....nothing you'll find info on in a paver brochure |
||||
|
Tony McCormack 17 June 2002 |
This is a tough one, Shawn. My favourite solution would be to rip out and start again, but this, I appreciate, would be terribly expensive.
If you follow your preferred option of replacing the cracked/dropping concrete with pavers, then the 'membrane' you need is known in the UK as a Drainage Composite - you can read more about them on the Fin Drain page of this site, but I've no idea where you would find them in the US. These composites collect any water that finds its way beneath the paving and channel it to a convenient disposal point. However, given the scale of the work, I think it may well be worth asking a local contractor to inspect the site and give you advice on the best way to proceed. Builkding methods and materiuals are vastly different in the US and what seems like a good idea to me may not be feasible, or even legal, in your country. |
||||
|
Shawn 18 June 2002 |
haha yeah that was my first option too, tear out concrete and replace... Got stood up on 2 appointments again today, 1 concrete, 1 pool...I really think this is just a symptom of florida. Its been a case of 1 doesn't do the other, and the reliable ones dont seem to touch concrete. Thus investigation of various decking materials as pavers, composite wood decking people i know i can get over, theres some pluses and minues given the setup for each so I'll just have to look at the various options and see what i come up with. Thanks for the paver info, it was a great help. | ||||
|
|
|||||
|
|
Sealing blocks at edge of wall - Philip Durkin - 10 June 2002 | ||||
|
Tony, superb web site, just what i needed.
what do you recommend for sealing the silca sand at the edge of a wall as the sand keeps falling out, the top surface of the block paver is the driveway and the side of the paver is the top bed of a small wall, as you obviously know your stuff could you recommend the best solution for the problem. regards phil durkin |
|||||
|
|
Tony McCormack - 11 June 2002 | ||||
|
Hi Philip,
there's 2 options - either use a decent sealant over the entire driveway, which will seal in all the sand, or take out a second mortgage and buy a pack of Geofix and use that to seal the block joints that are right on the edge. Geofix is a polymeric sand, ie, it's coated with a special goo that sets when exposed to the air. We find it's never quite as good as the manufacturers (recently bought out by FEB) would have you believe, but it should be ok for this sort of work.
It's 12 months or more since I last had to buy any, but I reckon it's around 40 quid for a 10Kg pack. However, a decent sealant will cost you maybe 1.25 quid per m², but you do get the added benefit of protecting all your paving, not just the jointing sand, so you have to weight-up what suits you best. |
|||||
|
Philip Durkin 12 June 2002 |
Thanks for a speedy reply, if my bank manager spits is dummy out and i opt for the cheaper sealant, will it put a glaze over the blocks (plaspave 50 in red with charcoal border) i would prefer for the bricks to look natural in their current guise?? I am not sure if you would suggest a manufacture for the sealant, the only one i have come across in my admittedly narrow search is from Marshall's, if used would this glaze the blocks
Kind Regards Phil Durkin |
||||
|
Tony McCormack 12 June 2002 |
Resiblock 22 has minimal effect on the character of the paving, if used as a single coat. A second coat gives a semi-gloss finish.
If you contact the Resiblock site and tell them I sent you, they'll send you a 250ml sample that you can test out in a discreet corner of your blockwork to ensure it doesn't 'varnish' your paving. In my opinion Resiblock 22 is probably the best block paving sealant on the market, anywhere, and it's not often I unreservedly endorse a product. |
||||
|
Caroline Baily 09 September 2002 |
I have used Geofix, and found that it has worked well. It was easy to apply and set quickly. It does however, need cleaning to avoid moss and dirt from discolouring it. I guess this would probably be the case for any jointing material. My back garden patio has been down for some two years now though, and still looks good. I have sealed it with Aquaseal block paving sealer now, and this means that it needs less cleaning!! Great.
I have now decided to use Geofix sand on my drive, and was able to purchase a 20Kg box/bag, for Ż25+VAT!!! I reckon this will be enough to do the whole area, and save my back!! |
||||
|
Tony McCormack 10 September 2002 |
Is this a newly paved driveway? Block Paving? If so, it must be quite small or you've vastly over-estimated just how far 20Kg of GeoFix will go!
Have you checked the coverage rate? Personally, I'd be very reluctant to use any polymeric sand on a block paved driveway unless there were extenuating circumstances, such as a lot of scour or a steep slope. Why do you think it would be an advantage on your driveway? I'd be interested to know. |
||||
|
Caroline Baily 10 September 2002 |
Sorry, did not mention, that my drive is slabbed, not block paved.
I'm going to use it for ease of use - but you were correct Tony, about the coverage. I have just contacted the manufacturer and given them the paving dimensions and joint size and they have told me that I would need 3 20kg bags. It's only a small drive! They even offered to send someone out to show me how to use the product and ensure that it was the right product for the job!! |
||||
|
Tony McCormack 10 September 2002 |
I thought there was summat amiss!
Get the rep out, and see what s/he has to say - you might be able to blag a free sample and get a trade discount. And ask them what happened to all the bumpf they promised to send to me last year when they were on the 'phone for 90 minutes extolling the manifold virtues of GeoFix! |
||||
|
|
|||||
|
|
Block Paving for a Lawn Edge - Madunphy - 19 June 2002 | ||||
|
I'm doing up my garden and will be edging my lawn with block paving which is coming up from part of my drive way. I will be laying the paving short edge against the lawn.
I'd probably put in a bit of a subbase just incase, but what should I lay the blocks on, the same sand that they are currently lying on in the drive way or should they be laid on a concrete mix. I know that I should edge the other end of the blocks with concrete to stop movement but I'm unsure what I should lay the blocks on. Thanks for any advice Mike T |
|||||
|
|
Tony McCormack - 19 June 2002 | ||||
|
As these blocks are forming the edge to your driveway, as well as abutting the lawn, they really ought to be laid on a cement-bound bed and haunched with same. A C20 equivalent concrete is adequate for this task.
If you really want to avoid using concrete, then one of the nailed-in edging restraints would also be suitable, provided nothing heavier than a car will be used on the driveway. HTH |
|||||
|
Madunphy 19 June 2002 |
Sorry not clear with my topic
These blocks are being taken up and used to edge the lawn which wont be butting up to the driveway. Mike |
||||
|
Tony McCormack 19 June 2002 |
Aah - I'm with you now. They're to be a Mowing strip!
I'd lay them on a 10:1 sand:cement bed and just haunch them enough to keep the line in place, Mike. |
||||
|
Madunphy 08 July 2002 |
Being the total novice, when you say sand, what type of sand. Can I use the sort if gritty sand that the blocks are current sitting on in the driveway?
Thanks Mike |
||||
|
Tony McCormack 08 July 2002 |
Yes, it's much better than building sand, which is only really suitable for making mortar. | ||||
|
Madunphy 26 July 2002 |
Back again,
I've just taken up the old lawn and I'm getting the ground prepared etc. Should I put the mowing strip in after reseeding the lawn? Or can I get the strip down first and then do the lawn in september? Also the strip will be circular in places. How best to lay the block in a curved pattern?? Get a template made which can be used to butt the blocks up too? I'd be afraid I wont get it right by sight alone.. Thanks Mick PS will the subbase for this one block strip need to be compacted/vibrated? |
||||
|
Tony McCormack 26 July 2002 |
You can put in the mowing strip now and leave the seeding until September.
Cutting for the curves won't be as complicated as you imagine. What sort of radius do you envisage, and what type of block will you be using? If any cutting is needed, I will be able to tell you how much to cut. I'm not sure what you mean by the sub-base for a one block strip - if this is just a mowing strip, then it's laid on the 10:1 concrete bedding; there is no sub-base required. |
||||
|
Madunphy 28 July 2002 |
Hi Tony,
Its my dad, thinking we need a sub-base. He's from the construction industry and thinks everything must be earthquake proof!!. For 10:1 mix, I'll be using the grit sand that the blocks are currently sitting on in the driveway. I assume this mixture is a dry mix? What sort of depth would the mix be for the strip? The blocks are 200mm by 100mm by 50mm?. Not sure on the depth measurement but I guess you know the ones I mean. The outline shape of the lawn is firstly aprox. 2/3 of a 4m radius circle which then joins to a man made curve that you could compare with a 1/4 of an elliptical curve. I'm just concerned that when we start to lay the blocks we wont get the curves right? |
||||
|
Tony McCormack 28 July 2002 |
Well, tell your Da there's absolutely no need for a sub-base under a mowing strip!
For the 10:1 mix, use a grit sand - see the Concrete page for fuller info. You can substitute 5 parts gravel for 5 parts grit sand, if you prefer. 10:1 is usually fine, as it's only to hold the blocks in places, not to contain a trafficked pavement or anything like that, but, if you wanted, you can up the strength to 6:1. For a 4m radius, you shouldn't need to trim the blocks at all.....
...as there is only a 5mm gap between adjacent blocks. If you can mark the origin of the 4m arc, it's much easier to accurately lay out the arc. See the example on the Steps for Block Paving page.
Good luck! |
||||
|
Madunphy 29 July 2002 |
Tony,
Is it possible to post images to this site? I couldn't find anything on the site to say otherwise? I could show you the lawn outline. Thanks for the reply. I intended to lay the blocks the other way as I think the the 100mm width could be too narrow. Am I mad?? I have enough bricks. Would this make it harder to keep the curve "true"? Thanks Mick |
||||
|
Tony McCormack 29 July 2002 |
Yep - you can post images if you have them uploaded to your own server or webspace. See the [help] link for fuller info. If you don't have webspace, send the images to me and I'll upload them on your behalf.
If you use the blocks 200mm wide, it still wont make much difference on a 4m radius. You will find it even easier to create a sweet curve than it would be laying the blocks 100mm wide, as each unit is narrower relative to the arc. |
||||
|
|
|||||
|
|
Thickness of bedding for block paving - B Cunningham - 21 June 2002 | ||||
|
I am having my drive re-laid with block paving. The contractor specified 50mm of sharp sand as the bedding layer but I have checked the sand thickness adjacent to the laid blocks of the part finished work and find that it is up to 100mm thick.ĀI phoned the contractor who said that the sub base is very solid, which I believe is true (old sub surface of gravel drive + 50mm hardcore + approx 50-75mm lean mix concrete all vibratory rolled).
And that 75-100mm of sharp sand, properly compacted, will never move. Do you agree with his reassurance? He should be on site tomorrow, 22/6/02 and I will discuss it with him then. |
|||||
|
|
Tony McCormack - 21 June 2002 | ||||
|
No! That is way too much sand and it will settle, regardless of your contractors' assurances.
BS 7533-3:1997 stipulates a bedding layer of 35-50mm, and we know from experience that anything over 60mm is terribly prone to channellisation (rutting). Your contractor should make up the levels with lean-mix or DTp1, not with extra sand. |
|||||
|
|
|||||
|
|
Sealing Clay Pavers - Mrs M - 21 June 2002 | ||||
|
I have had my drive block paved using clay pavers and the contractor has come along with a sealer called Resiblock Superior, I checked the label and instructions (left in the garage) on this product clearly says not suitable for clay pavers, york stone etc. Would this product be ok or shall I complain to him and get him to get something suitable.
Have you any suggestions as to what he might use |
|||||
|
|
Tony McCormack - 21 June 2002 | ||||
|
Resiblock 22 is the sealant for clay pavers, if I recall correctly, he says while reaching for his file on sealants....bear with me...yep - Resiblock 22 is suitable for Clays.
You can try their website for further info, but it's essential that the 'Superior' is not applied as it will 'upset' the "22" when that comes to be applied. There's no-one in the Resiblock Office now until Monday, but, if you want, I can give you their 'phone number and they will tell you where your nearest stockist is located. |
|||||
|
Mrs M 21 June 2002 |
No thank you I think I know of one in my area.
Thanks for your information |
||||
|
|
|||||
|
|
Marking on my Blocks - A Fuller - 22 June 2002 | ||||
|
My rear drive has been laid for about a month now, but there is a sandy coloured water mark all over my blocks (Driveline 50 - and its been there since laid), that dosn't disappear.
It almost looks like cats paws, as if cats trod in sandy dust and walked all over them. My guess is that as the contractor didn't use a rubber cover on the vibrator it has gound up the sand, could this be. The contractor is returning on Monday, and talks about 'acid'. Have you come across this sort of problem? |
|||||
|
|
Tony McCormack - 22 June 2002 | ||||
|
Are you sure it's not efflorescence?
Acid washing only works on cement stains, such as those cuased by spilt mortar or concrete. It won't work on efflorescence and it won't work on crushed sand. Also, you need to be very careful with acid washing as it can alter the colouring of the paving. The use of a rubber mat on the plate of a vibrating plate compactor is not essential and many contractors prefer not to use one for residential driveway/patio work with concrete pavers. The are a good idea with clay pavers, or with concrete pavers that have no spacer lugs, but, for the vast majority of British and Irish concrete paving blocks, they are a waste of time and money. |
|||||
|
A Fuller 23 June 2002 |
I'm not really sure what efflorescence is on block paving. I'd guess that it is the same as the white stuff (saltpeter?) that comes through on new brick work.
What I can say is..
|
||||
|
Tony McCormack 23 June 2002 |
Yep, effloresence is the 'salt' that weeps out from high quality concrete products - it's nowt to worry about and it diappears after a summer of British rain.
These marks could be crushed sand, but, if they are, they should be able to be shifted by rubbing with a wire brush. I'd try that before resorting to an acid wash. And finally, yes: the jointing sand is a specially selected sand of specific grain sizes. The full grading envelope is given on the Pointing and Jointing page. Your contractor should be using sand that comes in bags marked as "Jointing Sand" or "Kiln Dried sand for block paving" and not just using any old sand that's lying around. |
||||
|
|
|||||
|
|
Maintaining joint width - Darren M - 24 June 2002 | ||||
| Sorry if this is a silly question ! I am embarking on a diy block paving driveway project and I am wondering how you achieve the regular gaps between the blocks when laying? Matchsticks like kitchen tiles? Or are they tapered slightly in manufacture to allow the sand to settle in the gap? | |||||
|
|
Tony McCormack - 25 June 2002 | ||||
|
Most British and Irish blocks, both clay and concrete, have spacer lugs. Some continental European concrete blocks are slightly tapered, but then, they don't always comply with the BS for block pavers.
So, put away your matchbox. |
|||||
|
Darren M 26 June 2002 |
Thanks for prompt reply to both my posts Tony.
Next question - the width of the drive is to be nominally 3.5 metres. When laying the edging, I obviously want the two sides to be apart an "exact" amount so that I don't have to fill small gaps with bits of block. How can I account for the spacer lugs to determine edging separation - is this likely to be the same for all GB manufacturers or should I be contacting the block manufacturers. Hope this makes sense. |
||||
|
Tony McCormack 27 June 2002 |
Bloody hell! You like making work for yerself, Darren!
Just lay the edges where you want them, and then cut the body blocks to fit. If you want an exact dimension, it can be calculated if you know the block you plan to use and the pattern, but I can more or less guarantee that, even if you set it out with a laser level, an Earth Station and GPS, it would still end up being 5-10mm out one way or t'other!
That's the wonder of block paving. |
||||
|
Darren M 27 June 2002 |
I like it when major problems ( in my head ) become minor ones . Cheers.
Gonna scan some photos in and let you see how me "zig-zag" paving comes out
By the way, had 2 interesting quotes to excavate and remove the existing concrete/soil (approx 14m x 3.5 m with a few nadgery bits) - Ż325 (seemed reasonable) and Ż1600!! Do you think he didn't want to do the job? |
||||
|
Tony McCormack 27 June 2002 |
I designed a driveway earlier this spring and the client put it out to tender amongst some local contractors around their town. The prices they were quoted ranged from 5,000 to...get this...29,000 quid, for the same job!
And I'd done all the branework for them!! That's why I say always get at least 3 prices for any residential building work. |
||||
|
Max Ali 28 June 2002 |
Hi Tony,
Superb site. I'm a computer bod and I'd be proud of a site like this. Referring to your earlier reply about bids coming back from Ż5k-Ż29k - How did your client decide which one to pick? I always think that the cheapest one will be from a cowboy but I'm sure this isn't always the case. Or do you have to trust to instinct? |
||||
|
Tony McCormack 28 June 2002 |
We knew the approximate cost of the work, and so eliminated the silly bids, leaving those that were within 10% of the cost I'd estimated. After a bit of further negotiation, there was one obvious 'candidate' who knew his trade and was given the job.
Last I heard, it was finished 2 days ahead of schedule looking, and I quote, "***king brilliant" |
||||
|
Darren M 02 August 2002 |
Can't believe its taken this long to get the Groundwork/excavation sorted, but the man with the digger turns up tomorrow at 8am. And so it begins ....................
This may be my last "stress-free" posting for a while. |
||||
|
Tony McCormack 3 August 2002 |
At least it's stopped raining!
Keep us informed on your progress (or lack of it!) |
||||
|
Sterl 3 August 2002 |
I stopped at road gang who where laying a pipeline.
Asked if the would dig out my spoil with their mini digger. They charged me Ż60 to dig out 18 yards by 6 yards. Then he got his mate to cart it off for Ż50. I got a breaker to break up the old tarmac drive and he picked that up for another Ż50. So I got the whole dig out done for Ż170 including hire of the breaker. It would have cost me Ż100 to hire a digger and at least 3 skips. so i reckon i've saved Ż250. You just have to be cheeky and ask |
||||
|
Tony McCormack |
It's not a matter of being cheeky - many roadworks gangs are usually quite happy to earn a few extra Beer Vouchers |
||||
|
Darren M 5 August 2002 |
I've decided on 915 x 150 x 50 flat top edging. The majority of them are being laid is straight, and therefore "easy" to lay the edging. One section however will be curved. It is not a constant radius curve. Is there any special technique/tool for cutting these edging blocks to give the curve a fluid appearance rather than loking staggered ?
Thanks for continued inspiration. |
||||
|
Tony McCormack 6 August 2002 |
The 'special technique' is to snap them in half, making them (roughly) 450mm long and that gives you a sweeter curve than a 900mm (ok - a 915mm) unit.
You could do the 'Friday afternoon' cut, which involves smacking the edging in the middle with a lump hammer, giving a wonderfully organic-looking raggedy edge to the cut on the top face, or, you could go for the 'professional' cut, which means using a power saw or nangle grinder to nick the top face to a depth of around 20mm, and then smacking the edging in the middle with a lump hammer - this gives a nice, neat edge to the cut.
Experience - it cannot be bought! |
||||
|
|
|||||
|
|
Laying my drive - Darren M - 24 August 2002 | ||||
|
Thanks for edging advice - all in and sweet.
Next problem:
Any ideas?
|
|||||
|
|
Tony McCormack 26 June 2002 |
||||
|
I'd go for all blocks for the following reasons...
1 - getting a contractor willing to supply and lay 4m of bitmac is damn near impossible, even if it's 5m wide giving a total area of 20m². 2 - Cost - The set-up costs for bitmac are considerable - bringing in a roller, the insulated delivert wagon, the tarps, the firebox, the special laying gang, all the tools etc, costs the same whether you're laying 20m² or 200m², and so bitmac becomes very expensive in small quantities. 3 - Block paving can be sealed to prevent erosions of jointing sand and bedding by water, even from inundation. And although quality sealants aren't particularly cheap (reckon on 2-3 quid per m²) it's still a lot cheaper than having a small patch of bitmac laid. 4 - Aesthetics - That 4m bitmac strip is always going to look like a council-installed crossing apron over a service strip, even though it's your own property. If you're really, really worried about the possibility of inundation, then you could consider a rigid form of block paving, rather than the usual flexible construction. Have you had any costings provided? It's worth asking a reputable local contractor to give you prices for all blocks and the blocks/bitmac split, just so you can see the effect of having a small patch of bitmac laid to a residential driveway. |
|||||
|
Darren M 24 August 2002 |
Thanks for prompt reply.
I was always going to do the blocks myself so haven't had any quotes for that. Groundwork chap who did excavation was going to do the tarmac but we never got round to a price ........ Started laying Type 1 today. Lets hope Bank Holiday weather doesn't do its usual. |
||||
|
Tony McCormack 24 August 2002 |
It's been persisting down most of the day here in The Peoples' Republic of South Lancashire - typical, as I was planning to spend the day in the garden!
Keep us informed about your progress - or lack of it! |
||||
|
Darren M 2 September 2002 |
It rained !
However, the subbase is all down and I'm just finishing off the levels having gone over with the wacker and not expecting it to compact soooo much.
|
||||
|
Tony McCormack 2 September 2002 |
I wouldn't let the delivery wagon onto the sub-base, just in case it causes rutting. If the sub-base is over really firm ground, then it might not be a problem, but it's always better to be safe than sorry.
Try and dump the sand as close as poss to the working area. It's ok to dump it at the edge of the proposed driveway, and then feed from it as you lay your edge courses and then establish your screeded bedding. Any excess will have to be moved off the working area, of course, but it's easier to barrow, say, 1T of excess off the working area, than barrow 7.5T into the working area. Alternatively, you could get the wagon driver to split the delivery, dropping 4T or so on the working area and the remainder somewhere out of the way. |
||||
|
Darren M 3 September 2002 |
Makes sense - ta.
Next problem - when I come to screed off the sharp sand, I am ok with the majority of the drive as it is rectangular. However, at the bottom part I have incorporated a "reversing arc" so that we can get vehicles in and out of drive easily from the narrow access road that the drive leads onto.
The drive also has a slope on it in this section from drive to access road. Two sides of drive are same level (no fall side to side). Hope this makes sense. |
||||
|
Tony McCormack 3 September 2002 |
You need a trammel bar or a screed rail, and establish it from the mid point of the arc to the corner in the top right of your diagram. You can then screed from the soldier edgings to the trammel bar, and just tittivate the bits your screeder board doesn't reach. | ||||
|
Darren M 8 September 2002 |
Hello again.
The blocks are here and once the rain stopped we layed a 2m run before the rain started again. And I've got up and it's raining again. AArrghh! I have seen in other posts that it is ok to lay in mild wet weather but I am worried that heavy rain may affect the bedding layer underneath the blocks that I have already laid. Should I be taking precautions to protect them or am I being paranoid? |
||||
|
Tony McCormack 8 September 2002 |
You're being a teeny bit paranoid.
Once the blocks are laid, they protect the bedding from the worst of any rain, but, if there was a real, torrential downpour, that might cause some problems if it is allowed to saturate the bedding and the sub-base isn't capable of draining it quickly enough. You should always allow the bedding 24 hours to drain itself before final compaction of the blocks, otherwise the bed can become 'fluid' and pump its way up through the joints, and the jointing sand itself is a bugger to get settled into the joints.
The best protection you can give your paving is to get the ground covered with blocks as quickly as possible, get the cutting-in done, and get it sanded and compacted ASAP. Once all that's done, it can look after itself. |
||||
|
Darren M 19 September 2002 |
I am slowly getting there with the cutting in but its difficult getting in a couple of hours after work at the moment. Neighbours must think I'm mad outside with a blockcutter and floodlight! However , I upset meself tonight as I took up and relaid a section in the middle of the drive run where the screed had been particularly affected by rain before I could get it cut in. As I relaid it, gaps appeared in the pattern. These are only upto about 3mm but I was really peed off as they weren't there before! This made me spit out me dummy for a bit as I thought I'd have to re-lay the whole drive to take up this bit of slack but me wife said "email that bloke" for a bit of reassurance. So, will the jointing sand take up this slack ok ? Or shall I start pulling it all up? |
||||
|
Tony McCormack 19 September 2002 |
Once you start taking up and re-laying, you can get some 'pattern drift' and end up with wider-than-normal joints in some parts, and tighter-than-normal joints elsewhere.
Don't get stressed - re-lay the blocks and then use the blade of a trowel to adjust the spacing once you've got them all back in place, trying to even out the joint width. As long as you keep the joints to 6mm or less, you'll be ok, as the jointing sand will take up any slack and hold everything tight. These are concrete blocks, aren't they? |
||||
|
Darren M 19 September 2002 |
Thank you for your prompt reply again Tony - much appreciated and yes , they are concrete blocks - Brett Omega 60mm. | ||||
|
Tony McCormack 19 September 2002 |
Nice blocks! I only asked because pattern drift is more common with clay pavers than with concretes.
Remember to send me a pic when you're done! |
||||
|
Darren M 28 September 2002 |
It's done ! Did you hear the sigh of relief? Car is now parked on drive, rather than annoying neighbours, although I can't put van on yet as it has a tendency to leak stuff now and then and I haven't sealed the drive. I want to go for Resiblock, bearing in mind potential submergence problem mentioned earlier. However, there is some effloresence on blocks and obviously jointing sand will settle over next few weeks. When should I be looking to apply the Resiblock? I have taken a series of photos for you but film is not yet finished off. |
||||
|
Tony McCormack 29 September 2002 |
Congratulations! Can't wait to see the piccies, Darren, and add you to the Hall of Fame! Darren's photos can now be viewed on the Block Paving DIYers' page. As for the sealing, you need to leave the sand jointing for 6 weeks to let it settle, and then top it up, which puts us in to mid-November, when the ground is hardly ever dry. So, I'd be tempted to leave the sealant until next Spring, say late March, when the sun has dried off the surface once again, and the efflorescence has dissipated.
If ordering direct from Resiblock, tell them I referred you and you'll get a decent price. |
||||
|
|
|||||
|
|
Stains on my blocks - Darren M - 11 November 2002 | ||||
|
Hello again Tony
Winter is approaching and I'm bored - decorating indoors is not as much "fun" ! When I was laying the drive I couldn't wait to get it finished , but now I'm looking at other areas I can do with the left over blocks. Anyway, I swept some leafs (mostly from a schumack(?)tree) off the drive today and they had left behind a dark stain. I tried blasting with a power-washer but it didn't "scratch" the stain. Any ideas? |
|||||
|
|
Tony McCormack 11 November 2002 |
||||
|
Sumach's aren't usually a cause of serious stains, not like them damn sycamores!
I'd try using a detergent and a spadeful of grit sand, and give the lot a good scrubbing with a stiff brush. Don't be tempted to use an acid-based cleaner at this stage, or it could discolour the section you're cleaning. If the detergent/sand mix doesn't work, I'd leave it until spring, as you may find that natural weathering removes the worst of the staining.
Have you thought about building a patio with the left-over blocks?? |
|||||
|
|
|||||
|
|
Where to start - Dave Ask - 26 June 2002 | ||||
|
I am about to commence laying about 60m² of block paving for a driveway, the area is prepared, but do I start at the kerb end of the drive or from the house end?
The driveway slopes away from the house and goes up the side and infront of the property as well. Great site by the way, particular encouraged by other DIY installations. |
|||||
|
|
Tony McCormack 26 June 2002 |
||||
|
Start at the lowest end and work uphill - that way, the blocks can't slip away from the working edge.
On flat sites, we would normally start at the base line and work from that, but on a sloping site, the base line, or a perpendicular, would be transferred to the bottom of the slope. Always work from the paving that's just been laid, on not from the screeded bed.
Glad you like the site, and the DIY pics - send in some of your own and I'll upload them for you. |
|||||
|
|
|||||
|
|
Can I use old tarmac base? - Sterl - 3 July 2002 | ||||
|
I am taking up my old tarmac drive and replacing it with blocks, I'm also widening it, Is the old tarmac any use to use as a base in the part that I'm widening. It just a thought so I dont have to get it skipped away, I'm guessing the base under the old tarmac part is going to be sound,
Cheers. Ace site by the way |
|||||
|
|
Tony McCormack - 4 July 2002 | ||||
| Using old bitmac as a sub-base. Well, it's less than ideal, but it's better than nowt. I'd break it up as small as possible and then spread it out over the subgrade as a 'blinding', and then top it off with decent sub-base material. I'd be concerned if it was used to form the full-depth sub-base in one part of the driveway, with 'proper' sub-base material used elsewher, but, by spreading it out and combining it with 'decent' stuff, it should be ok for a residential driveway. | |||||
|
Sterl 4 July 2002 |
Thanks for the advice Tony. When i first posted the Q i had not looked at the site. What a great site.
Regards Sterl |
||||
|
|
|||||
|
|
Multi-colour blocks - Suki - 10 July 2002 | ||||
|
Hi Tony,
I have been asked do a 130 sq metres of block paving and they have asked for a multi coloured mix of blocks in a 45 degree herringbone, I have not done a multi-colour before and want to know what advise you have. All they know is they want brindle in there somewhere, I think 3 colours in total maybe burnt brown and another colour would look best but are they layed totally randomly or is there more method than that TIA M8 Also we screed with 3 metre 3x2 sawn timber. We purchase new ones each time and it takes sometime to find straight ones is there anything else you can advise us with the screeding rails, what experiences do you have with purpose made screed rails and where do I get them?? |
|||||
|
|
Tony McCormack - 12 July 2002 | ||||
|
You're planning to mix in 3 differently coloured blocks within the one pavement - is that right? There's nowt so queer as the taste of some folks! Well, if that's what the client wants, fairy nuff, but I think they could end up regretting their choice. It's going to end up looking 'bitty', but, until the whole pavement is laid, there's no easy way of giving them a visual indication of the finished results. From a laying point of view, you will have to truly randomise the blocks. There's a temptation to lay, say, a brindle, then a brown, then another, then a brindle again, then a brown...and you end up with a pattern instead of a truly random mix. Best way is to get the labourer to load, say, 16 of each colour into a barrow, unload them at the working edge in a random fashion, creating, say, 3 stacks of 16 blocks, and then have the laying operative place the blocks 'as they come'. If you get 3 brindles together, leave them. This is the only way to get a truly mottled appearance. Still, at the end of the laying work, you're going to have to stand back and survey the work, to see if there are any areas that stand out or look uneasy. Lift, randomise and re-lay as required until it looks as right as it's going to get, and then do the sand jointing. I'd add a few bob to the cost to cover this extra configuration. Screeder bars and rails: - we make our own by buying aluminium box- or I-sections from a local supplier. Lightweight, very strong, and dead true. If you want a professional system, have a look at Probst's stuff. It's the best kit in the world, bar none, and there's a link in the Tools section, or from the Screeding page. |
|||||
|
Suki 13 June 2002 |
Thx for the advise tony i may send u a piccy to show u what it turns out like, when u say u make your own screed rails do u mean u use pieces of alu at 2"x 2" and screed with another piece of alu at 2" x 2" if so how long or do u have lots at different sizes, could u elaborate a little plz. TIA | ||||
|
Tony McCormack 14 July 2002 |
Please do send me a piccy or three - it's good to see how jobs turn out after talking about them via the web.
The screed kit consists mostly of 75x25mm (approx) I-section or box-section ally that's used as the screeder bar and then 25x25mm box section or tubular ally or steel conduit for the trammel bars. The trammels are minimum 2m in length and max of 6m (but these have to be treated with respect to keep them from bending), while the screeder bars range from 600mm to 4m, with one 'beast' that is a 150x50 section and 7m long.
A mate of mine runs a double glazing business, so getting hold of ally section is no problem for us. He lets us have off-cuts for a pint and custom sections at cost. |
||||
|
Suki 16 July 2002 |
So if i can get me self sum ally tubular 75x25, i can get 3 pieces of 3 metres each and could then use them for block paving mostly. using 2 for the trammel rails and one for the screed bar. | ||||
|
Tony McCormack 17 July 2002 |
Yep - that's not a bad 'starter kit' |
||||
|
|
|||||
|
|
Bedding Layer - How? - DavidH - 16 July 2002 | ||||
|
|HELP - I'm being a bit dense and need assurance. I need help on the methodolgy of laying the bedding layer for my block paving DIY patio.ĀFrom the advice of the Screeding page and assuming 40mm final bedding layer and 50mm block paviour, is my interpretation of sequence correct?
1.ĀLay out material generously (say 70-90m) on subase; 2. Lightly compact (2 vibrating plate passes) 3.ĀDig out and level in screed bars at 41-43mm below FPL ; 4.ĀScreed off; 5.ĀRemove bars and fill in 6.ĀLay blocks, brush in sand, vibrate, check FPL's.
I appreciate that my material charactersitics may not give the same performance as the dims above but is my basic method correct? Also, when ordering the sand should I request "Coarse Sharp Sand"? And finally, can I leave the levelled bed exposed until the following weekend before laying the paviours?
DavidH |
|||||
|
|
Tony McCormack - 18 July 2002 | ||||
|
Your synopsis is spot on, David.
When ordering the sand, ask for "Coarse grit sand suitable for laying block pavings" and the BM should be able to sort that out. The full name is often given as a "Zone 2 Class M washed coarse grit sand", but that would only befuddle the poor order clerks behind the desk! Once the bed is levelled and screeded, it should be paved over asap. If you leave it overnight or longer, the local cats will shit in it,and it will be disturbed by wind, rain etc., so it should be topped-up and re-screeded just before laying the blocks. Keep me informed of how you're getting on. |
|||||
|
DavidH 6 August 2002 |
Almost there now. Rain has severely disrupted my output. However, one, hopefully final, question!
Q. ĀI have constructed steps to the back and patio doors. ĀThey only consist of one 75mm riser each, but should I infill them in the same method as the rest of the block paving? What I really mean is, should I be vibrating blocks into grit sand bed? I feel that the size of the step (0.7m x 1.5m) would cause a problem for the plate compactor.Āi.e. by the time I have started it up and tried to keep it from vibrating off the edge Iwould be switching it off again.ĀAlso how do I compact the paviors under the door cill/threshold.ĀIs the answer to fix them on a rigid base (mortar them in)? Your help would be gratefully received again. ĀDavid. |
||||
|
Tony McCormack 6 August 2002 |
No - for the treads, lay the blocks on a 10:1 sand/cement mix and clonk them down to level. Dragging the wacker up there will rattle loose the risers!
Getting the levels right where the blocks lie under the cill can be a bit tricky, but if you judge the bedding right, they will go in and you should be able to tap them down enough to consolidate the bedding. Once the cement content sets, that should be adequate. How's it all looking? Any photos? |
||||
|
DavidH 21 August 2002 |
Thnx for all your help. I thought I had finished annoying you with diyer questions but just one more.
Q. I went to use Marshalls sealer on my finished paving but 'bottled it' and washed it all off before it dried? The reason - Marshalls state a mix ratio is 1part sealer to 6 parts water and a coverage of 1 litre of mixed sealer for 7.5 m². I have approx ² of paving following a line around the back of house and conservatory. I attempted to sprinkle using a rose on a watering can. I started on a 0.7m wide by 4 length of concrete block path. The coverage was not even and by the time I had gone back to ensure joints were wetted I had practically used all of 2litre mix. It looked really white and dense.ĀNot sure how it would dry, I washed it off and booted up the PC to contact you. What am I doing wrong? Your web site details that it dries and gives a glaze to blocks, but I don't want shinny if I am laying it on too thick. Help! David. |
||||
|
Tony McCormack 21 August 2002 |
Marshalls' sealer? Do you mean 'Keybond', David? Or is it some other product? | ||||
|
DavidH 21 August 2002 |
Yes, sorry, keybond. White, PVA looking, liquid in 5litre container.
Any pointers? |
||||
|
Tony McCormack 21 August 2002 |
Keybond isn't a sealant, but is a Joint Stabilising Fluid. It 'glues together' the jointing sand, but has no effect on the finished appearance of the paving, once it's dried. It doesn't give a glaze - you must have mis-read that section.
Dilute it, as it says on the pack, with 6 volumes of clean water, and stir it well. Douse the paving - you don't need to go to a lot of trouble making sure coverage is exactly even - spread through a rose on a watering can until the top of the blocks is wet, then move on to the next patch. Excess liquid will run off the surface of the blocks and find its way into the joints. It takes an hour or so to dry, and you might notice a whitey-purple hue to the paving at first but, rest assured, this will disappear in the next 24 hours or so, leaving the blocks completely unaffected, but the sand jointing bonded together.
If you're still nervous, just treat an area of a couple of square metres in a discreet corner, leave it for a day or so, and see for yourself how it works out. Fret not - as long as the Keybond is properly diluted, it's almost impossible to balls it up. |
||||
|
|
|||||
|
|
Basket weave block pattern - Nashy - 19 July 2002 | ||||
| Hi all, I'm currently in the middle of clearing concrete/flags from my drive. My intention is to block pave it but I'm not that keen on attempting to lay any other pattern than basketweave due to the ease of it. As my car only rests on the first ten feet of the drive is basketweave applicable? and will the rest of the drive need 100mm sub base, 40mm sand as it is only ever likely to see pedestrian use? I'm thinking more in the region of 50mm sub base, 40mm sand,in attempted to cut down on costs/a bad back. | |||||
|
|
Tony McCormack - 20 July 2002 | ||||
|
What makes you think basketweave is easier than any other pattern? It's just as hard to lay as a 90 herringbone (which is structurally better because it gives a full interlock) but I'll grant you that it is simpler than a 45 herringbone, if only because of the cuts.
It's your drive: you have to live with it, not me nor any other 'professional', so choose the pattern you want. I honestly believe a herringbone, particularly a longitudinal 45, presents the bricks in their best light on almost any driveway, but if you want basketweave, then you have basketweave. |
|||||
|
Nashy 20 Jul7 2002 |
Fair comments, my main fear is confidence I'm more at home with a spanner in my hand.
So herringbone I'm gonna tackle with the help of this site, my main fear is that the first 12ft of the drive one edge is against the garden (turf).
Am I on the right lines or should I begin by cementing in block as edgings first? |
||||
|
Tony McCormack |
Lay the edge courses first. They should be laid on and haunched with concrete, as shown in the Block Laying section. You can then use these edges as a level guide to screed off for the rest of the paving.
The best method is to lay all the edge courses before laying the body blocks. |
||||
|
|
|||||
|
|
Laying edge courses - Steve - Aug 2nd 2001 | ||||
|
With reference to edging courses for block paving, it is my understanding that they should always be laid first and that the subsequent blocks be compacted to their level. My question is this, is it not possible to lay all the blocks, compact the whole area, and then haunch with suitable mortar etc the 'edges'. This would seem to be a much quicker way of laying say for example a long driveway ????
Thanks for your help |
|||||
|
|
Tony McCormack - Aug 2nd 2001 | ||||
|
Hi Steve, if you were to lay block paving without first securing the edge courses, what holds the paving in place while you run over it half a dozen times with a wacker plate to compact it all? The answer is "buggerall", and if you try it, the free edges of your paving will scatter and the whole body of the paving will slip out of line. Don't do it - you'll only regret it! |
|||||
|
|
|||||
|
|
Planters in path - Mike Brett - Aug 5th 2001 | ||||
|
Tony - sorry, but another question in the context of this job ("U-shaped" path in 200 x 100 x 40 block paving round a building, each section 10m x 2m roughly).
I want to preserve some wall-climbing plants that are well-established in buckets of topsoil which were set into the sub-base laid for a future path when the building was constructed a decade ago. (Well, I don't like rushing into things - I'm proposing to build rings of cut blocks around each plant, so that I maintain the 'no added concrete fillets or other bodges' look that you are always emphasising yet provide a structure which will resist the side forces and hold all the blocks in the main path in their right place. There are seven such plants on this 30 m run of path, and the way the plants have chosen to grow means I suspect that I'll need to make several different diameter constructions (range 25 cm - 40 cm clear internal dia.) rather than rubber-stamp one size seven times. Each plant grows about 30 - 40 cms from the building, and I'm going to use a row of soldiers to establish a reference plane as per your previous advice.
Do you please have... I guess I should lay the main path up to these areas, so I can see the lines the pattern in the main path is taking. Then cut the ring and bed it in concrete (with haunching inside). Then when dry, cut & fit the remaining piecings, then compact the whole path right up to the ring(?) My apologies if this is covered on the website, but I couldn't find it if it was. As usual, grateful for your help. - Mike - (I can provide you with some 'before' pictures !!) |
|||||
|
|
Tony McCormack - Aug 5th 2001 | ||||
|
Mike asked:
1) any caveats about doing this No, but there are many ways of acheiving the same end result, depending on the pattern you're using. With a 90 degree herringboone, I prefer 45 degree planter bays....
If you're using semi-circular planters of less than around 750mm dia, then you're better off using relatively short pieces for the soldier....
....around 125/100 length, rather than trying to do it with longer cut blocks, say 200/175. This is illustrated better on the Block Detailing page, where I look at different ways of laying a soldier around a circular manhole. 2) any suggestions about shortcuts for the arithmetic and techniques for making the minimum number of cuts, Trial and error, Mike! Cut your blocks, but if they don't quite fit, keep them to one side as they may fit elsewhere. If you are producing geometrically precise planters, then it is possible to work out the cut angles in advance, but with you doing 7 planters of varying dimensions, I'd just rely on good old trial and error.3) any advice on the best ways to handle the problem that the natural rings of cuts will get perilously close to, or need to cut into, the soldier line? Normally, the soldier line is maintained and the body of the paving cut to suit.I guess I should lay the main path up to these areas, so I can see the lines the pattern in the main path is taking. Then cut the ring and bed it in concrete (with haunching inside). Then when dry, cut & fit the remaining piecings, then compact the whole path right up to the ring(?) That sounds about right. If you soldier edges are taper cut, they act not unlike the stones of an arch, and so you can minimise the haunching concrete used or even use that awful Keyform edging restraint.My apologies if this is covered on the website, but I couldn't find it if it was. As usual, grateful for your help. - Mike - (I can provide you with some 'before' pictures !!) Oh, yes please - and some 'afters' |
|||||
|
|
|||||
|
|
Cracking Up - John Ahearn - 22 July 2002 | ||||
| I'm trying to cut 50mm concrete block pavors with a bolster to form a 1m radius arc. The blocks are cutting cleanly but are cracking in the middle. I've tried doing this on a bed of sand, wood and even an old concrete slab, all to no avail. What the hell am I doing wrong or am I just a complete eejit? | |||||
|
|
Tony McCormack - 22 July 2002 | ||||
|
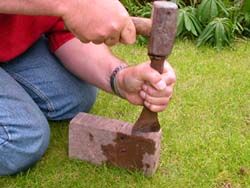
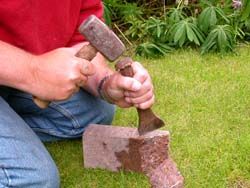
It's best to cut these blocks with a splitter, but if you must use a hammer and bolster then....
1 - mark/score the top face of the block. Hit the bolster hard enough to mark the block BUT NOT TO CRACK IT. 2 - do the same on the two sides, angling the bolster to create and undercut. 3 - repeat on the base of the block, joining the two 'lines' made on the sides of the block. 4 - turn block over so the face is at the top and strike with a single swift blow with the bolster. This should cause it to fracture along the lines you've scored. You can lay the block on earth or on sand while you do this, as they hold the block steady and absorb/deaden the impact of the blow without reflecting it back into the block, as it the case if you rest it on a hard surface.
It's so much easier with a splitter - they're eejit-proof! (almost) Ā |
|||||
|
John Ahearn 22 July 2002 |
Hi Tony
Many thanks for your very prompt reply. Unfortunately, I've been using the method you describe having read your instructions earlier and maybe I'm not explaining myself too well. I'm cutting off angled pieces at the ends of the blocks but they are cracking and breaking off in the middle of the block - nowhere near my cut marks. Am I still an eejit or what? P.S. Top marks for your website and service!! |
||||
|
Tony McCormack 23 July 2002 |
So you're trimming rather than cutting, is that right?
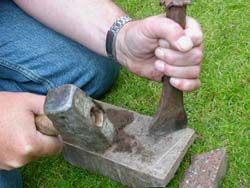
If you can hang on until lunch time tomorrow (Tuesday) I'll upload a couple of pictures showing how the blocks are first undercut and then trimmed. It's 20 past midnight just now, and I don't think the miserable gits next door would be best pleased if I started cutting blocks at this time of night! ....Next Day...... Thankfully, the rain has held off for long enough to allow me to take a few photos in the back garden.... 1 - Lay the block on its side, make sure it's stable and firm, and undercut it by striking on the side...
...sometimes, one good blow to one side will undercut the full width of the block, and other times you need to attack from both sides. As long as the section of block to be removed is undercut, that will be fine....
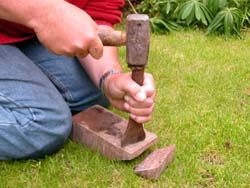
2 - Once the block has been successfully undercut, turn it face up to commence the trimming operation...
Use the hammer and pitcher/bolster to nibble off a bit at a time. Angle the tool into the block slightly when striking as this helps maintain the undercut....
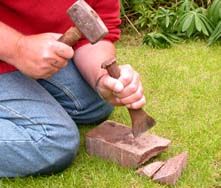
....and use swift, sharp blows until you've trimmed back to the cut line.
...you can easily trim off chunks of around 25mm at a time, and then tidy the cut edge once you're there or thereabouts.
Done! I used a Pitcher (Pitching Chisel) rather than a bolster, but the procedure, and the results, should be the same. |
||||
|
John Ahearn 24 July 2002 |
Many, many thanks for your help and advice Tony and, amazingly enough, your method actually works!! (Leave these jobs to the pros, I suppose)
I'd also like to say how impressed I am by someone taking the time and effort (and patience) to pass on their valuable skills to the untutored/thick - and for FREE!!!
Wishing you all the best and I'll be making regular visits to your site as well as recommending you to friends
|
||||
|
Tony McCormack 24 July 2002 |
Send me some pics of your paving when you've finished, John. |
||||
|
John Ahearn 27 July 2002 |
Alas Tony - no scanner, which is probably a very good thing for me. All I can tell you is that the finished article is a masterpiece and looks as though it was sculpted by Rodin himself! (After he flattened his thumb with a 14lb hammer)
Keep up the good work
|
||||
|
Tony McCormack 27 July 2002 |
You should treat yourself to a digital camera. |
||||
|
|
|||||
|
|
Advice for base please - Neilpet - 23 July 2002 | ||||
|
I am planning to do a patio in block pavers. I have started to dig out the area and have found it is clay and is really hard going t dig it out. How deep does the hardcore need to be considering there will be no heavy traffic on it ( except the misses lol!).
Fantastic site by the way. |
|||||
|
|
Tony McCormack - 23 July 2002 | ||||
| As it says in the Block Paving section, the sub-base should be at least 100mm thick. You could get away with 75mm if you have rock-solid clay (a high CBR) but anything less is a false economy and does not provide a competent sub-base. | |||||
|
Neilpet 24 July 2002 |
After much digging the past two nights, I have in places dug too deep due to the clay coming up in big clumps. Is this ok to have deeper hardcore in plces than others ie up to 75mm more. I presume the more the better | ||||
|
Tony McCormack 24 July 2002 |
More is better only up to a certain point. If you find you're putting in more than 150mm of sub-base, then do it in separate layers. Backfill the low spots with sun-base material first, then compact them, before topping-up over the full area to the required level, and compacting again.
It's great fun all this paving lark, innit? Ā |
||||
|
Neilpet |
I never realised it would be so much hard work doing the preparation, especially as my day job is behind a desk! Still I keep telling myself it will be worth it in the end.
Thanks for your advice, I dare say I will post again. |
||||
|
Tony McCormack 25 July 2002 |
You get a free six-pack stomach with every driveway (or a Party Seven, in some cases) When we do hand-dig work, we expect each operative to excavate and load into a skip at least 3 cubic metres per day. A good gang of 3 men will easily excavate and load 3 skips per day, with roughly 4.5 m³ per skip. On a soft dig, such as sandy loam or cow-belly clay, we can double that.
Maybe it's all that digging that made me the man I am today - a knackered spine and a dodgy ticker! |
||||
|
Neilpet 29 July 2002 |
Tony
Another thought whilst I am still digigng out!! I intend to lay a patio of the Plaspave Sienna blocks and border them with charcoal pavers. I've seen a design that I'd like to copy (in the Plaspave book but in Rococo) but on the lawn edge the design uses the small charcoal kerb stones with the charcoal pavers inside them to continue that border round. Presumably though if I used the kerbs along the grass edge and that was the way the patio slopes, ie away from the house the water wouldn't be able to drain away? Is there a solution I could adopt or should I just use normal pavers all the way around. Thanks again Neil PS No 6 pack yet, just the barrel I had before! |
||||
|
Tony McCormack 30 July 2002 |
You're concerned that the upstand on the kerbs will dam in any surface water, is that right?
Well, the pavement should slope so that the surface water is directed to a disposal point of one form or another, be it a gully, a linear drain or the public highway at the threshhold. So, the water runs across the paving, meets the kerb and then where does it go? Were you planning on draining onto the lawn? If so, can your lawn cope? How big is the area? What's the ground like in your garden?
It's not insurmountable, but if you can explain the falls and the drainage provisions, I'll be able to offer some solution, I'm sure. |
||||
|
Neilpet 30 July 2002 |
Yes I was planning to drain onto the lawn. The patio area is about 6mtrs x 4mtrs. There was an paved patio there before that drained onto the lawn without any problems. I was planning a fall of about 1:60 or 1:70 away from the house.
(This is a back garden and the patio is between the house and the lawn.) |
||||
|
Tony McCormack 30 July 2002 |
Right then - every 5th kerb, leave the joint open so that you have a 10-15mm gap. Fill the back of that gap with loose gravel or grit and that should allow the water to drain away. | ||||
|
Neilpet 30 July 2002 |
That was pleasantly simple. I thought you were going to say that I would have to run a drain, constructed from hand made clay pipe laid 6ft underground to reach the River Severn just north of Bewdley!!
Thanks for your help again, I'm sure I'll be back when I either think of more problems or actually start work. ...some time later... 8 August 2002 I have finally excavated the area for paving and am now ready to put the edging/kerb stones in place. I am planning to bed them on 100mm of concrete to bring them up to the finished level of the paving but do I need to dig a small trench to put the concrete in and if so how deep should it be. Thanks again for a great site |
||||
|
Tony McCormack 8 August 2002 |
Depends on the kerb you're using, Neil. In mathematical parlance it is....
[Height of kerb] - [Amount of Upstand] + [Depth of Bedding] .... below paving level. So, if you were using, say, a 200mm high Boot Kerb, with 125mm of upstand, then the sum would be... 200 - 125 + 100 = 175mm ie, you'd need to dig a trench 175mm deep measured against the paving surface level. Does that help? |
||||
|
Neilpet 8 August 2002 |
Not sure I'm quite with that, perhaps I didn't explain too well . I've excavated the area to a depth of 200mm below my fpl. I'm using a 200mm high kerb the top of which will be 100mm above my fpl (is that 100mm upstand). I haven't yet put in any hardcore so tonight I've tried to bed these kerbs on 100mm of concrete but because of the weight of the kerbs the front edge keeps sinking so I've thrown all my toys out of the pram and given up in a rage. I'm thinking now of putting in my hardcore and then just bedding them on a thinner layer when that's done, unless you can advise anything else?? Please help before I lose my sanity and the wife leaves me! | ||||
|
Tony McCormack 8 August 2002 |
The front edge of the kerb units is settling? Is that what you mean? If so, the only known cause for this phenomenon is overly sloppy concrete.
Use a semi-dry mix; concrete with just enough water to make it damp. Not wet, not moist, just vaguely damp, so it just about clumps together when squeezed into a ball. Then, when you bed a kerb, it stays bedded, and doesn't 'float' or 'settle' when you come to lay the adjacent unit. You could blind the bottom of the trench with sub-base material, but aim to be laying on between 75-100mm of concrete, if this is a retaining edge. |
||||
|
Neilpet 26 August 2002 |
FINISHED!! Thank God.
Just to let you know I managed to get hold of a Whacker today, Bank Holiday as well and finished the patio off. And I don't mind saying it looks superb. Thanks for all your help both in the Forum and in the excellent website. It is an inspiration and an incentive to a novice like me. I never realised it would be such hard work, but it's worth it. Cheers Neil |
||||
|
Tony McCormack 27 August 2002 |
So, when do we get to see the photos of your meisterwerk? |
||||
|
|
|||||
|
|
Material for sub base - Nirmal - 23 July 2002 | ||||
|
What a great site...
In my garden I have bricks and 50mm thick strong slabs which are not used. Can I used this as hardcore for the sub base. If not is there a place (I live in Harrow, North London) such as Homebase, B&Q where I can buy material for sub base? Any idea how can I break this slabs? Also do I have to use a digging fork to dig up the ground or can I hire any tool for digging from hiring company?
Thanks.
|
|||||
|
|
Tony McCormack - 23 July 2002 | ||||
|
If you want to use the old flags and bricks as hardcore, they must be broken up into small chunks - nothing bigger than about 75mm, and even then you'll need a lot of 'fines' to fill the voids. If this sub-base is for a patio, it might be satisfactory, but if this is for a driveway, I would always use (and recommend) a proper granulated sub-base material as sold by almost every Builders' Merchant in the land.
If you decide to smash up the flags/slabs, you can use a sledgehammer or a lumphammer, but it's a lot of work! For the digging - it depends on the area and access. If you can get a mini-digger in, then so much the better; if not, then it's a job for the pick, the mattock and the spade - see the Tools page. |
|||||
|
|
|||||
|
|
Overwide joint gaps - Mike - 27 July 2002 | ||||
|
Tony:
After a long time spent doing other things since my argument with that angle grinder last autumn, I am now pressing on with my block paving path. I have just laid the blocks on the next 10m stretch and due to layout errors for which I can only blame myself
and a wider shot to put it in context:
At its widest (just the other side of the downspout), the error is 8 mm, and the path between soldiers is 1.5m. At present the pattern is laid tight against the grass-side soldiers.
Please could you advise on the best corrective action? Those I can think of are:
As usual, very grateful to tap into your experience.
|
|||||
|
|
Tony McCormack - 27 July 2002 | ||||
|
Howdo Mike - long time, no hear! Good to see you back. Option 1 results in wide joints which aren't critical on a pathway such as this but you could end us with a handful of blocks right on the sightline that are 'skew-whiff' and stand out like the proverbial thumb that met the lump hammer. Option 2 will more or less bring about the same result as option 1, but with fewer skewed blocks. Option 3 would seem to be the most logical but that outside edge course, against the grass, should be straight, assuming you've laid it to a taut string line, so any amendments to the alignement will look worse than the few skewed blocks in Options 1 and 2. The best solution is the one you missed - option 4 - lever over the blocks on the internal soldier course, the one against the house, as it's all but impossible to get a sight line along there. Create the 'take-up' gap between the wall and the back edge of the soldier course and pack that full of jointing sand.
It's quite probably deviation in the wall that has resulted in the error in the setting out, so keep all the eror in one spot and you'll not be able to notice them. |
|||||
|
Mike 27 July 2002 |
Thanks for that Tony! I'd actually intended my option 3 to be your option 4, but maybe didn't express it very clearly. OK, so that's tomorrow's tasks clarified!
Like the new site, BTW. You were just putting the finishing touches to it when the winter hedge-laying distracted me last year. I'll send some pictures when the job's done. Cheers for now. - Mike - |
||||
|
|
|||||


|
|
|
|
Brew Cabin Archive navigation dhtml courtesy of Milonic |