So i've been excavating for my new sub-base, careful not to undermine the shallow footings (2 spreader courses 3 below DPC).
As I was skirting around the original drain I discovered a void, roughly 10" x 10" below the grate and around the clay piping.
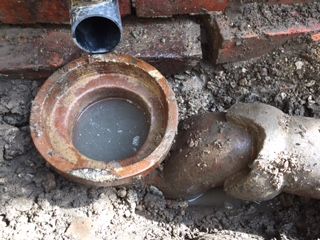
Part of the pipe appears damaged but that isn't where the leak is coming from, I think its on the underside.
I poured a couple of buckets of water down the drain to try and identify where the leak was from. It took about 5 minutes for the water to appear below the piping (as in the pic)
There are 2 spreader course bricks that are obviously loose (I've not touched them!) and the substrate beneath is soggy to say the least. I have no idea how long this has been a problem. The patio was laid a few years ago by the previous owner who was a total cowboy judging by other work done on the house.
I have only 6 days before I head of working for 2 months and I really need to get this gravel patio laid.
At that depth the pipes should have a concrete surround anyway. Those old pipes aren't that long and it might be worth you taking that gull and at least one pipe out, digging out the wet ground and replacing with concrete locally at the spreader course. You can get a clay to plastic flex seal coupler. Make sure you give the right outside diameter measurements. Iclt could be leaking further along the pipe work.
Had phone consult with Tony and he said the same thing.
Had a further look last night and the area under the pipe is silty mud, like porridge! There is definitely a leak on the underside of the collar (in the pic). The next collar is approx 1ft down. Missus reminded me yesterday that we've got insurance with B Gas and the guy is on his way over, so fingers crossed he will fix it proper. Not sure what I'm going to do with the the footings, may get someone round to give me an expert opinion as I think the water damage could be worse than initially thought. I'll post some more pics when I've excavated further along the pipe.
See what the guy from British Gas has to say, but check it with us here, as these people working for such 'home cover' businesses tend to be generalists rather than specialists. It's not unusual for them to be advising on a drain collapse one day and then a chimney rebuild the next!
The guy from BG came out, said yes its a leak and will get someone on it. No indication of timing.
I need to remove that drain to allow me to make good the brick work and add the concrete. Whats the safest way of me doing it without potentially damaging clay pipe further down?
Also, the boundary wall footings are even more shallow than the kitchen. They way its going I'll only be able to have strip of MOT if I am to stay away from footings of both the house and garden wall. The side return is only 1.8m wide.
The ground is a soft clay mud. Would it be a bad idea to simply level off the ground, lay the membrane, sharp sand then gravel stabilizer and 50mm of gravel. This would only be for the side return and not the patio. There I won't have an issue getting the correct depth.
Those joints are the type. We used to push a yarn into the collar and around the spigot end of the male section. Then we pushed compo into the same joint, forcong it in and haunching around the joint. You are best off dig down below the collar and cut it off with a cut off saw, ( we used two medium sized stones to cut them back in the day, one inside pressed against the pipe and slowly tsp around the outside of pipe intol it parted
Bit of useless info lol) It may need cleaning out if full of silt. Replace with your new fittings. Clean soft mud out around pipe and footings? Don't do to much of a span under bricks.
Hey Sean, can you point me in the right direction on what parts I'd use and how I would go about replacing the knackered junction and gulley. Not sure where you would cut the clay pipe as the angle is very tight where it joins the waste pipe below.
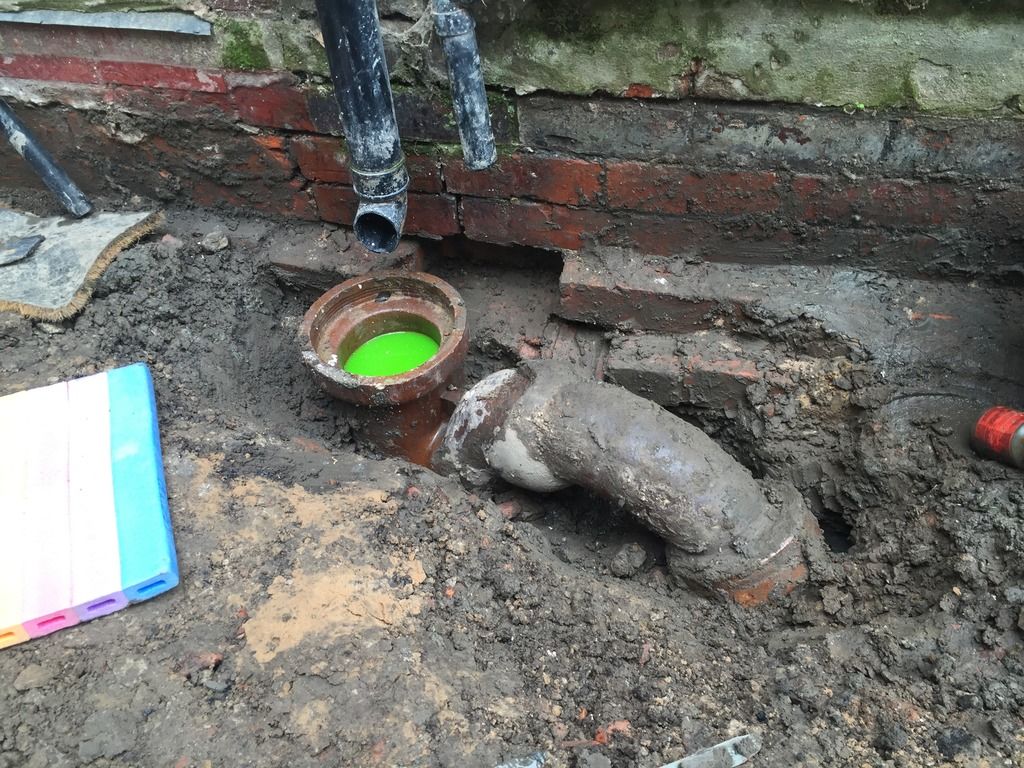
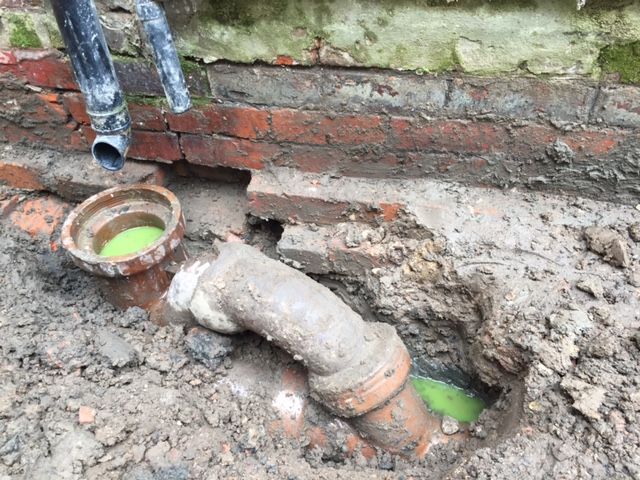
Sorry didn't realise to was a y junction. You'll need to expose more so can see exactly what's leaking. Is it a back inlet ( is that a pipe to the left going into it? Can't see it proper. ) also is it a combination drain? Trying to see if you could just hange the bend if that only thing leaking, or even do a repair on the leaky part and save you an headache.
The leaky part appears to be the top socket which goes to the gully, you can see a piece missing in the pic. The lower pipe, which the gully connects to, runs to the corner of the side return and up to is the bathroom. I had the bottom bend of this pipe replaced last year after is was found to be cracked and leaking.
I think Tony may be suggesting it would be best to replace the whole thing, including the section of waste pipe leading to the downpipe. I'd be nervous about this with it being so close and below the footings.
Any tips on a temporary repair so we can use the washer and sinks?
It would be best to replace the lot as Tony suggests. I'm just worried it is a lot to take on for a diyer, especually if it's a combi drain. Temp' fix...drill out the mortar, carefully so as not to damage the black yarn ( if any in there ). Replace the mortar with a 1/1 sand cement mix, force it in the joint and smooth it of like the existing collars. For added security you could denso around the joint before you place the concrete aurround.
I'll see what the DynaRod guy says tomorrow (from British Gas). Hopefully I can convince him to replace the lot, as there is potential leaking further up the waste pipe. If not, hopefully I can get a reccomended tradesman up here near Wilmslow.
I imagine the repairs to the footings should be easier if I'm having to temp remove UPVC connections and not clay
Thanks again for all your help, invaluable.
Got to look on the bright side, had we not of found the damn leak then it could have been much more serious in years to come. Every cloud and all that!
Don't fret too much about the foundations. If the contractor sent to effect the repair thinks the foundations are in any way compromised, they will shore up before removing the old salt-glaze pipework. Naturally, this assumes DynoRod know a competent contractor locally, which can't be guaranteed, sadly.
I'll email you a contact number for someone who *might* be able to help if all else fails. I know they are curently busy on a biggish job, but they might just be able to get a look at it over the weekend.......
DynoRod have quoted 420 inc vat replace 3m pipe, gully, junction. No intention of using concrete fill to meet part h building refs. Surely he should know that's the way?
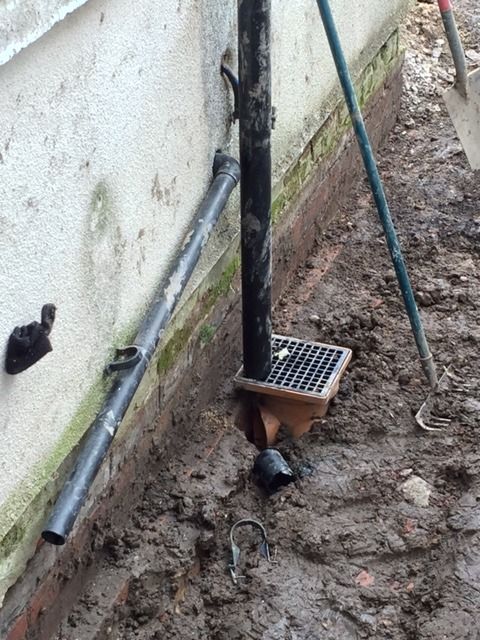
Full length of pipe fitted. Leaks found at 3 of the clay sockets, so thanks for directing me to have it all removed.
Pipe bedded on pea shingle and covered with original clay / dirt.
Had the fella move the gully to the right to enable me to work on the brickwork later and the downpipe now flows directly down.
However, the waste pipe from the kitchen which is fixed in place, is out of alignment. I've got some thinking to do as to how to get it around the downpipe and into the drain. Solvent connections.
Going to repair the brickwork later and the MOT is getting laid fri / sat.
Sean and Tony, thanks for all your help. Any comments appreciated.