Hi,
Firstly - thank you for putting together such a great site - a big relief to find Im not alone in my paving troubles! Ive read the other posts and really I just want to seek confirmation that what I am about to do is the correct thing!
Before I describe this, can I just say this is the very first time I have attempted a patio (Im more at home with PC's or wooden flooring than concrete) and Im probably being (stupid?!) by attempting to do the whole thing myself (usual budget reasons!).
Current situation:
Planned area is roughly about 2.5m by 4.5m, half of which has a set of dreadful looking flags of about 60x60 in size. I removed the top-soil in the remainder area each side to reveal concrete/compacted rubble falling away from the existing patio (ie. I will be able to use this for the new stuff, but add to it with some of my own rubble).
Problem is: Im not fit enough (slight bad back) to lift the existing flags (60x60 weigh a ton for me). Can I simply build up the surrounding area with sand/rubble, then lay the new flags (400x400x25mm!) on top of the old ones?
I assume as the new ones are so thin (typical Homebase 25mm) I cant go for the 5 cement dabs as you have mentioned in previous postings, but the sand/cement mix spread evenly is a better bet? If so, to what depth? and do i still need it spread over the area already covered by old flags, or just the rubble either side?
My assumption is that I should even-out the surrounding rubble to the level just below the existing flags, then lay the sand/cement mix (came in pre-mixed bags from homebase) over the whole area (both rubble and old-flags) with a slight gradient of 1:40, then just drop the flags straight on and hammer a little? If I can avoid cement up until pointing, I would be happier...
The existing flags which I am to lay over are 2 bricks down from the DPC, so I intend to leave a 10mm gap between the brick and new flags, and fill with.. (shingle?) like this?:
|
| |new-flag| |new-flag|
House ||old-flag| |old-flag| |old-flag| ----<grass>----
||-------rubble-------------------|-----soil---------
Oh, and this is for the back-garden - which slopes *towards* the house :( so it regularly collects puddles of water - so I will slant the flags towards the lawn (away from the house) and where the slanting lawn meets slanting paving, try to dig in a length of half-drain-pipe or similar in a feeble attempt to take the water out of the garden into the adjacent road... am I doing the right thing here as well?
Any advice/hints/tips/corrections on my assumptions or advice to stick to my day-job, extremely welcome! :)
Many thanks!
Ben
New Patio
-
84-1093879891
I really don't like laying new flags over owld shi....err...rubbish, but, given your plea of mitigating circumstances (Welcome to the Bad Back Club), I'll make an exception.
The existing concrete should be firm. Any rubble you add must be thoroughly compacted, hammered down so there is no chance of any settlement. Use a hammer if you've no wacker plate, or stir in sand and cement and turn it into a weak concrete.
So, assuming you get all the base prepared, you can set about laying those wafers you've bought. I'm sure there's a law about minimum thicknesses before you can call them 'flags' and 25mm is well below it. These will be painfully fragile, so you're going to have to be very, very gentle with them.
I'd opt for a full mortar bed, as there's little or no chance of you being able to tap down the flags sufficiently on a semi-dry mix without the damn things falling apart. Mix the mortar at about 6:1 but keep it reasonably stiff - not sloppy so that is drips off the trowel, but stiff enough to stand in peaks, and for no water to drip out when you squeeze a handful.
Spread out a layer of the mortar over the base and ripple the surface with the edge of the trowel. Press the flag down into the mortar bed and then tap it very, very gently with a rubber hammer (a clonker, as we call them) until the flag is settled to the correct level. If you haven't got a clonker, put a piece of 3x2 over the flag and tap that with a lump hammer.
If the flag won't settle to the correct level with a few taps, take it up, scrape out some of the bedding and start again - don't be tempted to pummel it into submission: at 25mm, there's no chance of them bloody things being able to take any rough treatment.
Check your levels as you proceed, making sure you're sloping away from the house. Use a taut string line and/or a straight-edged timber to guide you.
TAKE YOUR TIME - a rushed job is a botched job.
Don't walk on the wafers...err...flags for 48 hours, so try to point-up as you proceed.
I'm not sure what this 10mm gap idea is - a typical joint is 10-15mm - did you mean 100mm (10cm)? Even if you did, I can't understand what the 'shingle' is supposed to achieve? Can you enlighten me?
-
BW
- Posts: 3
- Joined: Wed Jul 31, 2002 5:48 pm
Thank you for your long and detailed reply - it was an educational read for sure! Nice to know there are still helpful souls on the planet!
Glad to be part of the bad-back club :)
I will compact the new rubble as you describe, yes. And your right - I should really call them wafers!!
Just to clarify though - should I place sand over the existing slabs, *then* a layer of mortar over that? or just mortar on the existing slabs direct, then the wafers? In a diagram:
<new wafer>
<thin mortar bed>
<sharp sand>
<existing flag>
<existing hardcore>
Either way, I will still put sand down on the areas where its just rubble, and use a mortar bed.
I take it therefore, I have no use for the dry-mix stuff I have bought? (fortunately only 2 small bags!).
I have a clonker, so no problems there (see, Im learning the lingo! I appreciate this!).
About the 10mm gap - sorry I did mean 10cm between the house and the new wafers. Anyone reading this may need to correct me, but I assumed a 10cm gap filled with decorative stones/shingle would solve the issue of running too close to the DPC. I'll try again with an ASCII diagram:
------------------ <--- Damp Proof Course
House brick 1 |
brick 2 |<10cm><new wafer><new wafer>
<old-flag to keep><old flag etc.>
In words: the existing patio is 2 bricks below the DPC, but by laying the new wafers on top, would effectively cover half of brick 2 in the diagram. Therefore, with only 1.5 brick height between the wafer and the DPC, I though it best to bring the new wafers forward a little, and fill the gap with stones to help prevent damp problems. Hope this explains what I was trying to describe (I can see it clearly in my head, but putting it into words... ) :-)
I guess this gap may not actually be useful after-all?
Again - thank you so much for this advice - if one could send a virtual beer, I would! :)
Ben
-
84-1093879891
You could put a thin scattering of sand over the existing flags, as it would prevent the mortar bedding bonding to them, which would make it a right sodding nightmare to take up at some future date. I've included this on the drawing below, but it isn't essential.
If you have any voids in the rubble/hardcore sections, though, these are best blinded with sand before placing the mortar bedding. Ideally, when you come to start laying the wafers, the whole base should be a graded flat plane, sloping away from the walls, with no holes, voids or gaps.
So, if you use a 6mm blinding of sand, and a 10mm bed of mortar, you can keep the paving to 109mm below dpc, which is just about tolerable. If you omit the sand blinding, and keep the bedding thin (10-12mm) you can save a few more millimetres, but it's not worth fretting over.
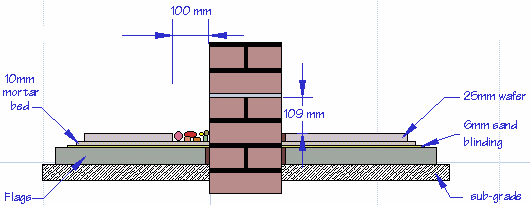
As you can see from the drawing, the 100mm gravel strip doesn't achieve very much. In this scenario, I'd be tempted to omit it completely and pave right up to the wall, making sure there was ample fall (1:40) on that first flag. Yes, you will get some splashback, but not much.
If you have any voids in the rubble/hardcore sections, though, these are best blinded with sand before placing the mortar bedding. Ideally, when you come to start laying the wafers, the whole base should be a graded flat plane, sloping away from the walls, with no holes, voids or gaps.
So, if you use a 6mm blinding of sand, and a 10mm bed of mortar, you can keep the paving to 109mm below dpc, which is just about tolerable. If you omit the sand blinding, and keep the bedding thin (10-12mm) you can save a few more millimetres, but it's not worth fretting over.
As you can see from the drawing, the 100mm gravel strip doesn't achieve very much. In this scenario, I'd be tempted to omit it completely and pave right up to the wall, making sure there was ample fall (1:40) on that first flag. Yes, you will get some splashback, but not much.
-
BW
- Posts: 3
- Joined: Wed Jul 31, 2002 5:48 pm
Superb! :)
Thanks for the diagram! Will keep this with me when Im digging this weekend.
The question now is - when will us Brits get some decent weather?? :(
Max Ali - no problem - and see what you were saying, my diagram wasnt very clear, but I should still hopefully end up well below the DPC (fingers crossed!) :)
Thanks again,
Ben
P.S will keep you posted on developments!