
|
 |
|
|
| Sitework - Page 05 |
|
|

|
|
|
|
|
|
|
|
|
|
|||||||||||||||||||||||||||||||||||||||||||||||||||||||||||||||||||||||||||||||||||||||||||||||

|
Concreting Wooden Fence Posts - Searcher - Aug 10th 2003 | |||||||||||||||||||||||||||||||||||||||||||||||||||||||||||||||||||||||||||||||||||||||||||||||||||
|
I am having some tanelised 4" x 4" posts fitted for fencing in an exposed area. I was considering using concrete-in metal fixing posts so that if the timber needs to be replaced in future I could do it without having to re-concrete. Having read the fencing section of this web site I am now not sure about this as it says that spike fixing systems are more trouble than they are worth. Does this trouble also refer to the concrete-in type of metal fixing too?
Also - reading your site a dry mix of concrete is recommended though I know the tradesman who is doing the work is planning to get ready mixed concrete delivered. Is using ready mix concrete likely to result in an inferior job? I am now contemplating doing it myself! -- By way of explanation -- I am not considering using concrete posts because one side of the fence has higher ground than the other and will additionally be built up to an even higher level. I was advised that the concrete plinths/gravel boards for use between concrete posts would not be strong enough to act as a retaining wall.... but tanelised 1.5 inch thick timber lengths spanning the bases of the timber posts would be. At the moment I believe the advise! Any further advice is welcome. |
||||||||||||||||||||||||||||||||||||||||||||||||||||||||||||||||||||||||||||||||||||||||||||||||||||
|
|
Tony McCormack - Aug 12th 2003 | |||||||||||||||||||||||||||||||||||||||||||||||||||||||||||||||||||||||||||||||||||||||||||||||||||
|
The concrete-in metal post holders are fine: expensive, but fine. It's the type that are simply driven into the existing ground that are more trouble than they're worth. They almost never drive in straight, resulting in strangely inclined posts.
Whether you use dry mix or a wetted ready-mix to secure the posts doesn't make a great deal of difference. Dry mix draws the required moisture from the surrounding ground, whereas ready-mix has all the moisture it needs. In all probability, wet ready-mix would give a stronger concrete than a dry mix, but end-strength is not the key requirement when it comes to fence posts - you just want something firm enough to stay put and keep the post in place. Moving on to your second point - using concrete base panels as a retainer is ok for 250-300mm of level difference, but for more than that, they aren't strong enough, it's true. However, there are ways and means of making them strong enough and there are ways and means of using stronger concrete panels in place of the standard wet-cast panels, but, if you're happy with the tanalised timber, go with that. Personally, I'd still use a stronger concrete panel. |
||||||||||||||||||||||||||||||||||||||||||||||||||||||||||||||||||||||||||||||||||||||||||||||||||||
|
|
||||||||||||||||||||||||||||||||||||||||||||||||||||||||||||||||||||||||||||||||||||||||||||||||||||
|
|
Bulk bags as weed barrier? - Chrissy K - Aug 11th 2003 | |||||||||||||||||||||||||||||||||||||||||||||||||||||||||||||||||||||||||||||||||||||||||||||||||||
|
I'm the one building the 40m² Indian sandstone patio in Bury. It's now completed, photos to follow, but I'm wondering what to do with the 1 tonne gravel sacks.
I have 3 of them and it seems a waste to bin them and I was wondering whether or not I could use them to act as weed barrier to put gravel on in the flower beds. Also would they work as root barrier to stop a fruit tree from uprooting my fresh patio Cheers |
||||||||||||||||||||||||||||||||||||||||||||||||||||||||||||||||||||||||||||||||||||||||||||||||||||
|
|
Tony McCormack - Aug 12th 2003 | |||||||||||||||||||||||||||||||||||||||||||||||||||||||||||||||||||||||||||||||||||||||||||||||||||
|
The 'pore size' of the agg bags (as we call them) is too big for them to be an effective weed or root barrier. The bags are woven polypropylene, and, if you can shove a matchstick through the weave (try it: you can!!) then a root would have no trouble in finding it's way through.
The suppliers used to charge a deposit on these agg bags, which meant they were always rounded up and returned for re-use, but that practice seems to have died out now that they've become so popular, and they are beginning to turn up dumped in out-of-the-way lay-bys, along with other building rubble and unwanted fridges that some lazy gits can't be bothered taking to a proper disposal site. You might find that the original suplier will take them back, or you could wash them out and use them as patio furniture covers, but as a weed/root barrier, they're second-rate, I'm afraid. |
||||||||||||||||||||||||||||||||||||||||||||||||||||||||||||||||||||||||||||||||||||||||||||||||||||
|
|
||||||||||||||||||||||||||||||||||||||||||||||||||||||||||||||||||||||||||||||||||||||||||||||||||||
|
|
Kerbs over duct - Danensis - Aug 12th 2003 | |||||||||||||||||||||||||||||||||||||||||||||||||||||||||||||||||||||||||||||||||||||||||||||||||||
| I want to bury a duct alongside my drive. As there is a wall alongside the drive the only place to bury the duct is where I intended putting the kerbs. I have dug a trench alongside the drive, but am now wondering what to use as backfill as I would normally use soft sand to protect the duct, but I am not sure this would be adequate to support the concrete bed for the kerbs. Would pea shingle be a suitable compromise? | ||||||||||||||||||||||||||||||||||||||||||||||||||||||||||||||||||||||||||||||||||||||||||||||||||||
|
|
Tony McCormack - Aug 12th 2003 | |||||||||||||||||||||||||||||||||||||||||||||||||||||||||||||||||||||||||||||||||||||||||||||||||||
|
Why not encase the duct in concrete?
You could use sand or gravel, but if it shifts or is washed out by groundwater, then you risk having a void beneath your kerbline. However, if you use a low-cement concrete, say something like a 1:3:6, then you can be sure the duct will be safe and there's no chance of the kerbs falling into a sudden void. |
||||||||||||||||||||||||||||||||||||||||||||||||||||||||||||||||||||||||||||||||||||||||||||||||||||
|
Danensis Aug 12th 2003 |
Ah, that sound like an awful lot of concrete - I reckon on about 2 cubic yards (11 metre long trench!), which is an awful lot of mixing - not sure SWMBO will take to that! | |||||||||||||||||||||||||||||||||||||||||||||||||||||||||||||||||||||||||||||||||||||||||||||||||||
|
Tony McCormack Aug 12th 2003 |
Tell her it's a fitness regime! A couple of cubic metres isn't all that much, and it doesn't need to be wetted-up - a dry mix will be fine for putting around a duct. If you have access to one of those little 'lecky mixers, they can churn out a couple of cubes in less than an hour.
If you're going to lay a kerb, you'll need concrete anyway. Were you planning on bringing in ready-mix or knocking it up on site? |
|||||||||||||||||||||||||||||||||||||||||||||||||||||||||||||||||||||||||||||||||||||||||||||||||||
|
Danensis Aug 12th 2003 |
I was thinking I could lay a bed a few feet at a time, and then bed the kerbs in on some mortar - bloody heavy they are - good job I've had my hernia patched!
SWMBO wants a gap at the back so she can plant some alpines - the drive runs east-west so its south facing and has overhanging trees - so I was thinking of just haunching the joins, hopefully traffic won't be too heavy other than the occasional delivery of materials, but the plastic edging we used to have got mashed at regular intervals, so I've gone from the sublime to the ridiculous. |
|||||||||||||||||||||||||||||||||||||||||||||||||||||||||||||||||||||||||||||||||||||||||||||||||||
|
Tony McCormack Aug 12th 2003 |
Well, you can lay just a few at a time. You lay the duct in concrete, smooth off the top of the concrete to a level approx. 25mm below bottom of the proposed kerb, and then lay the kerbs onto a bed of Class II mortar.
Just haunching the kerb joints is known as "Maxwell's Backing" in memory of a particularly parsimonious groundworker who favoured that method of haunching, as long as it could be covered up with soil before the Clerk of Works saw it. |
|||||||||||||||||||||||||||||||||||||||||||||||||||||||||||||||||||||||||||||||||||||||||||||||||||
|
Danensis Aug 12th 2003 |
Right, I'll have a go at that at the weekend. What sort of distance do I need from the base of the kerbs to the duct? Do I use concrete below the duct as well? | |||||||||||||||||||||||||||||||||||||||||||||||||||||||||||||||||||||||||||||||||||||||||||||||||||
|
Tony McCormack Aug 12th 2003 |
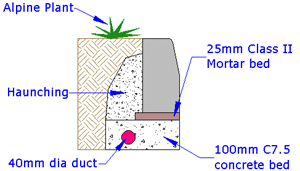
Normally, the bedding for kerbs should be 100mm minimum, but, as this is just a driveway, you should be ok bedding the duct (assuming it's just a 40mm jobby) within that bed, as shown here...
|
|||||||||||||||||||||||||||||||||||||||||||||||||||||||||||||||||||||||||||||||||||||||||||||||||||
|
Danensis Aug 13th 2003 |
It's 100mm duct (courtesy of some local cabling contractors) and I was wondering if I could put something over it to take the weight - I was thinking of that concrete channel that carries cables at the side of railway lines, inverted over the duct.
The reason I thought about gravel was to drain the land, which has at least two coal seams bringing water to the surface. However I reckon concrete might stop the neighbour's tree roots from undermining the drive! |
|||||||||||||||||||||||||||||||||||||||||||||||||||||||||||||||||||||||||||||||||||||||||||||||||||
|
Tony McCormack Aug 13th 2003 |
You could use an inverted U-channel, I s'pose, or you could even lay it the right way up, and then use the lid that is supplied with each unit!
If you want to lay the duct in gravel, then as long as it's fairly compact, there should be no great problem, as long as there's no risk of the gravel being washed out by the springwater. I still prefer concrete - you know then that the kerb isn't going to fall over suddenly! |
|||||||||||||||||||||||||||||||||||||||||||||||||||||||||||||||||||||||||||||||||||||||||||||||||||
|
|
||||||||||||||||||||||||||||||||||||||||||||||||||||||||||||||||||||||||||||||||||||||||||||||||||||
|
|
Re-pointing brickwork with lime mortar - krismac - Aug 13th 2003 | |||||||||||||||||||||||||||||||||||||||||||||||||||||||||||||||||||||||||||||||||||||||||||||||||||
|
I want to repoint some old interior brickwork with a white coloured mortar. I have been told I need a mix of 6 parts sand, 1 part lime and 1 part cement.
Is this correct ? |
||||||||||||||||||||||||||||||||||||||||||||||||||||||||||||||||||||||||||||||||||||||||||||||||||||
|
|
Danensis - Aug 14th 2003 | |||||||||||||||||||||||||||||||||||||||||||||||||||||||||||||||||||||||||||||||||||||||||||||||||||
| Why bother with the cement? Use a white sand, and use lime alone. It may take longer to set, but it's great stuff to work with. | ||||||||||||||||||||||||||||||||||||||||||||||||||||||||||||||||||||||||||||||||||||||||||||||||||||
|
Tony McCormack Aug 14th 2003 |
If it's old brickwork, as in Victorian or pre-1920, then a lime-only mortar is a much safer material to use. A cement mortar is much harder than the 'old' mortar and this difference in hardness has caused millions of quids worth of damage to older buildings. The older, lime mortar allows some movement of the masonry, but the cement mortar is so hard it sometimes causes spalling of the masonry. Further, the interface between the old lime mortar and the new cement mortar fails, which can result in the new mortar popping out of the joint or damaging the brickwork.
You could, as stated above, omit the cement completely, or reduce it to a smaller proportion. I think a Class V mortar uses 3 times as much lime as cement, so a 1:3:12 mix (OPC:Lime:Sand) would be about right. |
|||||||||||||||||||||||||||||||||||||||||||||||||||||||||||||||||||||||||||||||||||||||||||||||||||
|
krismac Aug 15th 2003 |
The building is mid 1930's.
I've repointed the main fireplace inside using a 1:1:6 mix (white opc:lime:sand) will that be ok, please say yes. I'm going to seal it what do you recommend? Many thanks for the previous info. |
|||||||||||||||||||||||||||||||||||||||||||||||||||||||||||||||||||||||||||||||||||||||||||||||||||
|
Tony McCormack Aug 15th 2003 |
White OPC is no different, structurally, to plain OPC - it's preparation is different, and it relies on certain premium-quality aggregates, which all make it more expensive, but the sand and water don't know that, and so you end up with a mortar that behaves exactly like a standard mortar. However, with such a relatively low cement content, and the equal amount of lime, I'd hazard a guess that you'll be alright.
But.....when it comes to sealing, I really, really wouldn't bother. Sealed brickwork looks bloody awful, IMNSHO, and, if you've gone to all this trouble to re-create the traditional look, why then spoil it all by slapping on a late 20thC glossy varnish look? Every 'sealant-treated' working fireplace I've ever seen has developed a nasty yellowy appearance, as the heat seems to affect the jollop over time. I've seen some hand-dressed stone fireplaces that have been ruined by well-meaning homeowners daubing the masonry with BrickSeal or similar |
|||||||||||||||||||||||||||||||||||||||||||||||||||||||||||||||||||||||||||||||||||||||||||||||||||
|
|
||||||||||||||||||||||||||||||||||||||||||||||||||||||||||||||||||||||||||||||||||||||||||||||||||||
|
|
Fence Panels as a retainer? - RV Fowler - Aug 27th 2003 | |||||||||||||||||||||||||||||||||||||||||||||||||||||||||||||||||||||||||||||||||||||||||||||||||||
|
I have a tarmac on concrete drive that slopes about 6 ft over 60 ft. I would like to put a hardstanding next to the drive which means there would be a level difference of 1½ ft between the drive and standing at the far end. Since I am restrained for width on the hardstandingm what sort of retaining wall should I consider taking into account drive usage by heavy vehicles and long term effects on Clay soil?
Should I expect any problems if I use concrete posts and gravel boards? If not how much width should I allow for a suitable retaining wall ? |
||||||||||||||||||||||||||||||||||||||||||||||||||||||||||||||||||||||||||||||||||||||||||||||||||||
|
|
Tony McCormack - Aug 30th 2003 | |||||||||||||||||||||||||||||||||||||||||||||||||||||||||||||||||||||||||||||||||||||||||||||||||||
| You need a substantial retaining structure, probably a brickwork wall, using engineering brick or even a reinforced concrete structure, if you plan to use HGVs. Without seeing the site, I cannot say what would be best, but I strongly suggest that you get a structural or civil engineer to take a look. | ||||||||||||||||||||||||||||||||||||||||||||||||||||||||||||||||||||||||||||||||||||||||||||||||||||
|
|
||||||||||||||||||||||||||||||||||||||||||||||||||||||||||||||||||||||||||||||||||||||||||||||||||||
|
|
Rubble as hardcore sub-base - Finstrap - Aug 31st 2003 | |||||||||||||||||||||||||||||||||||||||||||||||||||||||||||||||||||||||||||||||||||||||||||||||||||
|
I'm renovating house and so far the fruits of my labour is a large pile of rubble composed of broken blocks, bricks and concrete. The largest lumps are probably half the size of a building block.
I intended to recycle this rubble by using it as a sub-base for my driveway/hardstanding. After reading this website I'm not so sure this is possible as the size of the pieces of rubble seems too large. My question is: Is there a technique for using this type of rubble as a sub-base? Or would I be better skipping it and buying the proper sub-base material from a builders merchant? TIA - Mike |
||||||||||||||||||||||||||||||||||||||||||||||||||||||||||||||||||||||||||||||||||||||||||||||||||||
|
|
Tony McCormack - Aug 31st 2003 | |||||||||||||||||||||||||||||||||||||||||||||||||||||||||||||||||||||||||||||||||||||||||||||||||||
|
If you must use these old bricks and whathaveyou, then break them up as much as possible, keep them to a layer that's 1 brick deep, blind them with sand or fines to fill all the voids, and regulate the top with a decent quality granular material, preferably DTp1.
It's the inevitable voids which are created when rubble is used as a fill material that cause problem down the line with settlement and/or channelisation. By 'blinding' the rubble with sand/fines, and ensuring the voids are filled, you can minimise the risk, but, to be extra sure, you could lay a geo-membrane such as Terram 1000 over the top of the completed sub-base to prevent any future bedding material (assuming you're using a granular bedding material) from trickling down into the voids. |
||||||||||||||||||||||||||||||||||||||||||||||||||||||||||||||||||||||||||||||||||||||||||||||||||||
|
|
||||||||||||||||||||||||||||||||||||||||||||||||||||||||||||||||||||||||||||||||||||||||||||||||||||
|
|
Pergola spans and post sizes - R Kranberry - Sep 9th 2003 | |||||||||||||||||||||||||||||||||||||||||||||||||||||||||||||||||||||||||||||||||||||||||||||||||||
|
Here in the USA dimensional lumber is 3½ x 3½ inches (about 87 x 87 mm). Is this strong enough for the posts of the pergola shown on your plans?
Also I would like to build a single pergola with a 12 foot bays between the posts. Would 3½ x 1½ inch (87 x 37 mm ) lumber be rigid enough for that span or do I need to go to 5½ x 1½ inch (137 x 37 mm ) size lumber. Also would the inline braces still be only decorative and not structurally important? Thanks for your help. |
||||||||||||||||||||||||||||||||||||||||||||||||||||||||||||||||||||||||||||||||||||||||||||||||||||
|
|
Tony McCormack - Sep 11th 2003 | |||||||||||||||||||||||||||||||||||||||||||||||||||||||||||||||||||||||||||||||||||||||||||||||||||
|
I'm on incredibly thin ice here - I know next to nothing about timber constructions and I know even less about US lumber and its uses.
The pergola design I've put on the website comes from a design I knocked up in the mid 1980s and it was used for years when we were obliged to build the damned things as additional works to paving schemes. It's an empirical model - the original was built based on guesswork; it didn't fall down, so I sketched out a plan of the timbers used, and, sure enough we built several more over the years, all of which, as far as I know, are still upright. It wasn't a case of calculating stresses and loads and wind shear and whathaveyou, and then specifying the timbers - we used whatever we had in the yard: it worked, so we stuck to the same plan from that day on! At a guess, I'd say that reducing the post dimensions by 13mm is neither here not there, but I'm not so sure about the spans - 37mm seems a bit thin to my untrained eye. I'm surprised there's no 50mm timber used in your country, as it's such a 'handy' size. As for the inline braces, they remain decorative, as long as the rails are securely fastened to the posts, but they do make heck of a difference to the finished appearance. |
||||||||||||||||||||||||||||||||||||||||||||||||||||||||||||||||||||||||||||||||||||||||||||||||||||
|
Riggers Nov 15th 2003 |
Tony, sticking my nose in one this one! The bigger the uprights, the better stability. I use 4" (sometimes 6") square posts (100mm and 150mm to me and you!) and these are put 2' in the ground (600mm) in a lean mix.
The joists and rafters are attached using half-joints to act as stability and rigidity. I don't use joist hangers, I use a length of 3' x 2' (75mm x 50mm) and use expansion bolts to bolt them to the wall. I will show pics if requested. VERY rigid and VERY attractive I have to agree. Jigsawing off the ends to give a 'personal' touch as well! All the best.........................Riggers |
|||||||||||||||||||||||||||||||||||||||||||||||||||||||||||||||||||||||||||||||||||||||||||||||||||
|
|
||||||||||||||||||||||||||||||||||||||||||||||||||||||||||||||||||||||||||||||||||||||||||||||||||||
|
|
Lifting patio levels by 2ft - Worthy - Sep 12th 2003 | |||||||||||||||||||||||||||||||||||||||||||||||||||||||||||||||||||||||||||||||||||||||||||||||||||
| I am attempting to raise the level of my patio by 2ft and have built a small but I think strong retaining wall. What should I use to fill the area to a suitable depth for paving over? I have heard of terms such as MOT and hoggin etc. but I've no idea what these are, what would you advise? | ||||||||||||||||||||||||||||||||||||||||||||||||||||||||||||||||||||||||||||||||||||||||||||||||||||
|
|
Danensis - Sep 15th 2003 | |||||||||||||||||||||||||||||||||||||||||||||||||||||||||||||||||||||||||||||||||||||||||||||||||||
| No doubt Cormaic will be along in a minute with the definitive answer, but as I understand it Hoggin is a mixture of shale and clay, so likely to swell and shrink. I wouldn't have thought it suitable as a fill material. | ||||||||||||||||||||||||||||||||||||||||||||||||||||||||||||||||||||||||||||||||||||||||||||||||||||
|
Tony McCormack Sep 15th 2003 |
Hoggin is nasty stuff at the best of times - it certainly shouldn't be used as a fill material.
Build up levels using a selected fill - this can be any crushed rock or recycled material sold as "Crusher Run" or SF1, or DTp2. Your local Builders' Merchant will advise what is available at what price, and it should be laid in layers no exceeding 200mm and compacted thoroughly before placing the next layer. So, for a 600mm lift, you would use 2 layers of Selected Fill at 200mm thick, then a capping layer consisting of 100mm of the fill material, and finally 100mm of DTp1 as a sub-base. Many of these Acronyms are explained in more detail on the Aggregates page of the main website. |
|||||||||||||||||||||||||||||||||||||||||||||||||||||||||||||||||||||||||||||||||||||||||||||||||||
|
|
||||||||||||||||||||||||||||||||||||||||||||||||||||||||||||||||||||||||||||||||||||||||||||||||||||
|
|
Backfill for a stable block - Stephen Watson - Sep 22nd 2003 | |||||||||||||||||||||||||||||||||||||||||||||||||||||||||||||||||||||||||||||||||||||||||||||||||||
|
I am preparing a small site for pouring a concrete slab to erect some stables upon. The site is on sloping ground and I have dug away a base to get a level site. The size of the slab will be 7.4m x 6.2m. The soil is heavy, claggy, clay. Unfortunately I took too much soil out and am now having to backfill so that I can put in my Type 1, compacted to 125mm, before pouring the concrete. The backfill, due to the wet weather is not compacting well and tends to just move about rather than consolidate. I don't want to lose all my Type 1 in the quagmire.
Any suggestions how to firm the backfill, apart from waiting 'til next summer and it drying out. I have a horse living in my garage and I need to get my car in there!!! |
||||||||||||||||||||||||||||||||||||||||||||||||||||||||||||||||||||||||||||||||||||||||||||||||||||
|
|
Tony McCormack - Sep 26th 2003 | |||||||||||||||||||||||||||||||||||||||||||||||||||||||||||||||||||||||||||||||||||||||||||||||||||
|
You should not use excavated material to build up levels! It can never compact as thoroughly as it was before it was excavated, nor will it compact as thoroughly as a granular material. You run the risk of creating voids and/or settlement in the finished slab.
Lay a geo-membrane down over the sub-grade. This will help prevent the granular material being driven into the clayey sub-grade and lost in the quagmire. The membrane (I suggest summat like Terram 1000 or TDP115) may float on the water at first, but once you start backfilling with a decent granular fill material (or DTp1/2), the membrane will sink, and the water will be driven out. Build up your layers by not more than 200mm at a time. Once you've placed and levelled 200mm or so of granular material, compact it thoroughly with a vib plate, a rammer or a vib roller before placing the next layer. It's best to finish your fill layers approx 100mm below base of slab and then top up with DTp1 and a sand blinding to ensure that, when you come to pour the slab, you've got a regular thickness and no voids. Don't forget a DPM between the sub-base and the slab - it makes such a difference to the finished quality. |
||||||||||||||||||||||||||||||||||||||||||||||||||||||||||||||||||||||||||||||||||||||||||||||||||||
|
Stephen Watson Sep 26th 2003 |
Thanks for the advice, it's been a great help. I wasn't that far off the level for putting in my sub base as it happened, only a couple of inches across the area. A spell of mild weather and a good wind have dried it up a treat. I'm going to put down a membrane and fill the area in with type 1 right up to the base of the slab, about 150mm in all. Can I compact this in one go or should I do half, compact it, then do the other half?
I've got a good DPM to go between the sub base and the slab. It is my intention to pour a 125mm slab, however, because of the location, I cannot get a ready-mix load delivered and am having to mix with a concrete mixer. I'm getting a load of 20mm - 5mm whin stone delivered as the aggregate for the mix and using grit sand. I was intending on using a 1:2:4 mix but the guy at the quarry said that I might have problems using a small mixer and suggested a 1:2:2 mix, perhaps adding a little extra cement? I'm intending pouring a 125mm slab, which will incorporate an area for wooden stables with a hard standing at the front which has a central drain hopper, with the hardstanding sloping in to drain. Because of the area I am having to pour it in sections. I'm doing the top half, 6.2m x 3.5m, in two sections, (3.1m x 3.5m). Will a construction joint ('day joint') be sufficient here? After that I'll pour the front sections which will slope in towards the drain. This will be done in a few sections and , again, will the construction joint be sufficient? It's only a wooden structure that is being erected at the moment, however in the future I may wish to put a permanent structure, ie block or brick construction. With a 150mm compacted type 1 sub base and 125mm of concrete of the mix specified, will this be sufficient for a brick/block building? I've read that the urine from a horse may damage the surface of the concrete and, if a ready-mix load was being used, an additive would be added to protect against this. Is there a similar additive which I should use when mixing which can be obtained from the merchants? Bearing in mind though that the majority of urine will be 'landing' within the stable itself and there will be a rubber floor (approx 2.5 cm thick) poured within the stable (approx 3.5m x 3.1m) so that no liquids should reach the concrete!! Obviously outside is another question. Appreciate that this is a whole load of questions in one go, but want to get it right and as the weather is getting worse I need to get moving on it. Thanks. |
|||||||||||||||||||||||||||||||||||||||||||||||||||||||||||||||||||||||||||||||||||||||||||||||||||
|
Tony McCormack Sep 29th 2003 |
If you're only putting in 150mm of sub-base material, then you can compact that in one operation, rather than splitting it into 2 layers. It's only if you're laying more than 225mm or so that you need to lay in separate layers.
I'm not sure about a 1:2:2 mix - it's a bit heavy on the cement and light on coarse aggregate. The resulting mix would be more like a rough mortar than a concrete. And, if you plan to use the area for horses, then a hard aggregate content is very important - if you have an excess of matrix (fine agg + cement) the surface will be more readily damaged by hoofs than would be the case with a mix with plenty of hard whinstone incorporated. Using a small mixer really wouldn't/shouldn't make mixing the concrete any more difficult - just remember to be fairly accurate in your measurements, using, say, level bucketfuls rather than the more haphazard 'spadefuls', and keep the water content constant - variation in slump will result in a poor finish. As you plan to lay in a series of bays, Day Joints should be fine. Will you be using any reinforcement? If you plan to build a heavier structure on the basein the long term, then you mnight want to consiedr using a mesh or rebar, but for basic use, a fibre reinforcement will be ok. The basic construction you propose is sound for a wooden structure, but if the possible brick/block building is more probable than possible, a 150mm slab would be a better minimum. Have you spoken to a builder or structural engineer about what would be needed if you did decide to go with a permanent structure? Someone else mentioned this "additive for stables" but didn't have a name, and when I discussed it with my pet concrete technician, she didn't know anything about it. Perhaps you should call your local Ready Mix plant and see if they have any info, or try someone like Grace or Sika to see if they have a suitable product. I seem to recall that Alison suggested the additive in question was probably a hardener, rather than a urine-proofer, but we never pursued the discussion, so I have no real answer. Does the British Horse Society (or whatever they're called) have any recommendations in their bumf? |
|||||||||||||||||||||||||||||||||||||||||||||||||||||||||||||||||||||||||||||||||||||||||||||||||||
|
Stephen Watson Sep 30th 2003 |
Thanks for your advice which has helped a lot. I am going to pour a deeper slab in the area where the stable is to be constructed and have mangaged to locate a supplier who uses smaller vehicles and will allow access nearer to the site than previously thought. With the help of a team of barrowers I shouldn't have too many problems getting it poured within a relatively short period of time, still allowing time to compact it and finish it.
I have not stipulated any additives but am told that it should remain workable for about two hours. Would you say this is about right. This area will take 3 cubic metres of concrete, C20 mix reinforced with bars or mesh. I'll mix the front section, which is a hard standing area to the front of the stable, seperately. This area slopes down to a central drain hopper so I have divided it into seperate bays which makes it more managable. This is the first time that I have done this and don't know if this is the best way. Basically I've divided the area into smaller triangles by placing shuttering and will fill each one in turn. The only disadvantage is that I will have to wait until the previous section goes off before commencing the adjacent bay. Is there an easier way which would be possible for two or three folk to do? I've spoken to some horsey folk who have had no detrimental effects on plain concrete due to horses so I'm sticking with the original mix. Thanks again for your advice. Without your site for inspiration and information, I probably would have got a contractor in to do the job, however would not have had the enjoyment of doing the job or the feeling of achievement I'm sure will be there when the jobs finished. Once this is done I'm told that I have to construct a schooling arena for horses, basically a rectangular sand pit with a fence round it............I'm sure it's more complicated than that!!! |
|||||||||||||||||||||||||||||||||||||||||||||||||||||||||||||||||||||||||||||||||||||||||||||||||||
|
Tony McCormack Oct 1st 2003 |
2 hours working time for a wet concrete (50mm slump or more) is about right. Try and get it spread, levelled and tamped within 1 hour.
This business about making triangular sub-bays for the area in front of the stable block sounds like a lot of hard work. How big is the area, and how much fall is there from the outer edge to the central drain? |
|||||||||||||||||||||||||||||||||||||||||||||||||||||||||||||||||||||||||||||||||||||||||||||||||||
|
Stephen Watson Oct 2nd 2003 |
I thought it sounded like a lot of hard work as well!!! The area is 6.2m x 3.5m with the drain hopper centralised (more or less!). The fall at the moment from the edge of the slab is about an inch. This can obviously be adjusted if not correct.
Any advice here would be a bonus. Thanks |
|||||||||||||||||||||||||||||||||||||||||||||||||||||||||||||||||||||||||||||||||||||||||||||||||||
|
Tony McCormack Oct 6th 2003 |
Is that all??? Pour it as a single slab: breaking up that area into a load of bitty triangles will be more work than it's worth.
Seal the top of the gully by cutting a piece of ply to fit just inside it, or by wrapping it with visqueen/DPM, so that no concrete can get into it. Pour the concrete into the area, spread it with rakes/shovels and then tamp it using a straightedge timber, with one end on the central gully and the other being swung around following the fixed sides. Your straightedge need only be 3600mm or so, as that will be plenty to reach from the furthest corner to the central gully. You'll find that the concrete will want to settle towards the lower centre, but by repeatedly swing around the tamp and scraping off any excess, you'll eventually (after 3 or 4 passes) have a beautifully profiled 'dish', with the gully at the centre. With only 25mm of fall, the concrete will stay in place and not migrate towards the centre once you finish tamping. Once it's cured sufficiently, you can cut off the visqueen and re-open the gully. |
|||||||||||||||||||||||||||||||||||||||||||||||||||||||||||||||||||||||||||||||||||||||||||||||||||
|
Steve R Oct 6th 2003 |
Should mix be sulphate resisisting if not already specified? Resists horse pee, brake fluid and Boddingtons! Regards Steve |
|||||||||||||||||||||||||||||||||||||||||||||||||||||||||||||||||||||||||||||||||||||||||||||||||||
|
Tony McCormack Oct 6th 2003 |
Yep! Good idea, Steve. It only costs a couple of quid more for Sulphate Resistant Cement (SRC) and it's money well spent on this type of project. | |||||||||||||||||||||||||||||||||||||||||||||||||||||||||||||||||||||||||||||||||||||||||||||||||||
|
|
||||||||||||||||||||||||||||||||||||||||||||||||||||||||||||||||||||||||||||||||||||||||||||||||||||
|
|
Buying a Wacker - andyfr - Oct 9th 2003 | |||||||||||||||||||||||||||||||||||||||||||||||||||||||||||||||||||||||||||||||||||||||||||||||||||
|
Hi Tony
I have quite a lot of work to do on our long drive and have been thinking about buying a used wacker plate. Is it a waste of time going for a 50kg one as opposed to a heavier one? Regards - Andy |
||||||||||||||||||||||||||||||||||||||||||||||||||||||||||||||||||||||||||||||||||||||||||||||||||||
|
|
Tony McCormack - Oct 10th 2003 | |||||||||||||||||||||||||||||||||||||||||||||||||||||||||||||||||||||||||||||||||||||||||||||||||||
|
A 50kg plate is fine for light, residential work. A heavier plate is better for compacting sub-base material, but they can sometimes be too heavy/powerful for consolidating the blocks.
I reckon the best "all-rounder" for general paving work is the 75kg plate - PVP75, I think it is (I can't see outside to check the one in my yard: it's too dark!) |
||||||||||||||||||||||||||||||||||||||||||||||||||||||||||||||||||||||||||||||||||||||||||||||||||||
|
andyfr Oct 12th 2003 |
Thanks for that Tony What I want to do with it is sort out the drive as I said. It is 100mtrs long by 4mtrs wide. It slopes and winds and at the moment it is just gravel. The problem is that when the oil tanker or any other lorry delivers they insist on reversing up - well most do anyway. They usually end up churning it up. Nearby there is a river and I can help myself to the rocks in it as the farmer who owns the land has to keep getting it cleared as it blocks up when the rain washes the sand and rocks down from the hills. I was thinking of using the ones which are about 100cm - 150cm as cobbles. I know it is going to take me quite a while but it is something I would do in stages. Would a 75kg plate be suitable for this kind of job? I want to make sure that the sub-base is really firm and then I will think about the best way to set the cobbles, probably in concrete. Regards - Andy |
|||||||||||||||||||||||||||||||||||||||||||||||||||||||||||||||||||||||||||||||||||||||||||||||||||
|
Tony McCormack Oct 26th 2003 |
Another long delayed reply - see my excuses elsewhere!
If you're planning on having HGVs use the driveway, then I'd strongly recommend using a large, vibrating roller, summat like a Bomag 120, to consolidate the sub-base. The vib plate would be fine for any bedding layers and consolidating the block paving (if that's the way you go) but I don't think you'd get sufficient compaction of the sub-base to handle the quite considerable pressures imposed by such large vehicles. You can hire in a roller such as this for around 100 quid for the day, or 200-300 quid for the week. I know it sounds like a lot of money, but it will cover the ground at 4 or 5 times the speed of a vib plate, and it will consolidate to a much greater depth than a standard vib plate. A heavy vib plate or trench compactor would be as effective, but wouldn't be any cheaper to hire and isn't as quick as a roller. With 400m² to cover, a roller would be my first choice, without a doubt! |
|||||||||||||||||||||||||||||||||||||||||||||||||||||||||||||||||||||||||||||||||||||||||||||||||||
|
andyfr Oct 28th 2003 |
Hi Tony
Thanks for the reply. The oil tanker only comes once a year and we may only have one other lorry deliver but I wouldn't want it to break up under the weight. What do you think of my idea for using the rocks from the river as cobbles? Andy |
|||||||||||||||||||||||||||||||||||||||||||||||||||||||||||||||||||||||||||||||||||||||||||||||||||
|
Tony McCormack Oct 29th 2003 |
Are you thinking of using the cobbles to pave the entire surface of the driveway? If so, I think you'll regret it!
It's hell of a lot of work, they're tricky to lay well, you'd need to use cobbles in the 30-75mm range to get a reasonable surface, they're a "person of illegitimate birth" to walk on, and it's expensive, even when the cobbles themselves are free. Using a few of the larger cobbles to make a decorative edge, or break bands, is all well and good, but 400m² of cobble paving is almost unheard of nowadays - if it was done, it would be as a deterrent paving, rather than access paving! |
|||||||||||||||||||||||||||||||||||||||||||||||||||||||||||||||||||||||||||||||||||||||||||||||||||
|
andyfr Oct 29th 2003 |
Er...well yes I was thinking of using the cobbles to pave the lot but I'm not sure now.
Bearing in mind that we live out in the sticks what would you recommend for a fairly steep winding drive of this size?
When it was done by the contractor they just brought 2000 tonnes of the aforementioned riverbed and spread it out then drove over it with those huge motorway dumper trucks and other large plant. I topped it off with crushed gravel and just drove over it with the cars. It stood up reasonably well until the oil tanker churned it up. The cost of block paving would be out of the question, as would tarmac. It needs to be something I can do myself to keep the cost down. I have a compact tractor with a front loader and backactor so can do quite a bit with that. Regards - Andy |
|||||||||||||||||||||||||||||||||||||||||||||||||||||||||||||||||||||||||||||||||||||||||||||||||||
|
Tony McCormack Oct 29th 2003 |
The gravel probably failed because it tends not to 'bind'. If you were to use a crushed aggregate that is specifically graded to bind, such as DTp1 or DTp2, then that would stand more of a chance against the Oil Tanker.
You can get a crushed concrete DTp1 for a reasonable price in full loads (at least you can in/around the big cities) and if you spread out 150mm or so of that, gave it a good pounding with a vibrating roller, then it should do fine. You might have to do a bit of tittivating once a year, to get rid of the occasional pothole, but it's the cheapest solution I can come up with.
And then, if your numbers come up on the Lotto, you can always grade it out and top it off with a bit of base course (oops! - binder course) bitmac.
Just laying cobbles would be umpteen times more expensive. You need a full concrete bed to hold them fast and if you lay them loose, they'll all be at the bottom of the hill within 12 months. |
|||||||||||||||||||||||||||||||||||||||||||||||||||||||||||||||||||||||||||||||||||||||||||||||||||
|
|
||||||||||||||||||||||||||||||||||||||||||||||||||||||||||||||||||||||||||||||||||||||||||||||||||||
|
|
Spacing kerbs - Danensis - Oct 13th 2003 | |||||||||||||||||||||||||||||||||||||||||||||||||||||||||||||||||||||||||||||||||||||||||||||||||||
|
I got round to laying the kerbs down my drive, after putting in a concrete footing all the way down the side.
One useful hint I came across was to use the polypropylene strapping that comes around bricks and timber to slot underneath the kerbs so you can adjust them on the mortar bed, and then slip the straps out afterwards. I tried laying the kerbs out 'dry' before putting in the mortar bedding, but there is a real problem with spalling. Your web pages suggest laying them close, rather than leaving a gap to point later, but how do you stop little bits chipping off? |
||||||||||||||||||||||||||||||||||||||||||||||||||||||||||||||||||||||||||||||||||||||||||||||||||||
|
|
Paul Challinor - Oct 14th 2003 | |||||||||||||||||||||||||||||||||||||||||||||||||||||||||||||||||||||||||||||||||||||||||||||||||||
| Use a ten pence piece between each one, then take out later. | ||||||||||||||||||||||||||||||||||||||||||||||||||||||||||||||||||||||||||||||||||||||||||||||||||||
|
Tony McCormack Oct 26th 2003 |
Or, if you're scared of losing the 10p, you can use a piece of cardboard or 6mm ply. Once you've laid two or three thousand metres of kerbs, you sort of get the hang of handling and positioning them to avoid spalling, but the 6mm play is a good 'trick' for occasional kerbers. Once the kerb is on the bed and tapped down to level, the ply can be withdrawn, and the kerb 'knocked-up' to close the gap to 3mm or so. |
|||||||||||||||||||||||||||||||||||||||||||||||||||||||||||||||||||||||||||||||||||||||||||||||||||
|
|
||||||||||||||||||||||||||||||||||||||||||||||||||||||||||||||||||||||||||||||||||||||||||||||||||||
|
|
Disabled access gradient - B Mackie - Oct 18th 2003 | |||||||||||||||||||||||||||||||||||||||||||||||||||||||||||||||||||||||||||||||||||||||||||||||||||
|
Is the minimum gradient for wheel chair use 1:14? I have been asked to construct a ramp but I only have 8m length to play with and it needs to rise 1.2m. There is no way I can meet the 1:14 gradient - any ideas? It can curve and have flat platforms as there's plenty of room.
It was the client thought this was the gradient ratio - it might not be. |
||||||||||||||||||||||||||||||||||||||||||||||||||||||||||||||||||||||||||||||||||||||||||||||||||||
|
|
Tony McCormack - Oct 26th 2003 | |||||||||||||||||||||||||||||||||||||||||||||||||||||||||||||||||||||||||||||||||||||||||||||||||||
|
There is no minimum gradient, but the maximum acceptable gradient is 1:12. Rising 1.2m over 8m is a gradient of 1:6.6 and you'd actually need a run of at least 14.5m to rise by 1.2m at a max gradient of 1:12
I think the solution may be to make a switchback ramp with flat landings at the turn points. You may need to use a Z-layout, ie: 3 straight runs, each rising 400m, with flat landings at each 'hairpin'. Of course, it all depends on the site layout, but a single ramp is not going to do the job. |
||||||||||||||||||||||||||||||||||||||||||||||||||||||||||||||||||||||||||||||||||||||||||||||||||||
|
|
||||||||||||||||||||||||||||||||||||||||||||||||||||||||||||||||||||||||||||||||||||||||||||||||||||
|
|
Mortar and Temperature - Mr Mayer - Oct 24th 2003 | |||||||||||||||||||||||||||||||||||||||||||||||||||||||||||||||||||||||||||||||||||||||||||||||||||
|
Thanks for such an informative site! I live in Colorado and it's starting to freeze overnight. I want to get my flagstones mortared as soon as possible, hopefully this weekend.
My question is whether it is too cold for me to do this, and if not, is there something different in terms of mortar mix I should be using? MM |
||||||||||||||||||||||||||||||||||||||||||||||||||||||||||||||||||||||||||||||||||||||||||||||||||||
|
|
Danensis - Oct 24th 2003 | |||||||||||||||||||||||||||||||||||||||||||||||||||||||||||||||||||||||||||||||||||||||||||||||||||
|
If I remember from my days of witing specifications, you can lay at 2 degrees on a rising thremometer or four degrees on a falling thermometer. However that is in the UK, and I guess it depends on how quickly the temperature falls and rises in your neck of the woods.
You can buy additives that allow you to mix at lower temperatures, but I don't know what they do to the strength of the mortar. |
||||||||||||||||||||||||||||||||||||||||||||||||||||||||||||||||||||||||||||||||||||||||||||||||||||
|
Tony McCormack Oct 26th 2003 |
Your memory serves you well, Jon. 2 degrees and rising is the minimum temp in which we'd use any mortar or concrete, and although the 4 degrees and falling is 'tolerated'. If the temp falls to below 1C, then there are serious implications for the long term strength of the mortar/concrete.
When building civil structures, such as bridges or roadways, we'd use frost-proofers and/or accelerants to ensure we achieve the required cured strength, but, for pointing flags this loss of strength isn't all that critical, and as a very rough-and-ready rule of thumb, I'd allow pointing to take place as long as there were four hours of frost free surface and air temp following placement, and I always like to cover such pointing with hessian or similar to keep off the worst of the frost. For Mr Mayer in Colorado, I'd suggest having a word with whatever it is that passes for a building supply company in that part of the world. The frostproofers we use in the UK and Ireland might not be suitable for the very low temps you experience, so it's always best to seek local knowledge and see what they recommend. |
|||||||||||||||||||||||||||||||||||||||||||||||||||||||||||||||||||||||||||||||||||||||||||||||||||
|
|
||||||||||||||||||||||||||||||||||||||||||||||||||||||||||||||||||||||||||||||||||||||||||||||||||||
|
|
How to locate water supply pipe? - Dave L - Oct 24th 2003 | |||||||||||||||||||||||||||||||||||||||||||||||||||||||||||||||||||||||||||||||||||||||||||||||||||
|
I have installed a new water supply in a duct to the garages I own at the rear of my property. I want to connect into my incoming water main which approaches the house from the front.
I have located my service valve in the street (over the other side of the road....) and I've even had a word with the Brent guys working in the street who are relining the mains - they couldn't say for sure where it is but advised me to dig 500mm down in a certain area - which I must admit looked the sensible area to investigate....but I'm now at 600mm and no signs of it! Is there anything else I can do other than keep scratching around? My hands are hurting! Any help/guidance/offers of physical help(!!) gratefully recieved. |
||||||||||||||||||||||||||||||||||||||||||||||||||||||||||||||||||||||||||||||||||||||||||||||||||||
|
|
Tony McCormack - Oct 26th 2003 | |||||||||||||||||||||||||||||||||||||||||||||||||||||||||||||||||||||||||||||||||||||||||||||||||||
|
500mm is too shallow. Any water service should be at least 900mm deep for frost protection.
It sounds as though you have another 300mm to go, and here's a tip to stop your hands hurting - try using a spade! |
||||||||||||||||||||||||||||||||||||||||||||||||||||||||||||||||||||||||||||||||||||||||||||||||||||
|
Dave L Oct 26th 2003 |
Right....some news....
A neighbour came across to see what the increasing mound of earth was in aid of - I duly told him my dilemma and he told me to wait there and do no more until he got back. 10 mins later he arrived on the scene with two bent coathangers (not literally, but that's what they looked like!) and proceeded to walk up and down the garden and road. Dowsing Rods? Well, they indicate that I am 400mm off course and the pipe is 1200mm below surface. I will broaden my 'dig' tommorrow night under floodlight and see what I can unearth.... Thanks for the reply, Tony <Virtual Beer> |
|||||||||||||||||||||||||||||||||||||||||||||||||||||||||||||||||||||||||||||||||||||||||||||||||||
|
Tony McCormack Oct 27th 2003 |
I'd be interested to hear if the dowsing works. I've seen it work in the past and been utterly gobsmacked, as it defies everything I learned as part of my scientific education, but there's no doubt that some folk really do have 'The Gift'.
Let me know.... <virtual gulp> |
|||||||||||||||||||||||||||||||||||||||||||||||||||||||||||||||||||||||||||||||||||||||||||||||||||
|
Dave L Oct 27th 2003 |
Well, I am amazed!
Tonight, I have dug in the exact area I was instructed to by the 'rods' and guess what? One water pipe! Only 500mm down though! Will take a pic of both the original mark left by the man with the rods and the pipe.....I'm well happy. Now all I have to do this weekend is connect into the black (plastic) supply pipe and provide a connection for the new supply. Alcathene pipe - blue and black - are they the same size? Basically I need to know what I want when I go into City Plumbing on Saturday morning..... Any advice you can offer would be much appreicated. |
|||||||||||||||||||||||||||||||||||||||||||||||||||||||||||||||||||||||||||||||||||||||||||||||||||
|
Tony McCormack Oct 31st 2003 |
As far as I remember, all alkathene pipe is the same size, but most of it's blue, nowadays, so that the numpty hole diggers can tell it apart from, say, 'lecky cables or old gas pipes. | |||||||||||||||||||||||||||||||||||||||||||||||||||||||||||||||||||||||||||||||||||||||||||||||||||
|
Dave L Oct 31st 2003 |
Yeah, I guess the colours are there to assist our 'hallowed hole diggers' to identify the services etc.
Oh well, off to City Plumbing to fetch the pipework and fittings tommorrow. Judging by the weather forecast I won't be installing this until next weekend........ |
|||||||||||||||||||||||||||||||||||||||||||||||||||||||||||||||||||||||||||||||||||||||||||||||||||
|
Dave L Nov 3rd 2003 |
All done and working...no leaks and it didn't rain!
Bit of advice if you may? Household water supply, from the main, what is the supply pipe size - internal diameter? Mine was 7/8" OD and 1/2" ID in black - the thickness of the pipe wall suprised me. The inside of the pipe was quite 'rusty' in appearance, I wonder how much the water board would charge to install a new supply to my property from across the road.......probably not worth it, I know..... |
|||||||||||||||||||||||||||||||||||||||||||||||||||||||||||||||||||||||||||||||||||||||||||||||||||
|
Tony McCormack Nov 3rd 2003 |
I'm not sure if there is/was a standard supply pipe size, other than the alkathene that has been used for the last 30-odd years. From memory, alkathene pipe is 25mm OD and 13mm ID (6mm wall), but I could be mistaken.
I've only experience with what used to be North-West Water (now part of the United Utilities Evil Empire) and they used to offer a free replacement service for lead supply pipes. We were involved in the refurb of hundreds of older properties in and around South Lancashire during the 80s and 90s, and that was always one of the tasks - digging the trench for the new alkathene pipe. The Water Board (as they are still known) would do the digging and all the jointing work under the road/footpath, but we had to dig the trench for them on the private land. |
|||||||||||||||||||||||||||||||||||||||||||||||||||||||||||||||||||||||||||||||||||||||||||||||||||
|
|
||||||||||||||||||||||||||||||||||||||||||||||||||||||||||||||||||||||||||||||||||||||||||||||||||||
|
|
Retaining wall - Gary N - Nov 14th 2003 | |||||||||||||||||||||||||||||||||||||||||||||||||||||||||||||||||||||||||||||||||||||||||||||||||||
|
Dear Tony, Have you any views on Marshalls' Windsor Stone walling? I have a small retaining wall to build and this appears to be a good option. Regards - Gary |
||||||||||||||||||||||||||||||||||||||||||||||||||||||||||||||||||||||||||||||||||||||||||||||||||||
|
|
Tony McCormack - Nov 6th 2003 | |||||||||||||||||||||||||||||||||||||||||||||||||||||||||||||||||||||||||||||||||||||||||||||||||||
|
It's a nice, simple and relatively cheap solution for low walls. I've just flicked through the Marshalls' bumf and they reckon 600mm as a max height, which is more or less what I would guess at, although you could, at a push, take that up to 750mm.
The face is quite coarse and will get covered with the algae and lichens in a couple of years, especially if the walling is north facing, but this, in my opinion, only serves to make it look more natural. If you have a south facing wall, leaving a few 25mm gaps in between the blocks and inserting some alpines (aubrietia is excellent for this) will help soften the appearance. If you do go ahead with it, let me know how you get on. I'd like to hear a DIYer's opinion as to whether they think it is as simple and effective as it's portrayed. |
||||||||||||||||||||||||||||||||||||||||||||||||||||||||||||||||||||||||||||||||||||||||||||||||||||
|
Gary N Nov 7th 2003 |
Many thanks for your reply. I'll keep you updated.
Regards - Gary |
|||||||||||||||||||||||||||||||||||||||||||||||||||||||||||||||||||||||||||||||||||||||||||||||||||
|
|
||||||||||||||||||||||||||||||||||||||||||||||||||||||||||||||||||||||||||||||||||||||||||||||||||||
|
|
Steps for rear garden - Riggers - Nov 15th 2003 | |||||||||||||||||||||||||||||||||||||||||||||||||||||||||||||||||||||||||||||||||||||||||||||||||||
|
Hello all, I need some help on this one!
I have got to contruct a step going into the back garden. The steps will be 1900mm wide (using 3 Stonemarket Millstone slabs in width). The sides of the steps will be built from double skin blockwork and will be rendered. The client wants 4 steps going up to the top lawn area. The underside (risers) will also be rendered. I'm now at a loss as how to actually construct a step! I have cleared a large square (2350mm wide and quite a way back for the top step). It's like a huge square cut out from the lawn area and 3.5' high! Can anyone please help on how to get the correct measurements so I can lay the blocks as the supports so the slabs will sit correctly with the necessary overhang (25mm) and run nicely from the top lawn down to ground level? Any thoughts will be VERY much appreciated. BTW, I have built steps before, but not on this scale!! All the best and here's hoping! Riggers |
||||||||||||||||||||||||||||||||||||||||||||||||||||||||||||||||||||||||||||||||||||||||||||||||||||
|
|
Tony McCormack - Nov 15th 2003 | |||||||||||||||||||||||||||||||||||||||||||||||||||||||||||||||||||||||||||||||||||||||||||||||||||
| What's the total run and the rise? | ||||||||||||||||||||||||||||||||||||||||||||||||||||||||||||||||||||||||||||||||||||||||||||||||||||
|
Riggers Nov 15th 2003 |
Tony, thanks for the response.
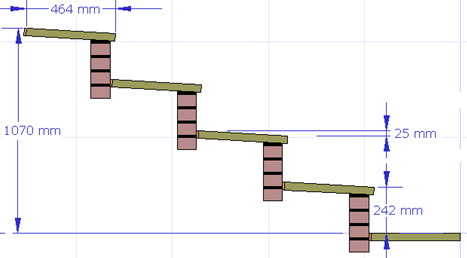
The rise is 3.5' from the base to the top of the lawn area and the run is whatever we want it to be. Bearing in mind that the slab step is 465mm in depth and the width is 620mm. 3 slabs wide by 1 slab deep. I have calculated that I require 4 steps in total with a riser at 100mm (approx), but it's just the marking out and positioning that's worrying me in preparation to start the foundations for the double skin blockwork. Thanks again...................Riggers |
|||||||||||||||||||||||||||||||||||||||||||||||||||||||||||||||||||||||||||||||||||||||||||||||||||
|
Tony McCormack Nov 17th 2003 |
4 steps is pushing it a bit....
I think you're better off using 5 steps, which means you could use a 200mm riser (160mm plus 40mm of flag thickness) with 15mm of endfall on each tread. I wouldn't bother trying to build the risers first, though. these small flights of steps are always tricky and it's easier to build each riser as it's needed. You can spend a lot of time plotting out on paper only to find that, when it's translated to a site, you're 10mm out here and 15mm short there, which makes hell of a lot more work for you. Plan the steps in advance, by all means, and build the side walls, but use the plan as a general�guide rather than a hard-and-fast rule. |
|||||||||||||||||||||||||||||||||||||||||||||||||||||||||||||||||||||||||||||||||||||||||||||||||||
|
Riggers Nov 17th 2003 |
Tony, many, many thanks for the drawing and the feedback, a REAL star!
Just to let you know that my Bro in Law has done a cross sectional drawing of the steps (and, yes, your're right, we need 5 steps!). All dimensions just the job! If you would like a copy (out of curiosity that is) then I'll e-mail it to you (it's a.pdf format so it's a small file). Again, many thanks for the help. When we're done, I'll take a pic for you!! Cheers and all the very best....................Riggers |
|||||||||||||||||||||||||||||||||||||||||||||||||||||||||||||||||||||||||||||||||||||||||||||||||||
|
Tony McCormack Nov 18th 2003 |
I'll take a look at the plan - and then I can see how it all turns out when the photos are taken at the end of the job! |
|||||||||||||||||||||||||||||||||||||||||||||||||||||||||||||||||||||||||||||||||||||||||||||||||||
|
|
||||||||||||||||||||||||||||||||||||||||||||||||||||||||||||||||||||||||||||||||||||||||||||||||||||
|
|
Road planings as sub-base? - Barry - Nov 17th 2003 | |||||||||||||||||||||||||||||||||||||||||||||||||||||||||||||||||||||||||||||||||||||||||||||||||||
|
Hi Tony,
In reply to a query from Chris on 28 Feb 2001, you state that you shouldn't use road planings as a sub-base because they turn to mush if they become saturated. I've just come across a project carried out for the Highways Agency at the Lucid Communications Website where they seem to think that asphalt planings ARE a suitable sub-base material. What do you think ? I've been offered a huge pile of planings at about 30% of the price of Type I and don't want to waste money. The project is a small car park (70 square metres) where I'd initially planned to put down 125mm (compacted) Type I on a hardcore bed, finished with 20mm depth of pea shingle. Thanks - Barry |
||||||||||||||||||||||||||||||||||||||||||||||||||||||||||||||||||||||||||||||||||||||||||||||||||||
|
|
Tony McCormack - Nov 18th 2003 | |||||||||||||||||||||||||||||||||||||||||||||||||||||||||||||||||||||||||||||||||||||||||||||||||||
|
I remember reading that report, or one like it, some time ago, and there were reservations about consistency of the planings, partly about the grading envelope and partly about the source. I'm not sure how work has progressed since, but I know most REs (Resident Engineers - the Lord Almighty on civil contracts) wouldn't allow planings in place of a standard Type 1 material.
However, for small projects, they could be ok. I know of a number of projects, such as your car park job, where they've been used without problems, but I still have reservations: it only takes one bad batch to make a mess of the entire job, and at least one car park on which I installed the kerbing (before I was disabled) suffered terrible rutting and repeated break-up of the surface for years because the main contractor had used planings instead of a "decent" sub-base material. If the planings are consistent and a good blend of fines and coarse material, then I suppose they would be suitable, but therein lies the problem - will the stuff you buy be a good blend or will it be too dusty? Will have have big lumps of unbroken material? If there were some control over the grading envelope for planings, I'd be a deal less concerned. Anyway, I have to be overcautious. If I "recommend" a particular type of aggregate and it causes problems, I'll never hear the last of it. So, rather than recommending planings, I urge caution. If you've seen the stuff and reckon you can get an acceptable degree of compaction with it, then go for it. Personally, I'd rather take a decision on their suitability case-by-case rather than issue a blanket approval for their use. |
||||||||||||||||||||||||||||||||||||||||||||||||||||||||||||||||||||||||||||||||||||||||||||||||||||
|
Barry Nov 21st 2003 |
Hi Tony,
Thanks for your advice with this. I suspect that, by the time I've inspected the planings and assessed the grading envelope, it would be quicker and easier just to buy in the Type I. Since the job is mostly making use of quite decent materials, I'll stick to the Type I. Thanks again - Barry |
|||||||||||||||||||||||||||||||||||||||||||||||||||||||||||||||||||||||||||||||||||||||||||||||||||
|
|
||||||||||||||||||||||||||||||||||||||||||||||||||||||||||||||||||||||||||||||||||||||||||||||||||||
|
|
Reinforcement steel for garage base - Jason Waller - Nov 14th 2003 | |||||||||||||||||||||||||||||||||||||||||||||||||||||||||||||||||||||||||||||||||||||||||||||||||||
|
I am about to build a concrete base for a garage and have found this site extremely helpful, so I would first like to thank the creator of this site for a job well done, this being the best web site I have ever come across.
The question I have to ask is about this diagram...
Thank you in anticipation |
||||||||||||||||||||||||||||||||||||||||||||||||||||||||||||||||||||||||||||||||||||||||||||||||||||
|
|
Tony McCormack - Nov 19th 2003 | |||||||||||||||||||||||||||||||||||||||||||||||||||||||||||||||||||||||||||||||||||||||||||||||||||
|
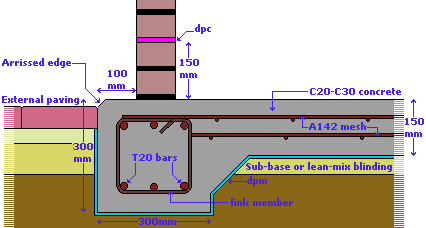
A link member is a specially shaped length of steel that is used to link together all the reinforcing bars. In that particular diagram, the link member is a rounded square, where the re-bars are fastened top and bottom, but link members can be almost any shape.
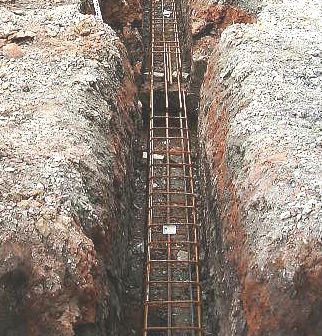
If you were to use that example, then the link members might be at 450mm centres, so, in a 6m length, you would use 13 or so of them. These link members are specified when the steel reinforcement for a slab is designed. The run list for the steel will specify that so many of such a type of bar is to be used, and they are to be linked using such-and-such a shape of link member at a given separation, and then the whole covered with mesh of a certain size. To be frank, if you are not sure about link members and their usage, then it's probably best that you leave the steelwork to a professional, as the way the link members are fastened to the re-bars is vitally important. Further, the type of link member and type of re-bar is specific to each slab, which has to be designed by a structural engineer. The example given on my website is a very basic 'common solution' when a keeled slab is required. I've just found this image of a groundbeam that has reinforcing bars linked together with the same sort of link member as is shown in the cross-section drawing.
|
||||||||||||||||||||||||||||||||||||||||||||||||||||||||||||||||||||||||||||||||||||||||||||||||||||
|
|
||||||||||||||||||||||||||||||||||||||||||||||||||||||||||||||||||||||||||||||||||||||||||||||||||||
|
|
Recipes for concrete mixes - Chris P - Nov 24th 2003 | |||||||||||||||||||||||||||||||||||||||||||||||||||||||||||||||||||||||||||||||||||||||||||||||||||
|
Looking at your cement mixes page I am confused by the zone sections in the Prescribed Mixes for Ordinary Structural Concrete section. A C20 mix has a ratio of 1:2:4 but what are the zone 1,2 &3 percentages?
See section below relating to C25 concrete taken from the mentioned page...
Hope this is clear, Thanks - Chris |
||||||||||||||||||||||||||||||||||||||||||||||||||||||||||||||||||||||||||||||||||||||||||||||||||||
|
|
Tony McCormack - Nov 25th 2003 | |||||||||||||||||||||||||||||||||||||||||||||||||||||||||||||||||||||||||||||||||||||||||||||||||||
|
The percentages shouldn't add up to 100%, as they are distinct values, not related. So, in the example you quoted, A C25 grade concrete, using a 40mm aggregate (the first column) would use 340kg of cement and 1800kg of aggregate. Of that 1800kg, if the fine aggregate were a zone 1, then it should make up 35% of the 1800kg aggregate total, but if you were using a zone 2 or zone 3 sand, then only 30% of the 1800kg aggregate total should be made up of that sand. The remainder (65% or 70% depending on 'zone' of fine aggregate), is made up of coarse aggregate ("gravel").
The percentage figure refers to the percentage of the total aggregate content represented by that particular zone of fine aggregate (sand). The definitions for each 'zone' is given on the Aggregates page, in the section dealing with sands. This is all very technical, and is the sort of thing only ever used in batch plants ands civil projects where the strength of the concrete is hyper-critical. For DIY jobs and most residential paving, it's way, way, way too involved, and the basic 1:2:4 type proportions are near enough. |
||||||||||||||||||||||||||||||||||||||||||||||||||||||||||||||||||||||||||||||||||||||||||||||||||||
|
|
||||||||||||||||||||||||||||||||||||||||||||||||||||||||||||||||||||||||||||||||||||||||||||||||||||
|
|
Sub-base compaction - Paul Kelly - Dec 9th 2003 | |||||||||||||||||||||||||||||||||||||||||||||||||||||||||||||||||||||||||||||||||||||||||||||||||||
|
I'm laying a block paving path. I'll be using the fully compacted method (see this page) for the screeding sand.
I've excavated between well-fixed timber egdes and laid a 75mm layer of scalpings as sub-base, but am not sure how much this will compact when I run a wacker plate over before putting in the sharp sand. Any ideas? I don't want to end up with either a too thick or too thin layer of sharp sand. Say I ended up with 70/80 mm rather than the proposed 50mm would this cause me problems? If the scalpings compact too much, with what should I make up the level - I can't get scalpings in small quantities. |
||||||||||||||||||||||||||||||||||||||||||||||||||||||||||||||||||||||||||||||||||||||||||||||||||||
|
|
Tony McCormack - Dec 9th 2003 | |||||||||||||||||||||||||||||||||||||||||||||||||||||||||||||||||||||||||||||||||||||||||||||||||||
|
Just how much the 75mm of sub-base m,aterial will compact depends on a number of factors, which is why it is simply not possible to provide hard-and-fast rules such as "110mm of sub-base will definitely compact to exactly 80mm". The type of sub-base material, its moisture content, the maximum particle size, the types of compaction kit, the weight/force of the compaction kit, the condition of the sub-grade or capping layer...all of these, and more, have an effect on the degree of compaction.
However, if you have 75mm of uncompacted 'scalpings' (another non-specific term) then, very generally speaking, that should compact to around 50mm thickness, which is not sufficient for a competent sub-base. You need 75mm compacted thickness as a minimum for non-vehicle areas, and 100mm MINIMUM for driveways and the like. For the sand bedding, you want a MAXIMUM compacted thickness of 50mm. Anything more than 50mm runs the risk of movement and uneven settlement. The spec is usually 35-50mm, but 40mm is around about ideal. If you find that you need more than 50mm of bedding to achieve the required levels, then your only option is to build-up the level of the sub-base using more 'scalpings'. Regardless of how difficult small quantities of suitable sub-base material may be to obtain (and, to be honest, it can be had in quantities of half-a-ton from almost every BM in the land), building-up the levels using extra sand is a recipe for long-term problems. |
||||||||||||||||||||||||||||||||||||||||||||||||||||||||||||||||||||||||||||||||||||||||||||||||||||
|
|
||||||||||||||||||||||||||||||||||||||||||||||||||||||||||||||||||||||||||||||||||||||||||||||||||||
|
|
|
|
Brew Cabin Archive navigation dhtml courtesy of Milonic |